

Monday, December 12, 2016
Final Layout
No, no I'm still going to be scrapping...this is just the last layout for our Grandson's first year album.As you can tell by the photos I'm pretty sure that Liam really likes cake since he seems to be wearing most of it, lol. I used the Scenic Route Metropolis Idea kit for this layout. I thought this kraft sheet from the kit was perfect for a birthday layout. So what do you think?

Tuesday, November 29, 2016
Memories
Don't you just love it when you see little ones smiling? When our daughter sent these photos of our grandson I knew I had to scrap them....oh actually I scrap every photo of him, lol. Anyways back to the layout.
For this layout I used the Bo Bunny "Bella Rosa" paper collection. I used the red side of the Amore paper from this collection for my background paper which I distressed and inked. For the torn corners I used the Aryia and Rustic paper from this paper collection for the top corner and for the bottom corner I used the Amore and Rustic paper and of course I distressed and inked them. I then cut out one of tags from the Elegant paper which I used to add Liam's name and what month the photos were taken. I distressed and inked this tag also. I popped up the two photos with cardboard. I had a peach color flower from my stash that I cut in half and tucked the two pieces under the bottom papers. I added a couple of other flowers from my stash below the photos. I added my wooden Memories title and added the little pocket watch that I added a twine bow to, and then added my butterfly and called it done. I was quite happy at how the layout turned out. What do you think?

For this layout I used the Bo Bunny "Bella Rosa" paper collection. I used the red side of the Amore paper from this collection for my background paper which I distressed and inked. For the torn corners I used the Aryia and Rustic paper from this paper collection for the top corner and for the bottom corner I used the Amore and Rustic paper and of course I distressed and inked them. I then cut out one of tags from the Elegant paper which I used to add Liam's name and what month the photos were taken. I distressed and inked this tag also. I popped up the two photos with cardboard. I had a peach color flower from my stash that I cut in half and tucked the two pieces under the bottom papers. I added a couple of other flowers from my stash below the photos. I added my wooden Memories title and added the little pocket watch that I added a twine bow to, and then added my butterfly and called it done. I was quite happy at how the layout turned out. What do you think?

Sunday, November 27, 2016
LOTW
Well I was pleasantly surprised this evening when I went onto the Swirlydoos Facebook page and found out that I got "Layout of the Week" for my "Baby Boy" layout.
 Thank you so much Swirlydoos!

Tuesday, November 22, 2016
Baby Boy
I cant believe in another week and a half this little guy is going to be a year old and these photos just make him look like such a grown up little boy! Still on my use papers from my stash regime I came across these papers from We R Memory Keepers "Winter Frost" collection and thought they'd be great for this layout. I also used a sketch from Kelly Holifield:
 Although it shows as a Halloween type sketch you can use it for any type of layout. A sketch just gives you a starting point for your design; I pretty much stuck to the sketch other than the spider and web. Here's how my layout turned out.


Saturday, November 19, 2016
The Boys
Well I've been digging through my paper stash trying to use up older papers before buying new papers. I've been pretty good so far in not buying new, she says giving herself a pat on the back, lol. The papers used in this layout was a scrap kit I bought about 7 or 8 years ago. Yea, I know I'm a pack rat, never throw anything out. These were perfect for this photo of my husband and our newest Grandson Liam. I guess not that new anymore since he will be turning one years old on December 2nd. Wow that went by so fast.
I used a green cardstock that matched the green in the papers almost perfectly. I matted the photo with a green cardstock just a bit darker than the background paper. I took the lighter blue paper and cut it approximately 3" x 12" and laid it out as shown in the photo. I cut three more pieces of the patterned paper and laid them out as shown in the photo. I added a doily as shown and also a couple of tags which were included in this kit. I added a Prima vine and my title "The Boys". I also tore the background cardstock and rolled it back, added a small orange piece of cardstock behind the tear and added a small rose bud that I made. I distressed all of my papers and inked them. Here's the finished layout.

I used a green cardstock that matched the green in the papers almost perfectly. I matted the photo with a green cardstock just a bit darker than the background paper. I took the lighter blue paper and cut it approximately 3" x 12" and laid it out as shown in the photo. I cut three more pieces of the patterned paper and laid them out as shown in the photo. I added a doily as shown and also a couple of tags which were included in this kit. I added a Prima vine and my title "The Boys". I also tore the background cardstock and rolled it back, added a small orange piece of cardstock behind the tear and added a small rose bud that I made. I distressed all of my papers and inked them. Here's the finished layout.

Tuesday, November 15, 2016
Another layout & a couple of cards.
Well I've been digging through my paper stash and scraps trying to use things up that I've had for ages. For my layout I picked this die cut from Websters Pages. I backed it with some coordinating green cardstock. I distressed and inked both papers. I dug around in my paper scraps to find these other papers which I distressed and inked. I seem to be into banners on my layouts lately, I really like how they look on the layouts. I popped the photos up with cardboard and I used a Prima vine which I ran down the right side of the larger photo. I also printed out a pair of flip flops that I drew in my Paint Shop Pro program and cut them out and popped them up with foam dots.
When I was downloading these photos from my phone I was looking at the small photo and thinking why does it look like Liam has a Mohawk. I looked at the actual photo and realized that it's actually a person way in the background behind them, lol. If I had noticed that earlier I could have photo shopped that person out of the photo. I'll probably do that and replace the photos.
 So still trying to use up more paper scraps I made these three cards. These papers are from a kit I bought way back in2010, most of the papers in this kit were quite pretty but the others, to me, were kind of blah looking so I really had to force myself to use them. Nothing super fancy but I liked the way they turned out considering I didn't like the papers, lol. So here they are:


 I'd love to hear your comments on my projects!
When I was downloading these photos from my phone I was looking at the small photo and thinking why does it look like Liam has a Mohawk. I looked at the actual photo and realized that it's actually a person way in the background behind them, lol. If I had noticed that earlier I could have photo shopped that person out of the photo. I'll probably do that and replace the photos.


Thursday, November 10, 2016
Halloween Duck
Another Halloween layout of our grandson in his duck costume. This was actually taken in September when our daughter had first picked this costume up. I think on Halloween day Liam had three costumes that he wore. I used some of the same papers I used in my previous Halloween layout of Liam. These are from Making Memories "Spellbound" paper collection as well as the embellishments.
I played around with my papers until I got an idea of the design I wanted then I distressed and inked all of my papers and glued them all down. I added my embellishments and flowers. The bottle cap with the pumpkin is one that I made by punching out the pumpkin from one of the papers and then adding it to a flattened bottle cap and then adding a clear 1" epoxy circle on top. I added my title and there it is. Here's my finished layout.

I played around with my papers until I got an idea of the design I wanted then I distressed and inked all of my papers and glued them all down. I added my embellishments and flowers. The bottle cap with the pumpkin is one that I made by punching out the pumpkin from one of the papers and then adding it to a flattened bottle cap and then adding a clear 1" epoxy circle on top. I added my title and there it is. Here's my finished layout.

Tuesday, November 8, 2016
There is only one you
My layout for this photo of our grandson was fairly simple with the layers and banners. I used the Heartfelt "Under the Sea" paper collection. I did distress all my papers for this layout but I didn't ink them. I fussy cut one of the flowers from the paper collection which I popped up with foam dots and laid in the bottom left corner. I added flowers from my stash and called it done. Here's the finished layout.


Monday, November 7, 2016
Walking Dead
Here's another Halloween layout I did, this is my grandson (no not Liam this time, lol) showing off his makeup talents. His favorite show is the "Walking Dead", I think he's hoping to get a job in their makeup department. He's getting pretty good at this stuff.
For my background paper I used the Echo Park "Chillingsworth Manor" paper. I backed my photo's with some green card stock. I distressed and inked the background paper. The other papers I've used are from Tim Holtz "Laboratory" paper collection. I tore the papers into strips which I inked and glued down some horizontal and some vertical. I then took some white lace I had and colored it with green distress ink and laid that down across the page just below the paper strips.
I then took some black Gelato across the top of the page and then sprayed with water and used my finger to spread it out. I took some of my Lindy's stamp gang ink in "Bells of Ireland" green and "Pineapple Paradise" yellow and sprayed them in different areas of the background paper as shown in the photo. I added cheese cloth to the layout behind the photos. I added my spider webs that I cut out on my Cricut machine. I added cardboard to the photos to pop them up, then added a few flowers from my stash, did my title and called it done. I'd love to hear your comments on this layout. Have a great week everyone!

Saturday, November 5, 2016
Little Pumpkin
I hope everyone is having a great day today! I just wanted to do a quick post to show off my first Halloween layout. Of course it is another layout of our grandson Liam, I'm sure everyone is getting sick of seeing him by now, lol. Liam's to young for trick or treating but that doesn't mean his Mama isn't going to dress him up in his pumpkin jammies, lol. So here's the layout, I'd love to hear what you think of it!


Wednesday, November 2, 2016
Making of a layout
When I'm posting my layouts and cards here on my blog I usually do try and give a "sort of" explanation as to how I did the layout. Today I decided to actually give a step by step on how I made this layout. So here goes!
The first thing to do is to decide what photo you're scrapping (duh, lol) and pick out your background paper. For this layout I'm using the Bo Bunny "Madeleine" paper collection. I distressed all sides of the background paper with my Prima distress tool as well as inking the edges with Tim Holtz "Vintage Photo" distress ink. I also made a small tear on the right side of the background paper which I inked and rolled back. I took a small piece of pink paper from my stash and glued that to the back of this tear as shown in the photo.
 You can pick out some coordinating papers now and cut to size as shown in the photo below (click on the photo to see a larger size). Distress and ink all of your edges. Please note the sizes are in inches.
 Now you can glue the layers down as shown in the photo below. A little tip (that someone shared with me long ago) is when you are using your tape runner, glue or whatever you use, is to not put your glue/tape right to the edges of your paper put them further towards the middle of your paper. That way when your adding your embellishments you can lift the edges to tuck things under the paper edges.
 Now all you have to do is add your photo and pick out your embellishments to finish the layout off. For my photo I added some card board to the back of the photo to pop it up. I added a tiny rose to the tear on the right side. Added my flower clusters and a couple of ephemera tags. I added a small wooden clock from Prima and inked it on the edges and tucked it under the photo. I also fussy cut out one of the bird cages from the "Madeleine" papers and popped it up with foam dots. To finish the layout off I added my wooden "Family" title that I painted to match up with the papers. I really hope you found this step by step helpful and I'd love to hear your comments. If you try out this layout leave me a link to your layout so I can check it out! Here's my finished layout. TFL!

The first thing to do is to decide what photo you're scrapping (duh, lol) and pick out your background paper. For this layout I'm using the Bo Bunny "Madeleine" paper collection. I distressed all sides of the background paper with my Prima distress tool as well as inking the edges with Tim Holtz "Vintage Photo" distress ink. I also made a small tear on the right side of the background paper which I inked and rolled back. I took a small piece of pink paper from my stash and glued that to the back of this tear as shown in the photo.


Sunday, October 30, 2016
Don't be a Tool Round Robin
Over at Swirlydoos the Round Robin for October is all about using our scrapping tools for our projects. It really is quite amazing how we tend to forget about a lot of our scrappy tools. The tools that I used were my sewing machine, compass (which I used to draw the circle I was going to sew), glue gun, Prima distress tool, heat tool and of course my paper trimmer but that one doesn't count for this RR.
After I was happy with the design of my paper layers and glued them down, I used my compass to draw the circle that I was going to sew. I didn't want a perfect circle just wanted to give me a base to follow. Then I also stitched around the edges of the background paper. Again not sewing it straight. I then used my distress tool around the edges of the background paper.
 I used some rub ons for the flourish, tiny dots and few small flowers around the page. It is a bit hard to see on the finished layout but in the top left and bottom right corner of the background paper I stamped a corner stamp using versa mark and then some gold embossing powder and used my heat tool to set it. I cut a small piece of hexagon chipboard and painted it green to pick up the green in the papers. I added some cardboard to the back of my photo to pop it up and placed it where I wanted it. I added my flowers, adding a blue bow to the two flowers on the top side of the circle. The butterfly I printed out on my computer, cut it out and then added glossy accents to it, let it dry and once it was dry I added the tentacles that I made out of wire. Here's the finished layout. I'd love to hear what you think of it. TFL!

After I was happy with the design of my paper layers and glued them down, I used my compass to draw the circle that I was going to sew. I didn't want a perfect circle just wanted to give me a base to follow. Then I also stitched around the edges of the background paper. Again not sewing it straight. I then used my distress tool around the edges of the background paper.


Saturday, October 29, 2016
Using Paper Scraps
I'm sure there are others like me who have paper scraps that we just can't throw out because either we like the paper line or you don't think the paper scraps are small enough to throw away. Well I decided I should do something with all of these scraps so I decided to make some cards. These first 3 cards were made from paper scraps left over from a scrap kit back in 2011. I still have more scraps from that kit left over. Here are the first cards I did, you can click on the photo to see a larger view.
 These next couple of cards are made with paper scraps from a scrap kit from 2010 and like the other three there are still lots of scraps! If I didn't ever buy anymore papers I could probably keeping making cards with my scraps for a couple of years. Of course not buying new papers just wouldn't work because as soon as I see new papers I just have to have them, lol. Here are the other 2 cards.
 TFL and have a great day!


Wednesday, October 19, 2016
Cutie
Well here we have another layout of our grandson. The photo was taken in June of this year, doesn't he look so cute in that yellow hat? For this layout I used the Scenic Route "Metropolis Idea" kit that I've had in my stash forever. I used it earlier on a layout showing off Liam's Baby Blues.This is a perfect kit for doing boy layouts with all of the fun colors and stickers etc. For my background paper I used a piece of orange paper that I also had in my stash. I took some modeling paste and a star stencil and stenciled over the paper. Here's a photo of it.
 I then took some of the different papers and cut them to different sizes and played around laying them out until I liked the design. I distressed all the papers and then glued them back down to my design. For my photo I popped it up with cardboard before laying it down. I then went into my flower stash and pulled out different flowers that would look good together and with the papers. I had these really cute little bug buttons in my stash so I picked out a couple of bee's and a ladybug and cut the back off and glued them down on the papers and flowers and also added a little butterfly and called it done. I was quite happy with the way it turned out. What do you think?


Friday, October 14, 2016
Selfie
I love this photo of our grandson, the way his arms look like they are being held out in front of him makes it look like he's taking a selfie, hence the title of the layout, lol. For this layout I used the Bo Bunny "Bella Rosa" paper collection.
For my background paper I used the Bella Rosa "Whisper" paper and I took a duplicate piece of paper and fussy cut out the left side floral section and popped it up with foam dots on the background paper. I then cut different size pieces of the other paper's in this collection and played around laying them down in different ways until I was happy with the design. I then distressed and inked all of the papers and glued them down. I took the photo and matted it and popped that up with some cardboard.
I took some hexagon chippies from my stash and painted them with orange acrylic painted that I toned down with some white paint, helping to match up the color to the flowers in the paper. On the top right corner of the layout I tore the paper and distressed and rolled the torn edges back. I added a small peach colored piece of paper behind the torn corner and added some flowers from my stash along with a couple of tiny rose buds that I made myself and added a small feather popping out from that small flower cluster. I then added another flower cluster on the bottom right of the paper using the same flowers from my stash and added a couple of small feathers. I was very happy with the way it turned out. What do you think?

Wednesday, October 12, 2016
Happy News
So excited, I just found out that I got Layout of the Week over at Swirlydoo's for my layout of our grandson Liam below! Yay me!! This is quite an honor as all of the ladies over at Swirlydoo's are such amazing scrappers! Thanks so much for this honor ladies!


Tuesday, October 11, 2016
Another One For The Album
I'm giving myself a pat on the back that I managed to use up some older paper from my stash for this layout. These papers are from Basic Grey's "Oh Baby Boy" collection. Since I didn't have a lot of these papers I made the layout fairly simple. I distressed all of the papers but I didn't ink them this time. For my first layer I used a medium sized doily. My other layers consisted of two banners running vertical and the other two banners running horizontal. I fussy cut some of the rocket ships from one of the papers and popped them up with foam pop dots. In the top right corner I cut two very small banners and added a small green flower on top of them. So there you go, a quick and simple layout!


Sunday, October 9, 2016
Another Grand Baby layout
I'm sure everyone must be getting tired of seeing all these layouts of our grandson Liam but I'm sure anyone who is a Mom or Gramma understands how we like to show off our babies, lol. I'm trying to do as many layouts as I can of Liam because he'll be 1 years old on December 2nd and I want to give our daughter and son-in-law an album of Liam's 1st year for Christmas.
I'm trying to use up papers from my stash before I start buying more, not sure how well I'm doing at this but at least I'm trying, lol. I used this pretty die cut from Websters Pages "Sunday Picnic" collection. I matted my photo on some of the other pieces from this collection and I popped it up over the other papers with cardboard. I did distress the paper layers a bit. In my stash I found this ribbon threader (probably not the correct name for it) in my stash that says "Heartbreaker" and I knew it would be perfect for this layout! I had some pretty blue ribbon that went with this paper and then cut out some smaller banners to hang of the ribbon. I fussy cut one of the flowers from this paper collection and popped that up with foam dots on the top right of the photo. I then added some flowers on the bottom left of the photo and added the pretty stick pins that one of my friends from Swirlydoos sent me for a RAK, thanks Angelica! Here's the finished page!

I'm trying to use up papers from my stash before I start buying more, not sure how well I'm doing at this but at least I'm trying, lol. I used this pretty die cut from Websters Pages "Sunday Picnic" collection. I matted my photo on some of the other pieces from this collection and I popped it up over the other papers with cardboard. I did distress the paper layers a bit. In my stash I found this ribbon threader (probably not the correct name for it) in my stash that says "Heartbreaker" and I knew it would be perfect for this layout! I had some pretty blue ribbon that went with this paper and then cut out some smaller banners to hang of the ribbon. I fussy cut one of the flowers from this paper collection and popped that up with foam dots on the top right of the photo. I then added some flowers on the bottom left of the photo and added the pretty stick pins that one of my friends from Swirlydoos sent me for a RAK, thanks Angelica! Here's the finished page!

Thursday, October 6, 2016
Early Christmas?
I'm not sure if it's because I was in Costco the other day and they had all their Christmas stuff out or I'm just really looking forward to Christmas....I'm just thinking I'm crazy, lol. Anyways I was wanting to make something other than a scrap layout and I thought I'd use this little box I've had in my stash for quite awhile.
I first painted the box with white acrylic paint. I chose some Christmas papers from K&Company that I've had in my stash for quite awhile. The paper collection is called Swell Noel. I cut the papers to fit into each slot of the box. I used a little Christmas tree that I got at the $Store, I used some blue & red Stickles which I dotted about the tree like Christmas balls. I used a poinsettia and smaller flowers from my stash, along with some berry branches. I used some chipboard pieces (Gift box, stocking and house in the snow) from the same paper line. I added a little bird in one square and a little mouse in his bed, this was a Christmas ornament that I bought at one of the craft sales I went to. I then added a small chipboard bird house and a little bottle of "Fairy Dust". So here's the finished project:

I first painted the box with white acrylic paint. I chose some Christmas papers from K&Company that I've had in my stash for quite awhile. The paper collection is called Swell Noel. I cut the papers to fit into each slot of the box. I used a little Christmas tree that I got at the $Store, I used some blue & red Stickles which I dotted about the tree like Christmas balls. I used a poinsettia and smaller flowers from my stash, along with some berry branches. I used some chipboard pieces (Gift box, stocking and house in the snow) from the same paper line. I added a little bird in one square and a little mouse in his bed, this was a Christmas ornament that I bought at one of the craft sales I went to. I then added a small chipboard bird house and a little bottle of "Fairy Dust". So here's the finished project:

Thursday, September 29, 2016
Swirlydoos August Sketch
Although I am not able to purchase the Swirlydoos kits each month I still like to try out the sketch's using papers I have in my stash. I thought the August sketch for the tranquility kit would be perfect to do for a couple of photos of our grandson taken in July. Here's the sketch:
 I used some papers I've had forever in my stash from Websters Pages "Park Drive" collection. I used the yellow "Blanket" paper for my first layer. I then took the green "Snacks" paper which I punched with one of my Martha Stewart punch around the page punches. As you can see by a couple of the corners I haven't quite mastered these punches yet, lol. I used lace, flowers and small pearl flourishes from my stash. I matted the photos with some yellow paper. There were journal cards in this collection that said "Today Was" so I cut them down in size and attached them to the back of the photos. I picked out a couple of words from my Tim Holtz small talk sticker book and attached them to these cards. One said "Beautiful" and the other "Extraordinary". I then added a couple of stickers from the sticker pack that came with the paper pack. I tried to use papers that were quite bright to mimic the colors in Liam's play station. Here's the finished layout.


Monday, September 26, 2016
Thoughts
I love this photo of my daughter when she was 13 and we were on the ferry going back to the mainland. She was just lost in her own thoughts when I snapped the photo. When I downloaded the photo into my software I gave it a soft focus effect which was the perfect touch. I used the Prima "Tales of You & Me" collection again. I'm in love with this paper collection, can you tell, lol.
I used the Notre Jardin Secret for my background paper. I took a duplicate piece of that paper and fussy cut out the flowers from the second piece and popped them up with foam dots for a 3D look. I distressed and inked all the papers. Here's how it looks:
 I then picked out 3 other papers and cut them to the size I wanted. I distressed and inked all of these pieces also. Once I was happy with the way the papers looked I glued them all down.
 I took my photo and a duplicate one without the soft effect and laid the soft photo just off to the side of the other one as shown in the finished layout. I added some card board to the back of the photos to pop them up. Using some Prima flowers from my stash I played around with the placement of the flowers and when I was happy with how they looked I glued them down. I added some seam binding ribbon that I had hand died and added that to the cluster. I also added a few flourish blings, tucking them just under the flowers a bit. I added a small Prima fairy that I inked a bit with pink to the top right of the photo. In the flower cluster on the bottom right of the photos I tucked one of my handmade stick pins among the flowers. I added my title and to finish the layout off I took some gesso and watered it down and added the white drips from a paint brush all over the layout. Here's the finished project. What do you think?

I used the Notre Jardin Secret for my background paper. I took a duplicate piece of that paper and fussy cut out the flowers from the second piece and popped them up with foam dots for a 3D look. I distressed and inked all the papers. Here's how it looks:


Thursday, September 22, 2016
Eclectic
I'm still working on my ATC's for Swirlydoos "Not so RR". Week 4 of this challenge is Eclectic. Now I have to admit I have no idea what Eclectic is, apparently the meaning describes a combination of many different individual elements of styles,
themes, mediums or inspirations pooled from many sources. I still don't really get it but here is my attempt at doing an Eclectic style ATC card.
 For my background white card stock I used three different shades of blue Gelatos. I just rubbed the card stock with the Gelatos and then misted it with water and used my finger to blend the colors down the card. I then took one of my stencils and some molding past to make all of the different sized dots on the background paper. For my shabby look I distressed and inked the edges of the paper. For a bit of steampunk I added the metal silver heart and flower. I searched through my stash and found some Tim Holtz books of sayings and used three ones that I liked. I then added one of my handmade rosebuds and some blue rhinestones and called it done. What do you think, does this have an eclectic feel to it? Thanks for stopping by!

Tuesday, September 20, 2016
September RR, week 3!
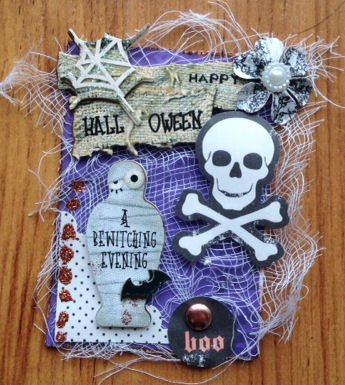
So this is week three for the Swirlydoos "Not so Round Robin". The category for this week is Seasonal/Holiday ATC's. I did two ATC's, one for Halloween and one for Christmas.
For my Halloween ACT i used a purple Halloween paper I had in my stash. I then took some cheesecloth to layer over the background paper. I had some layered 3D Halloween stickers in my stash so I used the Halloween Title and Mummy embellies on this card. The skeleton & cross bones were from my stash and popped up with card board. I also used a small flower from my stash, a corner paper piece, a small "boo" embellishment and some copper colored sticklles. Here's the finished product:
 For my Christmas ATC I used three different Christmas papers from my stash witch I distressed and inked. I added some green ribbon to the card and layered on top of that a Santa face punched from one of the papers from my stash and layered on top of some coordinating card stock. I also added some gold colored berries to the top of the card,and a pretty cream colored poinsettia. I also had a small "Merry Christmas" tag that I popped up with card board and added some clear gem stones on the bottom right corner. Here's the finished card:

For my Halloween ACT i used a purple Halloween paper I had in my stash. I then took some cheesecloth to layer over the background paper. I had some layered 3D Halloween stickers in my stash so I used the Halloween Title and Mummy embellies on this card. The skeleton & cross bones were from my stash and popped up with card board. I also used a small flower from my stash, a corner paper piece, a small "boo" embellishment and some copper colored sticklles. Here's the finished product:

Friday, September 16, 2016
September ATC Challenge
So it's week two of the Swirlydoos "Not so Round Robin" for September. This week's ATC will be a Steampunk ATC.
So for my card I used 2 pieces of torn kind of vintage type paper. One piece being torn an laid in the top left corner of the card. I punched a hole and added an eyelet to the top right and bottom left corner of the tag. I layered a couple of gears on the top left and bottom right corners of the tag. I also added a small rosebud on to the top of the layered gears. I added a small pointing hand and a metal tag with a brad to the card. I then added small gold colored pearl flourish to the card and added some thread twisted over the card. I found this steampunk photo of the girl on Pinterest. I popped the photo up on card board and added it to the ATC, finishing off my card. So what do you think about my steampunk card? Here's the finished project...

So for my card I used 2 pieces of torn kind of vintage type paper. One piece being torn an laid in the top left corner of the card. I punched a hole and added an eyelet to the top right and bottom left corner of the tag. I layered a couple of gears on the top left and bottom right corners of the tag. I also added a small rosebud on to the top of the layered gears. I added a small pointing hand and a metal tag with a brad to the card. I then added small gold colored pearl flourish to the card and added some thread twisted over the card. I found this steampunk photo of the girl on Pinterest. I popped the photo up on card board and added it to the ATC, finishing off my card. So what do you think about my steampunk card? Here's the finished project...

Tuesday, September 6, 2016
First ever ATC card
So for the Round Robin for September over at Swirlydoos it's going to be 4 weeks of making ATC cards. There won't be any teams but each week is going to be a different category each week and you can do whatever week you want or you can do all of them. I'm hoping to try all of them, at least that's the plan. So here are the categories for each week:
Week 1: Vintage due by 9/10
Week 2: Steampunk due by 9/17
Week 3: Seasonal/Holiday due by 9/24
Week 4: Eclectic due by 9/30
It was a little intimidating since ATC's are only 2½" x 3½" so you really have to think about what you want to do and put on the card. I had this small photo of my Dad taken back in 1941 when he was just 18 so I thought it would be perfect for the vintage card. For my background on the card I took a page out of an old romance paper back book that I had in my stash and glued that onto my card. I then took my "Vintage" distress ink and distressed the edges quite a bit. Then I took the same ink and rubbed some of the ink onto the rest of the card. I also took some "Broken China" distress ink and added that to the background also.Here's how it turned out..
 For the rest of the card I added some cream colored lace, a small pearl flourish, a small card stock clock and in each corner I used some of Prima's Junkyard findings screw heads. I popped up the photo with some cardboard and pop dots on the info strip. I'm really quite happy at how this turned out. What do you think?

Week 1: Vintage due by 9/10
Week 2: Steampunk due by 9/17
Week 3: Seasonal/Holiday due by 9/24
Week 4: Eclectic due by 9/30
It was a little intimidating since ATC's are only 2½" x 3½" so you really have to think about what you want to do and put on the card. I had this small photo of my Dad taken back in 1941 when he was just 18 so I thought it would be perfect for the vintage card. For my background on the card I took a page out of an old romance paper back book that I had in my stash and glued that onto my card. I then took my "Vintage" distress ink and distressed the edges quite a bit. Then I took the same ink and rubbed some of the ink onto the rest of the card. I also took some "Broken China" distress ink and added that to the background also.Here's how it turned out..

Saturday, August 20, 2016
Summer Love
As you can see in this photo of my son and his fiance that they have water behind them. Although this is not the ocean, it's a lake on the mainland called Harrison Lake I still decided to use the Couture Creations "Sea Breeze" collection. I just kept out any ocean type things on the paper not on the layout.
For the background paper I used one of the pieces that looked like wood strips. I distressed and inked the paper. I then took one of the pieces that was a light blue color and tore a large corner piece and added that to the background paper after I distressed and inked it. I then used 4 of the bottom strips off of the papers, distressed and inked them and laid them from top to bottom of the background paper. I then cut two pieces of the paper from the collection, one approximately 2" x 9" and one 1¾" x 9" and cut them both like a banner at either end. I distressed and inked both pieces and laid them from left to right on the layout.
I matted the photo with one of the dark blue papers from the collection and then added a piece of cardboard to the back of the photo to pop it up on the layout. I added some Prima flowers from my stash along with a small metal bird in a bird cage and then added the sparkly chipboard title "Love" to the layout. Here's the finished layout.

Friday, August 19, 2016
Family
I love this photo of my granddaughter, soon to be DIL and myself that my son took of us in Hawaii while we were sitting waiting for the grandson's to catch up with us. I also love this paper line from Prima, "Tales of You and Me". So of course I had to use this paper line for this photo, all the colors were perfect!
For the background paper I used the "Notre Amour" paper from the Tales of You and Me collection. I distressed and inked the paper along with using a heart punch on the top edge and again on the right hand side. I cut out pieces from three of the other papers as well as two of the tags from one of the other papers. I distressed and inked all of these papers and layered them on the background paper. I matted the photo with some pink card stock and then used some cardboard on the back of the photo to pop it up.
Now I just had to add the embellishments to the layout. I used some pink Prima flowers from my stash. I had one white flower that I inked the petal edges with some pink ink. To the flower cluster on the bottom right corner of the paper I added one of my own handmade stick pins. I added a little resin fairy from my stash along with a couple of other ephemera pieces from my stash. Here's the finished layout and I'd love to hear your comments on it!

Baby Blues

I've had this Scenic Route "Metropolis Idea Kit" in my stash like forever. As I was digging through my stash to find papers to go with the photo I cam across the kit and knew it would be perfect for this photo! I kept the layout very clean and simple. I layered a few of the different papers from the kit and fussy cut out a few of the stars from the paper and I used one of the arrows to point to Liam's eyes. I dug through my stash of chipboard letters for the title. For the "Blues" part of the title I had the letters but not in the same color so I just painted them...that's the advantage of scrapbooking, there are no rules, lol! Anyway I hope you like the layout and I'd love to hear your comments!
Thursday, August 18, 2016
Island Time
I hope everyone is having a great weak as well as beautiful weather. Here in Campbell River, BC (on the East coast of Vancouver Island) we are in a major heat wave. We broke a temperature record here when it reached 33 Celsius today. Thank goodness we live by the ocean and many lakes, the beaches were pretty busy today, that's for sure!
I decided on scrapping this photo of my son and grandson fishing last year when my dh took them fishing. The layout is a fairly simple one but I like the way it turned out. I basically used Kaisercraft's "Coastal Escapes" paper collection for this layout, along with one other piece of paper from my stash, the ones with the fish, they went perfectly with these papers.
Lately I seem to be into cutting papers in a banner shape and this layout was no exception. I distressed and inked all of the papers in this layout. I also used some Prima flowers from my stash along with shells from our beaches here and a bow using some seam binding that I hand dyed with blue ink from my stash. Here's the finished layout, TFL!

Vacation
So this is a scrap layout of another one of my vacation photos from our Hawaii trip back in January of this year. I used the Coutour Creations "Sea Breeze" paper collection on this layout also. This is a lift of Bec from Swirlydoos Saturday tutorial which you can find here: https://www.youtube.com/watch?v=X30krhV59AA
I distressed and inked all of the papers on the layout. All of the shells etc. are from our beaches here in Campbell River, BC. The scallop shell is from a fisherman friend of ours and the star fish I picked up at one of our local gift shops. The bow that I have tucked in amongst the flowers and shells is some seam binding that I hand dyed with some blue ink from my stash. The corner embellishments are also from my stash.
So this is my layout, I hope you like it and leave a comment. Also check out Bec's tutorial along with other tutorials on Swirlydoos You Tube channel, they have lots of great tutorials! Thanks for stopping by!

Wednesday, August 17, 2016
Fish On
Seems I've been on a roll and managing to do a number of layouts, I guess I'm making up for the no mojo patch I had earlier this year. Now I just have to play catch up and get all of these layouts posted on my blog, lol. This layout is a photo of my grandson fishing when my husband took my son & grandson fishing last summer when they were up visiting. I used papers from Couture Creations "Sea Breeze" paper collection.
I really like the way some of the scrapbook companies on the strip at the bottom of the double sided paper where they have the company name and collection name on the other side they have one of the other papers in the collection on that strip. So for this layout other than the background paper and the paper behind the photo all of the other papers were the strips from the bottom of the papers in the collection. This makes for a very cheap way of making a layout. I added a small doily that I inked up with some light blue ink. I cut one of the tags out of one of the other papers as well as one of the fish that I popped up with pop dots. From a duplicate piece of paper I fussy cut out the anchor and shells and popped them up with pop dots over the other one on the paper giving it a 3D look. I also distressed and inked all of the papers on this layout.
I hope you like this layout and I would love to hear your comments, good or bad.

Thursday, July 21, 2016
Summer Fun
My grand kids come up & visit with us every summer for about 3 weeks so we always spend lots of time at the lake. Last summer my friend and her grand kids came with us to the lake and they were showing my grandson how to do the skim boarding. It didn't take to long for my grandson to catch on to how you do it. I just managed to take this photo at the right moment to catch him looking like a pro landing on the board in the water.....of course it doesn't show the wipe out 10 seconds later, lol.
I used the Heartfelt Creations "Under the Sea" paper collection for this layout. I distressed and inked all the papers and added a bit of cheesecloth behind the papers. I used the Heartfelt Creations "Open Vintage Floret" pre-cut stamp and die set to make the two flowers on this layout. I added a few other goodies from my stash and called it done. TFL!

I used the Heartfelt Creations "Under the Sea" paper collection for this layout. I distressed and inked all the papers and added a bit of cheesecloth behind the papers. I used the Heartfelt Creations "Open Vintage Floret" pre-cut stamp and die set to make the two flowers on this layout. I added a few other goodies from my stash and called it done. TFL!

Saturday, July 16, 2016
Another Beachy Layout
Although the photo isn't taken on the beach it is a photo taken of my granddaughter & I when we were in Hawaii back in January. I don't know if anyone has heard of "Couture Creations", I hadn't until just recently, the papers used for this layout is from their "Sea Breeze" collection. The papers are all gorgeous, as soon as I saw them it was love at first sight, lol. My layout is a bit of a lift of someone's sketch but I can't remember who's sketch. If anyone knows let me know so I can give credit to them for it. All of the papers used are from this collection except the pink arrows. Shells and netting are from my stash. I distressed and inked all of the papers. TFL!


Thursday, July 14, 2016
Father & Son
Another photo from our Hawaii trip back in January 2016.This is my son and his Dad taken on one of the beach's on the North side of Oahu in Hawaii.I used the Heartfelt Creations "Under the Sea" paper collection for this layout. I distressed and inked all of my papers as well as adding a couple of fish that I fussy cut from the papers and popped up with foam dots. I used the Heartfelt Creations "Open Vintage Floret" pre-cut stamp and die set to make the two flowers on this layout. A few shells from my stash were added to the layout and I called it done. TFL!


Wednesday, July 13, 2016
Sand Dollars
Here I am with another photo from back in 2006. This photo is of my grandson when we were at the beach one day here in Campbell River. While the kids were playing on the beach they found a big bed of Sand Dollars. We told the kids what they were and it seems Scott thought that they were real $'s. He would go and collect a handful of them and put them in his bucket. I'd tell him that he couldn't take them home, that they were actually alive so it wouldn't be fair to do that to the Sand Dollars. So he'd dump out his bucket then just go get another handful of them. It went on for quite awhile, I finally was able to get him to leave the live ones alone when I found a couple of ones that had already died and he was able to take those ones home. So this photo is of Scott showing off his Sand Dollars.
I used the Heartfelt "Under the Sea" paper collection for this layout. I used three different papers from the collection to layer underneath the photo. I distressed and inked all of the papers I used. I did a lot of fussy cutting of the fish and turtle from the paper collection which I popped up with foam dots for a 3D look. I also cut out the port hole window from a duplicate paper of the background paper and popped that up with foam dots. I added some fish net to the bottom right corner of the layout which I glued on some shells from our beaches around where we live. I also added some string from my stash that has the little yellow ties on it that I laid out on the fish net. I added a few Prima flowers along with some other shells, a small sand dollar and a scallop shell. I also cut out the seagulls on my Cricut machine using an SVG file I made and popped them up with foam dots also.

I used the Heartfelt "Under the Sea" paper collection for this layout. I used three different papers from the collection to layer underneath the photo. I distressed and inked all of the papers I used. I did a lot of fussy cutting of the fish and turtle from the paper collection which I popped up with foam dots for a 3D look. I also cut out the port hole window from a duplicate paper of the background paper and popped that up with foam dots. I added some fish net to the bottom right corner of the layout which I glued on some shells from our beaches around where we live. I also added some string from my stash that has the little yellow ties on it that I laid out on the fish net. I added a few Prima flowers along with some other shells, a small sand dollar and a scallop shell. I also cut out the seagulls on my Cricut machine using an SVG file I made and popped them up with foam dots also.

Subscribe to:
Posts (Atom)


