

Saturday, March 24, 2018
Proud Dad
I've had this background paper in my stash for at least 5 or 6 years. So for this photo of my husband and daughter on her wedding day it went perfect as her bouquet was with sunflowers. For the other papers I used papers from Graphic 45's "Secret Garden" collection, which went perfectly with the background paper. I basically only used two of the main papers and the others were cut from the tag papers. I distressed all of the papers but I didn't ink them. I added a small piece of lace to the top right corner and then added some Prima flowers from my stash. This was a fairly simple layout but I liked the way it turned out. Click on the photo to see a larger size.

Thursday, March 22, 2018
Sweet
Here I am again with another layout using Prima's "Rose Quartz" paper collection. I thought it would go really well with this photo of me when I was 2years old. According to my Mum I was having a temper tantrum, which she was ignoring. It suddenly got quiet and when she turned around there I was asleep on the floor, lol.
I picked out one of the lighter papers for my background. My first layering I took the black paper with the roses on it and tore it across on about a 45 degree angle and added it to the background paper. I then took some different papers in the collection to use for my other layers, one at 3½" x 7¼", one at 3½" x 3½" and the last one at 3¾" x 6". I distressed and inked all of my papers and then laid them out different ways until I was happy with the design. Before I attached all the layers I added some pretty lace I had in my stash to one side of the paper as shown. I also added a small doily under the paper on the bottom right side, I had inked this all up with some pink ink I had in my stash. Before I added my flowers I matted my photo with some pink card stock from my stash and then added some cardboard to the back of the photo to pop it up. I added some flowers from the same paper collection, along with a few from my stash. I fussy cut out some of the feathers from one of the papers in the collection. I slit the feathers down each side to give them a bit more of a feather look and then tucked them under the flowers on the bottom left of the photo. I added this small chipboard fountain I had in my stash which I covered in white paint and then inked it up with some pink ink from my stash and added a couple of tiny flowers from Prima. I added my wooden title and to finish it all off I added some black paint splatters to the layout.
I'm quite happy with how the layout turned out and I'd love to hear your comments on it! Thanks for stopping by, here's the finished layout (click on the photo to see a larger size)....

Sunday, March 18, 2018
First Day, First Job
Well I think my layout mojo came back from vacation and I've actually made another layout. This photo of my granddaughter has been in my "photos to scrap" basket for ages. Just so you can see what I mean is, the photo was taken back in June 2015 and my granddaughter just graduated last June, lol.
I used the Prima "Rose Quartz" paper collection for this layout. I popped up all the paper layers & the photo with cardboard. I distressed and inked all the papers. I did some fussy cutting of some of the flowers and feathers from the different papers. For the feathers I took my scissors and cut slits on both sides just to give it more of a feather look. The paper roses are from the same paper collection by Prima. The little wooden clock and the metal key are from my stash. I was very pleased how the layout turned out, here's the finished layout... Click on the photo to see a larger view.

I used the Prima "Rose Quartz" paper collection for this layout. I popped up all the paper layers & the photo with cardboard. I distressed and inked all the papers. I did some fussy cutting of some of the flowers and feathers from the different papers. For the feathers I took my scissors and cut slits on both sides just to give it more of a feather look. The paper roses are from the same paper collection by Prima. The little wooden clock and the metal key are from my stash. I was very pleased how the layout turned out, here's the finished layout... Click on the photo to see a larger view.

Friday, March 16, 2018
Life is Lovely
I haven't made a layout in a while because I've been busy making mini albums. I finally got a photo of my daughter & fiance and I just had to scrap it. I used the Prima "Zella Teal" paper collection for this layout. For the paper layers I used a number of the 3" x 4" note cards that I distressed and inked. I also cut the different sayings out of one of the papers, as well as did some fussy cutting of the flowers and vines from the papers. I used Prima flowers from the same paper collection and also the small round resin window from Prima's Shabby Chic Treasures. I was quite happy how the layout turned out. I'd love to hear your comments on it. TFL!


Monday, March 12, 2018
Life's a Beach Mini Album
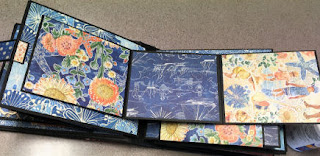
Well it's been a couple of weeks since my last post but I've been busy working on a new mini album. I made this one using Graphic 45's "Sun Kissed" paper collection. I have to tell you I am soooo in love with this paper collection! As soon as I saw it I knew it would be awesome for this project. I live just a few blocks from the ocean here in Campbell River, BC. My grand kids come up here every summer since they were just a few years old so I've always had tons of photos to scrap of them at the beach and at one of the many lakes we have. Just like me I know there are other parents and grandparents out there who have lots of photos like this and this would be the perfect album for them. There are over 60 spots for photos, along with many spots for journaling and adding memorabilia.
The album measures 6"h x 7"w with a 2" spine. I've used one of the tag's from the collection for the front cover of the album. I added some white Prima flowers which I sprayed with Lindy's Stamp Gang Starburst spray in Cape Cod Coral to match up with the colors in the papers. I tucked a couple of small sea shells in with the flowers and added a wooden anchor and seaweed from Kaisercraft. On the spine I added a little bottle cap dangle that I made (I sell these on my website here:Scrappers Heaven). I hope to get a video up of the whole album sometime this week.

 Here are more photo's of the inside of the album.


 Have a great day and thanks for stopping by!
The album measures 6"h x 7"w with a 2" spine. I've used one of the tag's from the collection for the front cover of the album. I added some white Prima flowers which I sprayed with Lindy's Stamp Gang Starburst spray in Cape Cod Coral to match up with the colors in the papers. I tucked a couple of small sea shells in with the flowers and added a wooden anchor and seaweed from Kaisercraft. On the spine I added a little bottle cap dangle that I made (I sell these on my website here:Scrappers Heaven). I hope to get a video up of the whole album sometime this week.


Subscribe to:
Posts (Atom)


