skip to main |
skip to sidebar
Although I am not able to purchase the Swirlydoos kits each month I still like to try out the sketch's using papers I have in my stash. I thought the August sketch for the tranquility kit would be perfect to do for a couple of photos of our grandson taken in July. Here's the sketch:

I used some papers I've had forever in my stash from Websters Pages "Park Drive" collection. I used the yellow "Blanket" paper for my first layer. I then took the green "Snacks" paper which I punched with one of my Martha Stewart punch around the page punches. As you can see by a couple of the corners I haven't quite mastered these punches yet, lol. I used lace, flowers and small pearl flourishes from my stash. I matted the photos with some yellow paper. There were journal cards in this collection that said "Today Was" so I cut them down in size and attached them to the back of the photos. I picked out a couple of words from my Tim Holtz small talk sticker book and attached them to these cards. One said "Beautiful" and the other "Extraordinary". I then added a couple of stickers from the sticker pack that came with the paper pack. I tried to use papers that were quite bright to mimic the colors in Liam's play station. Here's the finished layout.
I love this photo of my daughter when she was 13 and we were on the ferry going back to the mainland. She was just lost in her own thoughts when I snapped the photo. When I downloaded the photo into my software I gave it a soft focus effect which was the perfect touch. I used the Prima "Tales of You & Me" collection again. I'm in love with this paper collection, can you tell, lol.
I used the Notre Jardin Secret for my background paper. I took a duplicate piece of that paper and fussy cut out the flowers from the second piece and popped them up with foam dots for a 3D look. I distressed and inked all the papers. Here's how it looks:
I then picked out 3 other papers and cut them to the size I wanted. I distressed and inked all of these pieces also. Once I was happy with the way the papers looked I glued them all down.

I took my photo and a duplicate one without the soft effect and laid the soft photo just off to the side of the other one as shown in the finished layout. I added some card board to the back of the photos to pop them up. Using some Prima flowers from my stash I played around with the placement of the flowers and when I was happy with how they looked I glued them down. I added some seam binding ribbon that I had hand died and added that to the cluster. I also added a few flourish blings, tucking them just under the flowers a bit. I added a small Prima fairy that I inked a bit with pink to the top right of the photo. In the flower cluster on the bottom right of the photos I tucked one of my handmade stick pins among the flowers. I added my title and to finish the layout off I took some gesso and watered it down and added the white drips from a paint brush all over the layout. Here's the finished project. What do you think?
I'm still working on my ATC's for Swirlydoos "Not so RR". Week 4 of this challenge is Eclectic. Now I have to admit I have no idea what Eclectic is, apparently the meaning describes a combination of many different individual elements of styles,
themes, mediums or inspirations pooled from many sources. I still don't really get it but here is my attempt at doing an Eclectic style ATC card.

For my background white card stock I used three different shades of blue Gelatos. I just rubbed the card stock with the Gelatos and then misted it with water and used my finger to blend the colors down the card. I then took one of my stencils and some molding past to make all of the different sized dots on the background paper. For my shabby look I distressed and inked the edges of the paper. For a bit of steampunk I added the metal silver heart and flower. I searched through my stash and found some Tim Holtz books of sayings and used three ones that I liked. I then added one of my handmade rosebuds and some blue rhinestones and called it done. What do you think, does this have an eclectic feel to it? Thanks for stopping by!
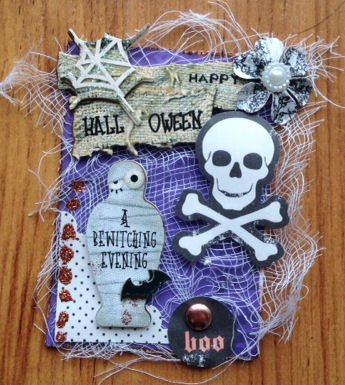
So this is week three for the Swirlydoos "Not so Round Robin". The category for this week is Seasonal/Holiday ATC's. I did two ATC's, one for Halloween and one for Christmas.
For my Halloween ACT i used a purple Halloween paper I had in my stash. I then took some cheesecloth to layer over the background paper. I had some layered 3D Halloween stickers in my stash so I used the Halloween Title and Mummy embellies on this card. The skeleton & cross bones were from my stash and popped up with card board. I also used a small flower from my stash, a corner paper piece, a small "boo" embellishment and some copper colored sticklles. Here's the finished product:

For my Christmas ATC I used three different Christmas papers from my stash witch I distressed and inked. I added some green ribbon to the card and layered on top of that a Santa face punched from one of the papers from my stash and layered on top of some coordinating card stock. I also added some gold colored berries to the top of the card,and a pretty cream colored poinsettia. I also had a small "Merry Christmas" tag that I popped up with card board and added some clear gem stones on the bottom right corner. Here's the finished card:
So it's week two of the Swirlydoos "Not so Round Robin" for September. This week's ATC will be a Steampunk ATC.
So for my card I used 2 pieces of torn kind of vintage type paper. One piece being torn an laid in the top left corner of the card. I punched a hole and added an eyelet to the top right and bottom left corner of the tag. I layered a couple of gears on the top left and bottom right corners of the tag. I also added a small rosebud on to the top of the layered gears. I added a small pointing hand and a metal tag with a brad to the card. I then added small gold colored pearl flourish to the card and added some thread twisted over the card. I found this steampunk photo of the girl on Pinterest. I popped the photo up on card board and added it to the ATC, finishing off my card. So what do you think about my steampunk card? Here's the finished project...
So for the Round Robin for September over at Swirlydoos it's going to be 4 weeks of making ATC cards. There won't be any teams but each week is going to be a different category each week and you can do whatever week you want or you can do all of them. I'm hoping to try all of them, at least that's the plan. So here are the categories for each week:
Week 1: Vintage due by 9/10
Week 2: Steampunk due by 9/17
Week 3: Seasonal/Holiday due by 9/24
Week 4: Eclectic due by 9/30
It was a little intimidating since ATC's are only 2½" x 3½" so you really have to think about what you want to do and put on the card. I had this small photo of my Dad taken back in 1941 when he was just 18 so I thought it would be perfect for the vintage card. For my background on the card I took a page out of an old romance paper back book that I had in my stash and glued that onto my card. I then took my "Vintage" distress ink and distressed the edges quite a bit. Then I took the same ink and rubbed some of the ink onto the rest of the card. I also took some "Broken China" distress ink and added that to the background also.Here's how it turned out..
For the rest of the card I added some cream colored lace, a small pearl flourish, a small card stock clock and in each corner I used some of Prima's Junkyard findings screw heads. I popped up the photo with some cardboard and pop dots on the info strip. I'm really quite happy at how this turned out. What do you think?