skip to main |
skip to sidebar
So the winner of Swirlydoos Ultimate Design Challenge was announced yesterday and the grand prize winner is Kathi Simmons - Congratulations Kathi!! Kathi's win was well deserved, her projects were all fabulous! You should pop on over to the Swirlydoos gallery and check out all of the beautiful entries!
So I decided I should dig into my Swirlydoos kit "Belle Chanson" and do a few layouts and tags. Last night I made another tag using the kit, I just love the teal color on some of the papers and Krissy very nicely added a teal chalk ink with the kit - I'm loving coloring my chipboard with it, lol. I just wanted to do another simple inspirational quote tag so off I went digging through my quotes that I have saved on my computer. Once I found the one I wanted I got to work on my tag.
I took a couple of pages out of an old romance type paperback novel and just tore them into different sized pieces. I took some Mod Podge and painted a layer over my tag. I then just laid the pieces down in no particular fashion.
I didn't worry if I went over the edges of the tag as I would trim it all up after it was dry. I then painted over the tag with the Mod Podge again to seal it all. Once the tag was all dry I trimmed it all then used some vintage photo distress ink and inked all around the inner edge of the tag and then used the teal chalk ink & went around just the edge of the tag. I also used the teal ink on my script stamp and stamp down the left side of my tag.
I had some left over burlap in my stash so I took that piece and glued it onto my tag and then took a bit of gesso and painted a few spots of it onto my burlap in different areas. I then inked up my Tim Holtz flourish with the teal ink. While I was waiting for that to dry I made a couple teal flowers that I added a bit of glossy accents to and then dipped into some diamond dust to give them all that sparkle! I also stamped my teal ink onto my non-stick craft mat, added some water to it and then took a piece of my cream seam binding and soaked up all that luscious color and scrunched it up and left it to dry to tie onto my tag when I was finished.
Once everything was dry I was able to glue the pieces onto my tag along with a little string bow I made. I then printed out my saying and cut it out and glued that onto the tag and tied my ribbon on and voila I was done! I hope you like it! TFL!
Okay so I did another tag using Lynn Forsythe's video and I actually remembered to do all of the steps this time, lol. Some times I really have to shake my head at myself! Oh well, I'm entertaining if nothing else, lol. Okay enough about my feeble brain, I really just wanted to pop in and post the new tag, so here it is.
I don't know but I think I like both of them, this one just has the few added extras. Well thanks for stopping by and having a peek!
Since I didn't get to go on in Round 5 of the Ultimate Design Challenge at Swirlydoos I've had a little bit of time to catch up on things. I have been wanting to try Lynn Forsythe's "Farewell Technique" tag that she did a video on, which you can find HERE. So sad that Lynn has left the Swirlydoos Design Team to move on to other things, but I will be stalking her blog! So here is my version of Lynn's tag...

So I was all pleased with myself for just zipping along on this and getting it done so quickly, when I suddenly realized I had forgotten a few steps. I had totally forgot to cover the tag with torn book pages and also forgot the lace and twine bow underneath the large flower. You'd think by now I would learn to watch the video again before I try someone else's technique - duh, blonde moment! I still like the way the tag turned out but I am in the process right now in doing another one and making sure I do all the steps this time, lol. The small rosebuds I made myself and I cut the leaf flourish on my Cricut machine. You can check out my "Rosebud" tutorial HERE. Anywhoo...thanks for stopping by and having a peek!
So unfortunately I didn't make it into week 5 of the Ultimate Design Challenge over at Swirlydoos but I sure had fun with the first four challenges, it really pushed me out of my comfort zone. Thanks for a fun time Krissy!
So it was my week for team 4 of the February 2013 card challenge. We got three twists for this challenge and had to do at least one of them. Here's the information for the challenge
Twist 1 You had to use at least one of the three colors - white, blue and brown and you could not use any other colors on the card except for maybe green from leafs of your flowers.
Twist 2 You had to use either glitter, bling or pearls on the card.
Twist 3 You couldn't make a square card.
I checked out Patty's (who's card I was following) card and got started. So there I was whipping along with my card and thinking how quick I was when suddenly I'm like "Oh S__t", I hadn't used any of the colors we were suppose to use.
Oh well, that card just became my dh's Valentine card, lol. So off to my paper stash to collect the paper colors I needed and I think I got all of the twists, on this card. There is glitter on the card and also blue rhinestones for bling, I used the white, blue & brown colors and the card is more of an oval shape. So here's my card!
I also wanted to show you Patty's card that I had to follow!
So thanks for stopping by and I love hearing your comments. Have a great weekend!
So excited that I made it to week 4 in the Ultimate Design Challenge at Swirlydoos. So this week the challenge is using mixed media on a canvas. I did my first one but I was not really happy with it so I redid it (thank God for Dollar store canvases, lol). So this is what I came up with.
So first is used three glimmer mists in blue, pink and green. When they were almost dry I used my Prima Peacock feather mask and molding paste on it. I didn't realize this before but when you add molding paste to a damp canvas it will suck up the color from below, which made the colors on the feather look very cool. Then I added some glass bead gel to three corners of the canvas and let that all dry. While these were all drying I took some cheesecloth and sprayed it with the same glimmer mists and set that off to the side to dry.
So while that was drying I cut out some angel wings on my Cricut machine out of some Tim Holta grunge board and then embossed them. I painted them with white acrylic paint and when that was dry I used Inka Gold Steel Blue and Green-Yellow and just rubbed that over with my finger and then dry brushed some blue Gelato's over the wings. The embossing and painting doesn't show up that well in the photo but it looks good IRL. When that was all dry I glued them and a gold heart (from a pair of earrings which I got from the dollar store) to the top left corner.
Now that the canvas was all dry I took some Glossy Accents and painted that on the area I wanted to put the cheesecloth on and then laid that down to dry. I then printed out my saying on the computer and cut it out and laid it down over the cheesecloth once it was all dried. I took just a bit of gesso on my finer and kind of rubbed it over the glass beads in the corners and then dry brushed that with some blue Gelato's. I think I covered all of the steps here, lol.
So I thought I'd show you my first canvas I did which I decided to use for a photo of my daughter when she was 16 mo old. I didn't use enough molding paste for my peacock feather and i used gesso to stick my cheesecloth down with and I also didn't pre-spray my cheesecloth so it didn't pick up enough of the glimmer mist when I sprayed it on. I think my second try looked a lot better, lol. So here it is....
I'd love to hear your comments on them. I'm keeping my fingers crossed that I make it to week 5 but I'm not real confident as the others are all so talented. I'm pretty happy that I made it this far but I sure would like to win that prize! TFL!
I'm sure everyone knows who Anna Dabrowska/Finnibair is and her style of scrapping. I love her work but my style of scrapping isn't anything close to what she does but I thought I would give it a try. So here's my masterpiece, lol.

I bought the canvas from the Dollar store - I love that place, you can buy something and if what your doing with it doesn't really work out, well you haven't lost a great deal of money! So to start I decided to use my brick mask on the canvas. Instead of using gesso or molding paste I decided I'd use some Liquitex glass beads. If I'd been really smart I should have read the label first to see that it dried transparent, not the beads but the paste. So to fix that I just took some gesso and a paint brush and painted over the beaded bricks. Once that was all dried I sprayed everything with glimmer mist in "Sunflower", "Tuscan Sun", and "Lily Pad". After a few layers of that I decided to try spraying some "Juniper" glimmer mist - bad idea, it was to dark for what I wanted. The canvas looks a lot brighter IRL than what it looks like here but it would have been much better if I had left off the "Juniper" mist.
While all that was drying I dug into all of my scrapping stash and pulled out all sorts of bits and bobs I could use on this canvas. I also remembered I h ad some metal Prima flowers which would be perfect to use on this canvas. I even used the metal tabs off of the pop cans and pulled out some old jeans I have in my sewing room for doing repairs with a cut the zipper pulls off of all of them. I decided to use this B&W photo of my daughter that her friend took (I'm sure everyone must be getting sick of seeing these photos by now but I love them, lol) and basically figured out where I would place it and then moved it off the canvas and started laying all the goodies down. I sprayed more glimmer mist over everything and once it was all dried I glued my photo down. I liked it but still felt it needed something else - like maybe more bits & bobs. I decided to show it to all of my Swirly sisters at "Swirlydoos" to see what they thought. Well they all agreed that they liked it but yes it needed more "stuff" laid down, overlapping the photo and on top of other pieces. So below is what the canvas looked like before I added more goodies. I think you'll probably agree that the top one looks much better. Some of the girls also suggested maybe putting some gesso over some of the goodies so they would pick up more of the glimmer mist and I think I'll try that out next time. It was a lot of fun to play with something so outside of my comfort zone. I'd love to hear your comments - TFL!

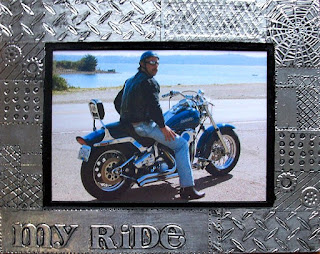
So I made it through to week 3 in the Ultimate Design Challenge over at Swirlydoos. This weeks challenge was from Design Team member Miranda Edney to use Foil tape. This stuff is amazing to work with and just looks so cool, like real metal or you can use inks on it, just so many ideas. You can find Miranda's tutorial on how to use this tape here: Foil Tape Tutorial You really do need to stop by the Swirlydoos forum to see everyone's projects, they will take your breath away!
After playing around with the tape a bit I decided to make a picture frame to go with a photo I have of my dh on his Harley to give to him as a Valentines/Anniversary gift. I wanted to use chipboard letters for the title on the frame but when I tried it the foil tape I had was a thin gauge so it tended to tear when trying to push the tape down on the letters. So instead I used alphabet stickers which gave the same effect just not so deep. I used a crisscross embossing folder on the tape on the botto0m right and top left of the frame. Then I took 4 small metal gears that I had and put two on each side and covered them with the foil and used my stylus around the gears. Beside the crisscross metal pattern on the top of the frame I laid down some mesh ribbon (like you would use for making Christmas wreaths) and laid the tape down over that and used my bone folder and ran it back and forth across it to pick up the mesh pattern. I used a spider web embossing folder for the top left corner of the frame. For the other areas I just used my stylus to make the different patterns. After the frame was all done with the foil tape I covered it with black paint (as shown in Miranda's tutorial) and wiped it off so that the black paint was left in the cracks and crevices of the tape. I really like how it turned up ad once I got the photo in it I think it looked even better. (As she pats herself on the back, lol) I really hope that my dh likes it as much as I do. I hope you stop by Swirlydoos and check out the challenge! TFL