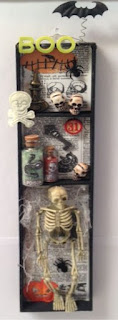
Thr first thing I did was to pull of one of the wooden strips so I had a bigger section for my skeleton. I then painted the thing with some black paint. I took a sheet of paper from a Halloween paper pack from Tim Holtz and cut some strips to go into each section. I started with the bottom section first. I added a little paper pumpkin to the bottom corner and then a spider. After that I glued my skeleton in I tucked some cheese cloth that I had pulled apart around and under the skeleton.
For the middle section I took a couple of small corked bottles I had and filled them with some glitter glass and tiny beads to them. I fussy cut labels from the papers and added them to the bottles and glued them into place. I then added the small skeleton head, key and number piece to this section.
For my top section I added an oval tag with a black fence and raven on it to the top left corner. I found this metal bottle in my stash and added it to this section. I added two small skeleton heads and a spider to this section.
To finish off the project I added a small felt skull and cross bones to the side of the box and took out some letters from my stash to spell "BOO" and glued them to the top of the box. I then took some wire and twisted it up and added the small paper bat to the top of it and glued the other end to the box to make it look like it was flying. Here's the finished project, click on the photo to see a larger view.
I'd love to hear your comments, TFL!


No comments:
Post a Comment