Wednesday, November 2, 2011

Happy Wednesday all!

Well I got on a bit of a roll yesterday and managed to get two layouts done. I had these beautiful papers from Bo Bunnies "Forever Fall" collection of papers and as soon as I saw them I knew I had the perfect photos to use with them.I'm sure everyone has seen this line of papers by now but if you haven't you really have to pop over to the Bo Bunny website and check them out - they are to die for!! LOL

This first layout is using a photo of my son and his girlfriend taken in their backyard a couple of weeks ago. I just thought the photo was so pretty with all the leaves on the ground and the trees with the leaves all changing color. The background paper is from this Forever Fall Collection, it's double sided and is called "Dusk". The paper was just so pretty I didn't want to cover it up to much so I cut out one of the pieces of the cut outs double sided paper and used that to sort of mat the photo. Before matting the photo I used the piece to trace out another piece of paper the same shape from the red side of the double sided "Dot" paper and then used it behind the matted photo but off set it to the right and up a bit.

I also used one of the journal tags from the cut out sheet and used that behind the two other pieces. I cut out my Title word "Fall" on my Cricut machine and then used some foam dots to pop the letters up off the page. I used some rub on letters that I had  in my stash on the journal tag and spelled out "In Love" so I had a bit of a double play on the word Fall. While digging through my stash for something else I came across this pretty laser cut gate from Dusty Attic and thought it would look quite pretty with the whole layout.

For my handmade flowers I used some brown and some teal blue (to match the background paper) Bazzill paper. I used Gabrielle's water distress flower tutorial which you can find here on Gabi's Blog: Water Distressed Flower Tutorial I remembered I had these other tiny teal rose buds from Prima in my stash and they matched perfectly with the teal I used on my flowers. The flourish is one of Prima's "Say it in Crystals" flourishes, I didn't want to use the whole thing so I just cut a piece off of it and it fit perfect in the left bottom corner. So here's how it all came out:


For this next one of the kids visit to the pumpkin patch I used the Bo Bunny double sided "Bouquet" paper. It was also so pretty I didn't want to cover it all up so I matted the photo in brown and then cut a couple of different lengths of paper from the "Dot" paper using both the red side and the dots. I used the "Perfect Pumpkin" cut out  and then used my Cricut machine to cut out the other part of the title "Finding". I decided to distress all the paper edges but instead of using a brown ink I used one of my small "Versa" ink pads called "Mountain Lake" which was almost the same (maybe a bit darker) color as the blue in the paper. I think it turned out good as it just sort of gave the layout a little something else to draw out the blue in the paper.

I made some more flowers using Gabi's tutorial again, only this time I made them in brown with orange centers. On these flowers I added some "Aqua" stickles glitter to the edges of the petals of these flowers. I used some more of the pretty little Prima rose buds again in this flower cluster. I also added some pretty orange stain ribbon which I tied into a bow and with the long tails I kind of weaved them through the flowers. My leaves are some that I drew in my Paint Shop Pro program and sell in my Fall/Halloween digital scrapbook kit which I sell on my website here: Scrappers Heaven  The little felt pumpkin is from the Making Memories "Spellbound" 192 piece Halloween Embellishment Kit. I have this kit on sale for $5.99 on the website also.

I apologize for the photo on this layout as it got really sunny this afternoon when I was taking the photo so there's a lot of shadow on the photo (not that I'm going to complain when we get sunshine at this time of the year, lol). Well I'm off to scrap some more Halloween photos. Thanks for stopping by and have a great evening!

Tuesday, November 1, 2011

Happy November 1st!!

Seems I'm a little lazy in my blog posting these days. I hope everyone had a safe and Happy Halloween yesterday and hopefully all of your little ghosts and goblins are not bouncing off the walls with to much sugar today, lol. We only had about 17 kids last night, which is just a few more than last year. Halloween has sure changed from when we were kids, I remember going out with my sisters and our friends and the streets would be so fall of trick or treaters it was crazy! I guess the parents tend to take the kids to parties and the mall rather than going door to door, plus we live in a bit older neighborhood so I guess the kids have all grown up now. Oh well I guess I'll just be forced to eat all those goodies myself, lol.

I have done a couple of layouts and a card since the last time I posted. This first one is a card I did using up some more of the Pink Paislee "Butterfly" collection that came  in the MCS May LE Kit. I saw this saying somewhere on the internet and I thought it would be perfect for an all occasion card. Used a bit of Gesso on the bottom and did some distressing. Added some pretty lace and pink pearls and of course a beautiful Prima flower.
This next layout is showing off one of my fish I caught when my DH and I went out fishing in July. I thought these Websters papers from one of the MCS LE kits I had would be perfect for this layout. I did a bit of fussy cutting of the papers and added some foam dots to pop up some of the goodies on the layout. I was actually quite pleased with it once I was all done. Don't you just love these fabric flowers from this Websters line, I just think they are so cute.
We had a challenge for October over at MCS to do stitching on our layouts - machine or by hand. I've just started to do this a bit on my layouts these days so I thought this would be a great time to start doing it more. I did this double page layout with some photos of my daughter and her boyfriend when they took my grandchildren (my son's kids) to Disneyland back in August. I did some machine stitching on the corners of the layout and then hand stitched a flourish down on the bottom right. The paper pieced Mickey Mouse and Tinkerbell were cut using my cricut machine and the Micky Mouse font cartridge and the Tinkerbell & Friends cartridges I have in my collection. I didn't do any distressing on this layout as I wanted a bit more clean type layout. I also hand made my flowers following Gabrielle Pollacco's water distressed flower tutorial. I also cut out the title using my cricut machine.


This last layout I did last night using a photo of my granddaughter (1st on the left) and her friends going to their first ever school dance (she's in grade 7). I'm feeling pretty old looking at this as it just seems like my son was that age not long ago and now he's 31! This old age thing sucks, lol. I used the Making Memories "Spellbound" collection from a few years ago that I had in my stash and this was also my entry into the big Fall contest that is going on over at the MCS Sketch Blog. I just turned the sketch sideways to accommodate my horizontal photo. You can get a lot of layouts done with this Spellbound kit and I still have a few of them plus the embellishments from the same collection over on my website here:  Scrappers Heaven and they're on for a really good price, so pop over and check it out! So here's the layout, I hope you like it and please, I love to hear any comments you have, so feel free to leave some love! :-) Have a great week everyone!

Sunday, October 16, 2011

Half way through...

Wow can you believe it's already October 16th? Where did the time go to? I haven't even finished scrapping my summer photos and soon we'll be doing Halloween layouts! The weather has cooled down quite a bit, at least in the evening. We're in a nice stretch of sunny weather right now which is great as I'm trying to get my gardens all cleaned out for the winter - which I'm about half way through so far. Plus we're also trying to dig out the side of our yard to put in some more parking so we can get our camper and boat onto more level ground to make it easier to get the camper on and off the pick up truck. It's suppose to stay sunny until at least next Friday so we'll keep our fingers crossed, after all this is BC and the weather can change in 5 minutes, lol.

In bertween all this I have managed to do a couple more layouts and a card. This first layout and card were made using the May Limited Edition kit from My Creative Scrapbook. I just love this Pink Paislee "Butterfly Garden" collection with it's pretty papers and die cuts, pop up clear butterflies and rub-ons. It's just so versatile. This is a photo of my daughter giving her friend "attitude" when she was taking her picture last year. I just thought it was a funny one do to a layout with. I kept the layout fairly simple, added some pretty Prima flowers that came in the kit and the green satin ribbon from the kit  which I stitched down the middle and then pulled the stitching to get it to gather up. Did some distressing on the papers and added my title and here is how it turned out.


On this card I used the same Pink Paislee papers that I distressed and layered. I used one of the rub-ons for the angel/fairy in the top right corner and a pretty Prima flower. I found this saying somewhere on the web and I thought it would be great for an all occasion  card, so I printed that out using my Paint Shop Pro program. I had this pretty white lace in my stash which I added and then put some pretty pink pearls across it and up in the right corner by the fairy and then added a bit of gesso to the bottom which I used some Tim Holtz tattered rose distress  ink on after the gesso dried. I was pleased with the way it turned out - I'd love to hear your comments on any of my work!

I did this last layout of a [photo of one of my fish I caught in the summer when my DH and I were out fishing. I've really only fished on a lake before as my parents had a cottage on the Okanagon Lake in the interior of BC which is where we spent our summers. I would go out fishing with my Dad for Kokanee (a small land locked salmon) which were not really that big. So now that we've moved up here to Campbell River on Vancouver Island and we have our own boat I get to go out fishing on the ocean. I haven't fished for salmon yet but we go jigging for Cod , halibut etc. and since I like white fish this works out great for fish and chips, lol. This is one of the biggest fish I had ever caught (which is really no where near the size that my DH and step-daughter have caught) but to me it was big and it gave us a good dinner of fish and chips that night, so I was quite happy, lol.

I thought these Websters "Spring Market" collection of papers from MCS March LE kit would go perfect with my photo. I did some fussy cutting of the flowers in the left bottom corner, the "fresh fish" sign and the Farmers Market sign and popped them up with foam for a 3D look. I took some of the blue ribbon from the kit and pleated that using some tape and added a small satin flower from the kit and then this pretty fabric flower from Websters and the chipboard buttons from the same collection. So here is how it turned out. Thanks for stopping by and having a peek at my work. I hope everyone has a great week!

Saturday, October 8, 2011

Happy Thanksgiving!

To all of my Canadian friends I'd like to wish you all a "Happy Thanksgiving" this weekend and remember - Don't eat to much turkey or there will be no room for Pumpkin pie, lol.

I decided I should start using up some more of my left over kits from MCS, this is from their LE kit in Oct 2010. You can get so many layouts done with each of the kits, Pam definitely does not scrimp on the kits you get! This is photo of my grand children going back for their first day of school this year. These are papers from Webster's "Your Life Beautiful" paper line last year. I cut out the letters for the word "School" and the owl, backpack, globe and school from the "Learn Your ABC's paper and popped them up with foam. the layers I've cut from the "Learn Your ABC's", "A Sweet Stop" and "Playtime". Also used some of the trim from this line and the stickers. Of course I just had to add some pretty flowers from Prima! Other than the fact that my photo is a little blurry and there's a big white spot in the photo from my flash I think the layout turned out not to bad. Thanks for stopping by and having a peek, have a great weekend!

Sunday, October 2, 2011

An aniversary!!

So 13 years ago today that I had my surgery for my breast cancer and I'm still going strong! I can't believe it's been that long ago already. I've had a few other types of cancer in those 13 years but those were all good after surgeries so this was the big one and I'm very happy today.

I did manage to get another layout done that I started yesterday. This was based off of the August sketch from My Creative Scrapbook, which you can see below. I did a lot of machine stitching on the layers here because the colors are so soft I thought they would stand out a bit more. You'll have to ignore the spot on the photo from my camera flash. The papers are some more from The Scrap Cake, I did a little bit of fussy cutting of some of the circle and flowers from the paper. The butterfly I made myself cutting up one of my white flowers so that I had two pieces, each with two petals on them. I colored them blue using my Tim Holtz "Blue Jean" distress ink pad then glued the two pieces together in the middle and for the body I actually cut the stem off of one of my tiny folded satin roses, so the bigger part of the stem was the body then the thin part I bent to make the antennas. I then used some of my stickles glitter "Eucalyptus" color and outlined the wings and put a couple of strips down the middle of each petal. It doesn't look as good in the picture as it does in real life - oh well I'll blame my camera, lol. Of course the flowers are from Prima and the red rose chippy is from one of my scrap  kits from MCS. The title was cut on my Cricut machine. Anyway, thanks for stopping by and having a peek and remember I always love to hear your comments! Have a great week!


Thursday, September 29, 2011

Two whole days in a row....

Yup, it's like it finally decided to be summer. Yesterday and today was gorgeous, warm and sunny so I managed to get out in the yard and start doing some clean up and even managed to get the lawn mowed. Let's hope that's the last mowing of the year, lol.

So I started this layout yesterday and finally got it finished tonight. I love this photo of my grandson when we were at the beach when the grand kids were visiting this summer. I used the beautiful Bo Bunny "Timepiece" collection for this layout, I think it works great for boy/masculine pages. 

I did a lot of distressing and layering on this layout. After I placed the bow and the Prima flowers on the page I took some of Tim Holtz negative tape and wove it through the flowers. I made the paper accordion flower out of some of the paper. The gears I drew in Paint Shop Pro, then I turned them into a SVG file so I could cut it on my cricut machine. I cut it using some chipboard and using my deep cut blade to cut the chipboard. I then painted them with "Vintage Photo" crackle paint and once they were dry I inked the  edges. Thanks so much for stopping by and having a peek.

Thursday, September 22, 2011

New Sketch at MCS

Well it's time for a new sketch at the My Creative Scrapbook new sketch blog that you can find here: http://mycreativesketches.blogspot.com/  Remember Pam always gives fantastic prizes away so add your version of the sketch and you never know you could end up with a great prize. I know I'm keeping my fingers crossed that I might win, lol! Here is the sketch to use for this months contest.
Here is my version of the sketch. These are some cute papers I found at one of our local Scrapbook stores from the Stamping Station which I thought would go great with the blue in the photos. This is my daughter and my grandson (my son's boy) at Disneyland this summer being silly for the camera, lol. I tried something a little bit different on here and did some inking on two of the papers just to sort of make the layers stand out more - not sure if I quite created the effect I was going for but it doesn't look to bad, lol. I cut the leaves and the letters out on my Cricut machine and also made the yellow and patterned paper flowers using a flower shape from my Cricut machine. The other three flowers were ones I had in my stash from the dollar store. The bling and the butterfly are from Prima. I hope you will all give this sketch challenge a try. Thanks for stopping by and having a peek at mine! Have a great weekend!

Thursday, September 15, 2011

Where did the time go!

Wow, I can't believe it's been a month since I updated my blog. It's been kind of busy what with the grand kids up visiting and then we were off camping for a week. We also got a new member of the family when we got back from camping - a little 8 week old ginger kitten, which we named Hunter (named after one of my DH's favorite authors Hunter S. Thompson) - our other two cats are not impressed, lol. The weather finally decided to actually be summer weather and it turned out really hot which was just in time for our friends wedding which was on Sept 3rd and then this past weekend our other friends daughter got married. So it turned out to be a very busy and expensive month so far, lol. I'm really looking forward to this weekend of not having to do anything!

In between all this stuff I have managed to get a few layouts and cards done. My Creative Scrapbook has started a new "Sketch" blog which can be found here: http://mycreativesketches.blogspot.com/. And as usual Pam (the owner) is giving away some awesome prizes so be sure to check it out!  Below is the first sketch on the blog and then my take on the sketch using a photo of my son and his girlfriend taken at one of the beaches in Vancouver.


This next layout took a bit of time. I took my grandchildren to this Farm in Black Creek, BC while they were visiting this summer. This is a gorgeous farm right on the ocean that they will take you on tours during the summer. I did a lot of distressing and stitching on these pages. I haven't done a two page layout for so long it kind of took me awhile trying different things out until I was happy with it. The feathers with the flowers are actually from the Emu in one of the photos. The chicken, barn, wagon wheel and cow are ones that I have drawn myself and that I sell in my "Farm" digital kit on my website and on eBay. I've popped them up with foam for a 3D look. Remember you can click on any of the images for a larger view and then just hit the back button to return to this page.
The My Creative Scrapbook forum's August challenge was to create a layout using some of your packaging that your scrapbook items come in. This was a fun challenge but due to being so busy during August and the first week or so of September I didn't even get a chance to work on it until a few days ago. I decided to use some more of my May LE Kit from MCS that had all these great papers and embellishments from Pink Paislee's "Butterfly Collection" and gorgeous Prima flowers. This is a photo of my daughter and her boyfriend that was taken while they were visiting in Victoria, BC this past July. The packaging items I used in this layout was the card stock with the small little flowers on it, right behind the photo is from some Prima flowers and just to the right of that the white doilie printed on clear plastic is also from some Prima flower packaging. The last item I used was the top of the packaging of the Butterfly Collection of charms that has the bow on it. Isn't it amazing how you can become "green" for the environment when you are scrapbooking! Anyway below is the layout I made for the challenge.

The last thing I have to show you is a card I made using the same Pink Paislee Butterfly Collection of papers. One of the sheets of paper, the "Botanical Garden", had different pieces of the collection all on the one sheet and since this piece with the bird and birdcage on it was a longer piece I thought it would be perfect  for one of those tall slim cards - which I've never made before. I just love this line of papers, they are so pretty and just seem to fit perfect for almost any layout, card or altered item! I played around with this for quite awhile because the piece was so pretty I hated to put anything on top of it - I really have a bad habit of doing that with pretty papers, lol. I distressed and inked the two larger pieces of the paper and put them together. for the two smaller pieces on the front of the card I finally settled on one of the other pieces from the same sheet of paper which had the same colors  in it and had a white outline of some leaves on one side that I liked and was pale pink on the other side so I just cut it in half and used the pink side for my sentiment. The sentiment is one from Tim Holtz line of stamps, which I have, but I didn't think the "shabby" font of the stamp would look right for the card so I used my Paint Shop Pro program to print out the sentiment on the paper instead. I distressed and inked those two pieces and attached them to the larger ones. I then added some lace to the bottom of the card and then attached these all to my base card stock for the card.

After getting the card basically together I decided it needed a little something so I took some Gesso and mixed in a little bit of iridescent medium to it. I let it dry a little so it would be thicker to paint on and be a bit more sturdy to use (if that makes sense, lol). I painted some of the top left corner where I was going to place my flowers but made it a bit larger than the area the flowers would take up. Then I painted a bit lighter coat around the edges of the pink paper where the sentiment is and then let these two areas dry. After these were dry I stuck the flowers I had chosen onto the card and also some pretty pale pink self adhesive pearls onto the opposite corner and added a little white 3D butterfly that I inked with some pink ink to match the paper and viola the card was done. I'm really happy at the way it turned out.


I  hope you like the layouts and card I did and I'd love to hear any comments you have. Thanks for stopping by and having a peek at my work.

Tuesday, August 16, 2011

Bo Bunny

Don't you just love the Bo Bunny "Barefoot & Bliss" collection of papers? As soon as I saw them I knew they would be perfect for scrapping pics of the grand kids when they came up to visit since we are always at the beach when they are here. I was finally able to get a bit of time on Sunday to start playing with these papers. They're almost to nice to cut up - I have that problem when I have pretty papers I just hate to start cutting them, lol.

These are some photos of the grand kids when we took them out on their first ever fishing trip. My grandson was the first one to catch a small greenling. A couple of minutes later my granddaughter got a bite, as she brought it up to the boat my DH saw  that it was a mud shark - the look on her face was priceless when we told her it was a shark. My DH handed her his cell phone so she could call her Dad and tell him, she was so excited. It ended up that she caught three mud sharks (which we threw back in), then a couple of greenling. My grandson ended up catching a mud shark and a couple of greenling. We had a great dinner of fish & chips the next day!

The background paper I used for this layout is actually from Bo Bunny's  "Paradise" collection.  I matted my photos with some green bazzill paper to match the green in the papers. I fussy cut the waves out of the Barefoot & Bliss paper and popped them up with foam for the 3D look and then I cut the seagulls out from the same sheet of paper and just glued those down in the top left corner. I don't know if the little fish are from this same Bo Bunny collection but I had seen them on another layout somewhere on the net and thought they were so cute so I drew one in my Paint Shop Pro program and then turned it into an SVG file to cut out on my cricut machine. I just got a deep cut housing for  my Cricut so I cut the three different size fish out of chipboard and then cut the same ones out of some of the blue paper from this collection and glued them on the chipboard and popped them up with foam on the layout. I took some blue chipboard letters that I had in my stash and sanded them down and then added some green crackle paint to them for the "Fish" title. To finish the layout off I made a tag out of the same papers and did my journaling on that and then tucked it in behind one of the photos. I was quite pleased at  how it turned out, now I'm hoping I have enough paper left over to either do a few beach themed cards or another layout with them. Thanks so much for stopping by and having a peek and I'd love to hear any comments you'd like to leave. Have a great week!

Saturday, August 13, 2011

Beach layout

Well yesterday was spent cleaning my house up after the grand kids visit -it should stay a bit cleaner longer than it does while they are here, lol. I got my butt in gear pretty early this morning and did all my running around doing errands done by about 10:30am.  It's amazing how much you can accomplish so early in the day!

So this afternoon has been some "me" time and I was able to get a layout done of the kids at the beach looking for sea treasures. My grandson found this big purple starfish - he wanted to bring it home but I told him it was still alive and that would be mean to the poor thing. I found these pretty beach papers from Creative Imaginations at my LSS, I thought they were so pretty and would be perfect for this layout. I did a lot of distressing on all of the papers. I got the fish net from a fish netting place in Steveston on the mainland, cost me about a dollar for a piece that's almost 12" x 36" and the little fence I got at a small craft store in the same area on the mainland, it's about a foot long so I just cut off a small piece of it to use and the shells are some we found at the beach. I took some glossy accents and poured a thick coat over the bottom of my grandson's photo and then poured some craft sand I had over it and let it dry - it didn't come out exactly as I wanted but still doesn't look to bad, lol. I also took a duplicate piece of paper and did some fussy cutting on the top left corner and popped it up with foam for a 3D look. If you'd like to see a larger version just click on the photo and hit your back button to return to this page. TFL 

Thursday, August 11, 2011

Quiet house again

Wow, I can't believe it's August 11th already. We've been so busy with the grand kids visiting I haven't had time to even update my blog here. We were up bright and early this morning to do the 2 hour drive down island to Nanaimo to meet the ferry back over to the mainland. The kids Mum came over as a walk on passenger and I passed them off to her and they just got right back on the ferry and headed home. Needless to say I have tons of photos to scrap now, so that should keep me pretty busy for a while. Now the house seems so quiet. I guess tomorrow I can start a  major clean up of the house as it wasn't any use doing it while the kids were here, lol.

I also got an email today from Scrapbook News and Review magazine to let me know they were publishing a couple more of my cards in their issue that comes out on August 14th. The cards are my "Love U" card I made with the May LE Kit from My Creative Scrapbook and my "Love" swing card made with some pretty papers from Stampin' Up. I think this is my fourth time being published in their magazine so I am feeling pretty happy about that. Well I guess I better go and get dinner started here. I hope everyone has been having a great summer so far! Thanks for stopping by!

Thursday, August 4, 2011

Finally...

Summer has arrived here on the West Coast of BC - it's about time! It was a gorgeous day today so the grand kids and I hopped in the car and drove down to Courtney (about 40 klms away) to fill my truck up with cheap gas. Thanks to a new Costco with a gas station opening up in Courtney there is a big price war going on with the gas stations. Managed to get gas at 99¢ instead of $1.26 a liter. It was worth the drive, it only cost me just under $60 to fill up instead of $100 - works for me!

After we did that we stopped on the way home at the Pitch & Putt and had a round of golf with the kids. My grand daughter was the grand champion, even getting 3 hole in ones - me, well I didn't do so great, lol. The weather was nice and sunny so we soaked up some good old vitamin D.

Last night I managed to get some of the photos that I've been taking of the kids while they've been here scrapped. Every year during the July 1st (Canada Day) celebrations here in Campbell River there is a big "Shoreline Arts Carving Contest". There are all different classes from Novice to Expert. All the contestants get a log to carve, which they start carving out using a chain saw and then end up with smaller tools for the fine details. Let me tell you over the years that I have lived here I have seen some awesome work by these people! The carvers are all sponsored by a business in town and after the competition the business gets to have the beautiful carving outside the doors of the business. These ones in these photos  are a few of the carvings from the Novice class that were still down at the shoreline.

Well the weather is suppose to be absolutely gorgeous for the next week or so - suppose to be up to 27 Celsius every day, so I think we'll be spending a lot of time at the beach. I  hope everyone has been having a great week and TFL! 

Saturday, July 30, 2011

Camping

Well this has been a busy week. We had a great time camping with my son and friends last weekend and of course I have lots of photos to scrap now. My grandchildren came back with us to visit for three weeks and we've been busy going to the lake and the ocean beaches. I did manage to get a scrap page done in between all of our running around.

I had this really cute paper from Imaginisce's "Happy Camper" collection that I thought would go perfect  with these photos of my grandson making and eating smores. I was finally able to use my Cricut cartridge "Camp Out" to cut out the cute camp fire for this layout. I also used a couple of my graphics from my "Great  Outdoors" digital scrapbook kit, the campsite "This Way" sign and the "outhouse" which I popped up with foam for a 3D look. I used one of  my Prima vines and some Prima flowers to finish the layout.

Now I'm off to print of some more of my camping photos so I can hopefully squeeze in some more "me" time to scrap. Thanks for popping by and I hope you all have a great weekend!
 

Thursday, July 21, 2011

Going MIA for a few days

We're off tomorrow morning to meet up with my son and grandchildren and his girlfriend and her two little ones and my sons friend and his wife and little one to camp for the weekend. Where we are going to is only about 40 minutes away at a place called Miracle Beach which has a beautiful long sandy beach.

I'm very excited as this is going to be my son's first real visit up here since we moved to Vancouver Island 5 years ago. He use to come up this way when making deliveries for Ikea, but that was usually arriving late in the evening and crashing for the night and then taking off the next morning to make all his deliveries down the island. I always have my grandchildren up here for three or four weeks in the summer but my son's usually to busy working (being a single Dad can be tough sometimes). We come home on Sunday and the grand kids will come back with us. So I'm pretty sure I'll have lots of photos to scrap when I get home. Have a great weekend everyone!

Wednesday, July 20, 2011

Another great tutorial

I don't know what it is but I always seem to go in spurts of making different things. Sometimes I'll doing nothing but layouts and the next thing I'm doing nothing but cards. Oh well, as long as I'm keeping busy, that's all that counts, lol. I made this card following another of my friend, Paulien's great tutorials. Paulien's tutorials are always great to follow as she has tons of pictures and very detailed directions so that even a beginner paper crafter can follow them! You can find this tutorial at Swirlydoos here: http://www.swirlydoos.com/sd_plugins/forum/forum_viewtopic.php?106343

The paper I've used here is from the May 2011 kit from My creative Scrapbook which just happened to be the same papers that Paulien used from one of the Swirlydoos kits - how convenient is that, lol! I did have to do a little but of substitution on the flowers and instead of using the Rock Candy Crackle paint I used Stickles glitter as I thought the Stickles showed up better on the small butterfly than the crackle paint. Now all I have to do is make an envelope to fit the card and I'm all set! I do hope you pop over to Swirlydoos and check this great tutorial out. TFL and have a great day!

Monday, July 18, 2011

Swing card

So I decided to try making one of these cute little swing cards that I found a tutorial for on Split Coast Stampers. I think this one turned out pretty good. I love the look of them when they are standing up. The only thing with these cards is that you don't have a lot of room for writing your own little message on them but I suppose you could do that on the very back of the card. It is nice to be able to send someone something different instead of your usual type card.

I used this pretty paper again from Stampin Up,  I love this paper - I may have to go back and pick up a couple of more sheets of it. I used one of my Martha Stewart punches for the edge papers. I cut out the "Love" and butterfly on my Cricut machine and added a bit of ribbon and a bow to finish it off. Thanks for taking a look and I hope everyone has a great week!

Saturday, July 16, 2011

Another step card

Okay so I think I'm going to get addicted to making these step cards, I just really think they turn out so cute. Although this is only the second one I've made, I can see many more of these in my future, lol. I made this one for some friends who were so nice to lend me one of their trucks the other week while mine was in getting fixed. I think that's why I love living here in a small town compared to living in Vancouver/Richmond on the mainland. Here everyone is always there to help you out no matter what it is you're doing, you don't even have to ask them. We only moved here almost six years ago and we have made so many wonderful friends - love, love, love the small town atmosphere!

 Anyways, back to my card, lol. The little hedgehog on here I drew  myself in my Paint Shop Pro program. He's my version of the Penny Black hedgehog stamps. I couldn't afford to buy all these stamps so I decided I would just draw my own and I think he turned out kind of cute. I think these papers that I've used are from Stamp-in-Up, I really liked the colors in them when I saw them. I used my Spellbinders Nestabilities to cut and emboss the ovals with my Big Shot. I used one of my Martha Stewart punches for my side pieces and the "Thanks" I cut out on my Cricut machine. Oh and the little flower is one of Prima's. Well thanks so much for taking a peek!

Getting published

I just received an email from Scrapbook News and Review to let me know that they are publishing two more of my cards in their issue that comes out on Sunday. I'm very excited, this will be my fourth time published in their online magazine, which is so cool. It's very exciting when you're a crafter of any sort and find that people really like what you have made, it just makes it all worth while. The cards are my "Once Upon a Springtime" fairy card and my "Fun in the Sun" paper piecing card, which for some reason I forgot to post that one here on my blog. After the August issue comes out I can re-post both of the cards here on my blog.

I'm also very happy to report that my DH liked his card and his new motorcycle helmet that I got for him - Yeah! My in-laws were in town so the four of us all went out to this really nice Chinese smorgasbord  that we have here in town, which is one of my DH's favorite places to go to. Of course after all that food all we could do is come home and flake out in front of the TV, lol. Well I'm off to bed - have a great weekend all!

Friday, July 15, 2011

A new card

It's my husbands birthday tomorrow (the big 47 - I can't even remember 47 it was so long ago, lol) so I have been racking my brain, trying to get some inspiration for a card for him. I was surfing through Split Coast Stampers website and came across a tutorial on making a step card. I really like these type of cards, I just think they look really cool when they are opened. So now I had the type of card decided on and just needed to find some masculine type paper and I came across some really nice ones from "Crate Paper". One was from their Static collection called "gravity" and the other from their Taylor collection called "Play Time". Although they were from different collections their colors matched perfectly.

The next thing I wanted to do was something a little more than just your standard "Happy Birthday" and since I had bought him a new helmet for his Harley I kind of wanted to somehow base it around motorcycles. I was trying to find some kind of saying like "Harley riders don't get old they just...." but I couldn't think of anything to finish the sentence off. After poking around the internet I found someone talking about how some people think they are to old to ride a motorcycle but this person thought they got old because they quit riding. I thought that would be perfect, I just switched the wording around to suit what I wanted and so I came up with "Harley riders don't get to old to ride, they get old because they quit riding!" For my sentiment on the inside of the card I said "To someone I know who will never grow old - Happy Birthday Sexy!"

For the motorcycle on the front of the card I went searching the internet for a silhouette of one. I finally found one I liked except that it had a girl riding it, so I took it into my Paint Shop Pro program and cut the girl out of it and then I saved it as a .png file which I then took into my "Inkscape" program and turned it into an .svg file and cut it out on my Cricut Machine and attached it to the front of the card with foam to pop it up for a 3D look. I think it turned out not to bad, so I hope he likes it and his new helmet! I've posted a photo below, if you click on the image it will show you a larger picture, then just hit your back button to return to this page. Thanks for stopping by and have a great weekend!

Tuesday, July 12, 2011

Happy Tuesday

Well I've been busy recovering my in-laws cushions from their trailer. The people who owned it before must have really been into cows because all of the cushions were covered in this black & white cow pattern fleece. They even had the lamp shades in the same material - not really my in-laws style - can't say as I blame them, lol. Anyway I decided after breaking numerous finger nails trying to get the new covers on the very dense foam I should take a break and have some "me" time.

I decided to follow along with my friend Paulien's new July tag that she has up on her blog, which you can find here: http://paulienvandenbosch.blogspot.com/
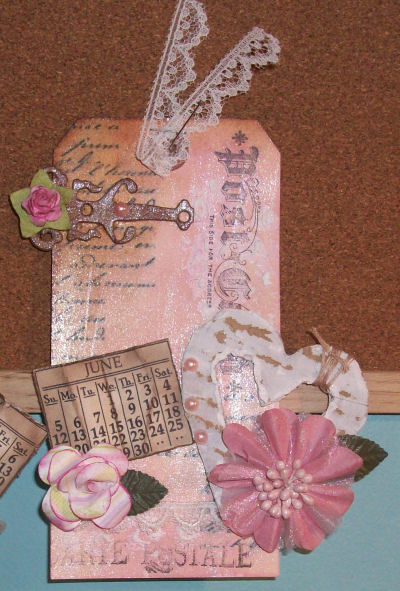
I had to do a bit of substituting as I didn't have all of the needed items, such as a chandelier stamp, script stamp and I used one of my pretty Prima butterflies rather than make my own (I know lazy).

The first thing I had to do was to find a .png file(a graphic with a transparent background) of a chandelier to use in place of the stamp that Paulien used. Once I found that I was able to use my Paint Shop Pro program to print the graphic onto my tag. I also didn't have a nice lacy border stamp like Paulien used but I did have one with little butterflies so I used that instead. For my script stamp I used one of my rub-ons, which doesn't look to bad. I really do need to get a script stamp as I found that doing different projects it would be really good one to have.


For my misting on the card I didn't have any of the Distress re-inkers so I used some of my Rangers "stream" ink and mixed that up with water and sprayed that onto the tag. I didn't have any of the Pearl-ex micro powder to add to the spray to give it some shimmer but I had just some Lumin Arte "Radiant Rain" shimmering mist and applied that over top of the blue mist after I had heat set it. It is hard to see how it shimmers in the photo below but if you click on the photo you are able to see a bigger photo of the tag and see how it shimmers. 

The next thing I had to do was to figure out what to use in place of silver metallic paint to mix with my iridescent medium. I remembered I had some Rangers Silver ink so I mixed that with the iridescent medium to paint on my doily. It didn't come out quite as silvery than if I had used metallic paint but it looked not bad. 

When I first started scrapping I always thought I had to use the exact same products as was in the tutorials I followed. I soon found that it could be quite expensive to keep buying things I might not ever use again. Now I realize that the idea of a tutorial is to give you the basic techniques so that you can then put your own spin on things! So I  hope by giving you some of my steps for this tag that it will get your own ideas flowing when following tutorials. Anyway here is my take on Paulien's tag, hope you like it. TFL and thanks for another great tag Paulien!

Friday, July 8, 2011

Prize Giveaway!

Yeah Friday is here!! I've got a few things to show you today. The first is news about a prize giveaway at my friend Gabi's blog, which you can find here: http://gabriellepollacco.blogspot.com/ Gabi is giving away a great prize pack full of all of her favorite scrapping goodies. A photo of the prize pack is below this post. So pop on over to Gabi's blog and leave a comment and you never know - you might be the lucky one to win this great prize!


The other thing to show you is my layout that I did for the "Pages in Time" interactive Blog Hop. I don't know if any of you followed it last week or not - it ran June 30th to July 6th. The idea of the blog hop was to go to each of the listed blogs and the girls were sharing with you different ways to spice up your scrap layouts. It was really fun seeing all the different techniques used. At the end of the hop what you had to do was follow the sketch they gave you and incorporate at least 5 of the techniques that the girls shared into your layout. So below is my take on the layout, a photo of my son taken this past weekend while he was camping with friends. The techniques/things I used in my layout were: Distressing, matting with doodling on it, scalloped border punches, my own hand made bling using stickles glitter, title "Life - Enjoy", journaling "Cultas Lake, July 2011", and flowers. Thanks for all the inspiration ladies and thank you all for stopping by my blog and having a peek. Don't forget to hop on over to Gabi's blog at a chance at winning her prize!
    

Thursday, July 7, 2011

An altered project

I didn't realize that it has been so long since I updated my blog. I guess I got a little busy visiting with friends etc on our "Canada Day" (July 1st) long weekend this past weekend. This week has been so warm and sunny I wanted to spend it outside doing some yard work and soak up some of that good old vitamin D!

I did this altered toilet paper dispenser a couple of weeks ago but I forgot to take a photo of it before I sent it back to my sister so I had to wait for her to take a photo of it and send it to me. So this was a gift that my sister received from someone a number of years ago, she just had it as a decoration in her bathroom. It was getting so old that the picture on it was getting all faded and yellow looking. I decided to give it a makeover.  This is the before photo so you can see how it looked.


I painted the whole thing with white paint and after it dried I painted it with Rangers Rock Candy Distress Crackle paint, not that you can really see the crackle effect in this photo. I used Prima Flora fairy paper for the background and then used Graphic 45 "Once Upon a Springtime" collection papers cutting out the fairies and flowers etc popping them up with foam for a 3D look. I used stickles glitter on the fairies & butterflies wings. Also cut out the two butterflies with my Cricut and covered them with stickles glitter also and used pop dots down the centers so I could fold the butterflies wings up. I'm quite pleased at how it turned out. TFL!
 

Sunday, June 26, 2011

Beautiful day in paradise!

Well we're having another gorgeous sunny summer day here in Campbell River today - now if it would just stay around for a few days that would be even better. I tell you this spring and now the beginning of summer have just been crazy. Here it is July 1st at the end of this week and we are still having a few days where we need to wear a jacket.According to the "experts" El Nina that we are having is suppose to be over by the end of June and all across Canada is suppose to get and unusually hot summer - okay, it can start anytime now! Just to show you how weird it's been our local ski mountain, Mount Washington (here on Vancouver Island), had the biggest snow pack in the world (for ski hills) of over 700 cms. So instead of opening up for their usual summer sports of mountain biking etc. they are opening up for more skiing on July 1st! Isn't that crazy? Oh well, lol.

This past week I wasn't having a very good week. I had to take my vehicle in to get fixed last Wednesday - which was suppose to be ready on Thursday but now it won't be ready until Tuesday as they had to fix a number of other things - "Oh joy, more money to spend"! On Wednesday afternoon my MS decided to start acting up again and I was having major problems with vertigo again. I couldn't even lift my head off of my pillow for two days without feeling like I was going to throw up or fall over - not a fun feeling. So I guess it was a good time to take my vehicle in to get fixed as I couldn't drive anyway, lol. It's settled down a lot now, I just have to not look up to much or  move to fast and it seems to be more in the morning when I first get up.

Before the vertigo happened I did get started on a new layout of my son and his new girlfriend. This layout was made from following Delaina's (My Creative Scrapbook) video tutorial which you can find here: http://www.mycreativescrapbook.blogspot.com/. I was quite happy at how it turned out. My scrapping style has really changed since joining the "My Creative Scrapbook" group, the ladies have really got me to thinking more "outside" the box when I scrap and when I look back at my layouts I did when I first started scrapping I just think how "un-exciting" (if that's a word) they are compared to now. So let me know what you think of this layout - I love to hear any comments  - good or bad!


I also managed to get a quick all occasion card done using up some more of my Feb LE kit which is below.  I used a duplicate paper to cut out the fairy and chick to pop up with foam for a 3D look and also used some stickles glitter on the fairy and butterfly wings. TFL and have a great week!
 

Monday, June 20, 2011

Websters Pages

Check out all the fun here at "InspireMe" this week celebrating Websters new paper  lines!

Thursday, June 16, 2011

Apologies to all!

As a Canadian and a former Vancouver person I can not believe how embarrassed I am over the riot in Vancouver last night after the Stanley Cup hockey game. Watching what unfolded on the TV last night after the game just seems so surreal. I felt like I did watching the news of the Twin Towers being hit - I could not believe it. Everyone we know and people we don't  know are so shocked over this and are so totally pissed  off (pardon my language here) at the people who went into Downtown Vancouver last night to purposely start these riots. 

These were not "Hockey Fans" nor were they regular Vancouver citizens! We are all disgusted at these people and we all want them caught and brought to justice over this. To these few people who started this - You have put a black mark on Vancouver that the world will not easily forget and if you think any of us are proud of you for this, think again! With all of the street camera's, news camera's and regular everyday people with their cell phone camera's getting shots of all of you idiots, you'll be caught. People have already put up Facebook pages, websites so we can post your photos for the police and anyone who recognizes anyone in these photos are coming forward to the police and giving them your names.

It would not have mattered if the Canucks had won the Stanley Cup, these riots would have started anyway. Police found people who had come into Downtown Vancouver with Molotov cocktails in there back packs. Normal people do not carry something like this to a huge gathering of people unless they planned on starting something. Watching you idiots on the TV smiling and laughing and acting so proud of yourselves for what was happening made me sick and embarrassed. So lets see how much you laugh and smile when the police come knocking at your door. Yea you are real heroes - NOT!

To the rest of Canada and the world we apologize to everyone for what they witnessed last night and want them to know that is not what the real Vancouver and it's citizens are about!   

Tuesday, June 14, 2011

Another Brooke layout...

Well you must be getting bored with all these photos of my friends little granddaughter, Brooke, but every photo they take of  her is just so adorable I can't help but scrap it. lol. On this layout I used some of my leftovers from the October LE kit from MCS, I just love all these butterflies. These papers are from DCWV and are just so pretty. When I laid my photo down on the papers I didn't want to cover up the big butterfly on the paper on the bottom right corner of the photo so I cut out around the butterflies wing so I could slip the photo underneath it. Then I decided to do the same with the smaller butterfly on the background paper on the left side of the photo.  I also cut out some of the small butterflies from the paper strip I used with all the butterflies on it and then just taped them down the middle so I could fold up their wings for a 3D look and staggered them up the paper on the right side of the photo.  The 3D butterfly sticker is also from DCWV and of course the flowers are from Prima and are from the May LE Kit from MCS.

I am quite pleased at how the layout turned out but what is funny is the photo I used on this layout is totally different from the one I started with - funny how that happens sometimes. Well now I'm off to do a layout with the photo I originally started with, lol. Thanks for stopping by and having a peak at my layouts  and cards!

Monday, June 13, 2011

Challenge winner!

Well what a nice surprise tonight. I was over at My Creative Scrapbook's message board this evening checking all the new posts and found out that my layout below of my sons friends little girl bouncing on the trampoline won the "May Sketch" challenge. There were so many gorgeous entries into this challenge that it means so much to me to have had the honor of my layout winning this challenge. So excited, I can't wait to receive my prize pack from Pam! So here is a copy of the layout that I made for this challenge. TFL!
 

Friday, June 10, 2011

What a difference a week makes.

So the Canucks were up 2 games to nothing and they go to Boston and lost the next two games - not just lost but lost badly. So disappointing, I felt so bad for our goalie, Luongo, losing that first one in Boston 8 zip - where was the defense? Oh check me out, like I really understand the game, lol. But here they are back in Vancouver and played game five and Luongo gets a shutout - I guess being in their hometown, with the hometown crowd cheering them on really works a lot of magic. Let's hope when they go back to Boston for game six they can take some of that magic with them! Okay so enough about that, let's get back to scrapping, lol.

I did manage in between gardening to get some cards made. The first two I made with the goodies from the May LE Kit from MCS and the last one I used the February LE Kit from MCS. It was my sisters birthday this week so the birthday card was for her. I love making cards and layouts that people love getting. My sister sent  me an email to let me know she had received the card and thought it was so beautiful, that just made my day! The other two cards I may put on my website or eBay to sell, I haven't decided which yet. I've posted the cards below and I would love to here your comments on what you think of them.


On this third card I took some duplicate paper and cut the fairy and the frog out and popped them up with foam for a 3D look. Then I took one of the tags from this same paper line and did some fussy cutting on some of the flowers and added them to left bottom corner popped up with foam.


 So my friend Paulien Van den Bosch has her June tag up  on her blog now so I figured I would actually do the tag before the end of June, unlike when I did the May tag, lol. I really love the ideas that Paulien comes up with for her tags, they really look great when they are all done. So below is my version of her tag. Once again, thank you Paulien for another great tag tutorial!
Thanks for stopping by and I hope you all have a great weekend!

Monday, June 6, 2011

Woohoo...

I just found out that my "Happy Anniversary" card is being published in the June issue of Scrapbook News & Review! This is my third time in this online magazine so I was pretty excited to receive this email. My next goal is to get one of my layouts or cards published in a paper magazine! I guess I just have to keep sending things in and one day maybe!

So did everyone watch the Saturday night play off game between the Boston Bruins and the Vancouver Canucks? It was a pretty awesome game! We were at a friends place for their annual Spring Fling lawn curling party. They had the TV going so we were all running in and out of the house between our games to see how the hockey game was going. There sure was a lot of happy faces and jumping up and down when Vancouver got that winning goal! So I guess tonight the game is in Boston so I sure hope the Canucks keep this up.
Well I'm off to do some more gardening as summer has finally shown up here on the West Coast and who knows how long it will stay for, lol. Hope everyone has a great week.

Wednesday, June 1, 2011

Canucks take the first game!

So this is a first me actually watching a hockey game and caring, lol. I'm not a big hockey fan normally but this is different....the Canucks made it to the Stanley Cup and it is so exciting, even for me! Everyone in BC is Canuck crazy right now, heck everyone in Canada! Everyone has Canuck flags flying from houses and cars and wearing their Canuck jerseys - people even have their babies in Canuck Jerseys, lol. So it was a pretty exciting game,  thought for sure it was going into overtime but thank goodness it didn't, just way to stressful, lol. So 1 game down - 3 more to go. Well most people in Vancouver are hoping that it goes to 5 games that way the Canucks would be winning in their own hometown - but I'm pretty sure that no one would be made if they won it in four games, lol. So on to game two and keeping my fingers crossed.

So I was actually doing something while I was watching the game. When I was checking out Paulien Van Den Bosch's blog the other day looking for her tutorial on the May tag that I posted yesterday I found she had another great tutorial for some handmade flowers using "Baby "Wipes". Yup, you heard right - Baby Wipes. These looked so pretty I just had to try making some.

I started the process of making them the other day. I used my Rangers Ink  color "Stream" to dye my baby wipe, which had to dry overnight. Then yesterday I added the "Gesso" to the one side of the baby wipe and let that dry overnight. So tonight  while watching the game I cut out all my petals and added the puffy paint to them. I didn't make my own stamens as Paulien did in her tutorial because I already had these white ones, you see in the photo, in my stash - so I saved myself a step, lol. I made my petals a couple of different sizes and I think they didn't turn out to bad. You can click on the picture for a larger view. Now I'm going to have to try making them in some different colors. So stop by Paulien's blog here: http://paulienvandenbosch.blogspot.com/ and try making some yourself. 

So thank you for a great tutorial Paulien and thank you for stopping by and please leave a comment and let me know what you think! Have a great week all!