skip to main |
skip to sidebar
Not really in to the layout mode so I decided to do some cards up this past week. These are a bit of a lift of a card I think I saw on Pinterest. My card base for these is 4¾" x 6¾" (cut at 9½" x 6¾" & folded in half) this way, since they can tend to get a bit bulky, they should still fit into a 5¼" x 7¼" envelope.
For the two cards I made with Prima's Rose Quartz papers I cut some pink card stock at 4¾" x 6¾" to add to the base card. Note I've distressed all of the papers for these cards. For the "Choose Kindness" card I cut the next layer using the "Midnight Beauty" paper at 4½" x 6½". The next layer I used the "Rose Dreams" paper cut at 4" x 6". I cut out the tag "Choose Kindness" from the paper collection and used some pop dots on the tag and added it to the other layers. I did a lot of fussy cutting of the roses from the "Rose Dreams" paper and added pop dots to those also and then attached them to the top right and bottom right of the card and added a small pink bow as shown. To finish the card off I added a couple of Prima flowers from my stash and added a few small die cut leaves under the flowers. I made the "I Love You" card basically the same but switched the "Rose Dreams" and "Midnight Beauty" around in the layers.


The two cards I made using Prima's "Zella Teal" paper collection were made the same way as the other two cards except for the fact that I also added pop dots to the 3rd layer of paper to pop it up. I also did a lot of fussy cutting of the roses from this paper collection to add to the cards. Here are the other two cards.
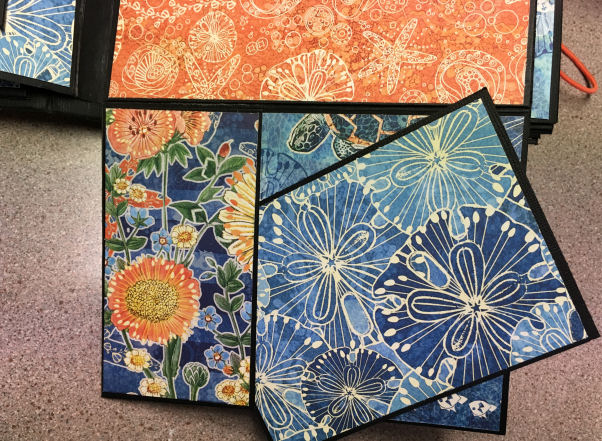
My last card here I made using Graphic 45's "Sun Kissed" paper collection. This was a pretty simple card. I used the same size card base, the first layer I used some peach color card stock to match up with the colors in the papers. I then cut my next layer using the "Sand Dollar" paper at 4¼" x 6¼" and after that I added the tag from the "Kids at Play" paper. I added to the bottom left corner of the card a couple of shells I collected from the beach along with a little Kaisercraft wooden anchor.
I hope you like the cards and I'd love to hear your comments! TFL!
Just posting a couple of Birthday cards that I made for my daughter and Granddaughter using Prima's Rose Quartz papers.
Thanks for looking!
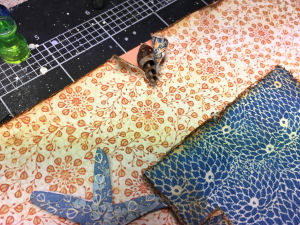
Hello everyone today I'm going to be doing a tutorial on how I made the layout below. This is going to be one of the projects I'm entering into the Design Team call for Graphic 45's 2018 Brand Ambassador Audition. As you can see I'm using Graphic 45's "Sun Kissed" paper collection which I love, love, love, to scrap this photo of a racoon that someone made at one of our beaches with driftwood. Isn't he just so cute waving to everyone passing by.

This layout can be done with any of G45's collections, you'll just use different embellishments depending on what your theme is. So here we go, first off you want to gather up your papers and embellishments that you will be using and decide what paper is going to be for your background. I used the orange side of the "Under the Sea" paper. You can also see I did a lot of fussy cutting (this paper collection just screams to be fussy cut, lol) of the different elements in the papers. I also inked and distressed all of my papers and added pop dots to my fussy cut items and used cardboard under the photo to pop it up a bit higher the the other papers.
I used a die that I had for the lighthouse, fish net from my stash, as well as some small wooden pieces and the yellow ribbon that I like to add over the fish net.
I played around with the different paper layers until I was happy with the design. Then I started adhering them to the background paper. I added cardboard to the back of the photo as well on a few of the other paper layers. This just lifts things up so you can tuck things under the papers and photo. I also added the fishnet to the bottom right corner.
Once I did all of this I started adding my different embellishments to the layout. Here's how it looks with all the embellishments.
A few closeups.
And the finished layout again.....
I hope you enjoyed the tutorial and if you have any questions just leave me a comment!
My next project for the "Graphic 45 2018 Brand Ambassador Audition" is going to be my mini album that I made with the same "Sun Kissed" paper line. I love these papers so much and as soon as I saw them I knew I had to make this mini album! Here is the front cover, I used on of the tags from the paper line and some white flowers that I colored with a orange spray I had to match the orange in the papers and I also added a little wooden seaweed that I had and tucked it in to the flowers. The album measures 7¼" x 6¼" with a 2¼ spine.
Here is the spine with a little bottle cap dangle that I made....
Here are all of the other pages with flips and flaps for loads of your photos and memorabilia.
Sorry that was a little long but like I said there are loads of space for all of your summer photos! TFL!