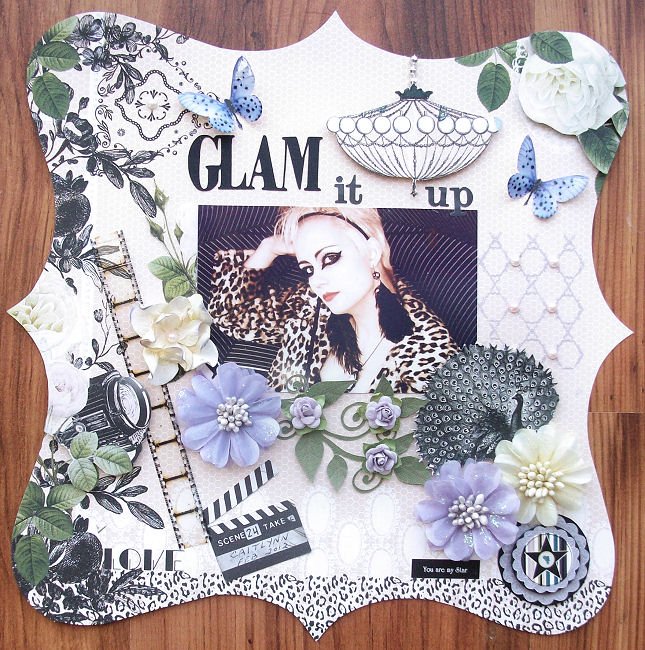
Tuesday, March 19, 2013

Meg's Garden "Ode to a Summers Day"

Good morning all! I just wanted to share a couple of projects I made using the new papers from Meg's Garden.

I love these new papers from the “Ode to a Summer’s Day” collection by Denise Ann. For this layout I used “A Summer’s Day”, “A Summer’s Dance” and “A Summer Bouquet”.  I distressed all the papers on this layout with my distress tool and also some Vintage Photo distress ink by Rangers. I die cut the Summers Day paper and then laid that down on a piece of pale green card stock and another piece of paper from my stash.

For the pieces under my photo (yes that’s me way back in 1955, lol) I cut one of the corners off the Bond 25 Square doily and used some of the distress ink on that. I then cut a piece from the top left of the Summers Dance paper (to get the paper that was more of a red color) and then a smaller piece of the Summers Day 4” strip (so it was a bit darker green shade).


The Summer Bouquet paper is definitely made for fussy cutting! So I fussy cut three pieces of the flowers from the paper to lay around the photo. I then took one of the white gardenias and inked it with Fired Brick distress ink and laid that down over the fussy cut flowers along with two of the Lilac & Lavender paper roses.
To finish off the layout I used some green alphabet stickers from my stash and outlined them with a fine tip black sharpie. I know you’ll love working with these new papers just as I do, TFL!
Materials Used from Meg’s Garden
Paper - P6333 A Summer’s Day
            P6336 A Summer Bouquet
            P6337 A Summers Dance
Bond 25 Square White Doily
Lilac & Lavender papers roses
White Gardenia

Other Items Used
Pale green cardstock    
FabScraps Victoria Tree paper
Vintage Photo distress ink
Fire Bri8ck distress ink
Distress tool

For my next project I used the new “Ode to Summer’s Day” collection for this card. I thought that the image of the man and woman would be nice for a card that could be used at anytime of the year to give to someone you care about.

I cut the base for my card out of a pale green cardstock which, when folded in half would make a 5” x 7” card. I cut the bottom 5” x 7” out of the “Summer’s Dance” paper. What I love about these papers is there is the 4” x 12” strip of matching papers to the 12” x 12” sheet which is perfect for when your making cards, you don’t have to cut into that pretty 12” x 12” piece, you can save that for a layout or another project. So I cut out the image of the man & woman out of the 4” x 12” strip of paper, which would be 3” x 4”. Out of the 4” x 12” strip of a “Summer’s Day” I cut a piece 5½” x 1 ¾” and I then used  a piece of Green Toile paper that I had in my stash approximately 4 x 1 ½. I distressed and inked all of the papers and laid them out as shown in the photo. I added a strip of lace down the left side of the card and added one of the white Meadows flowers and used two of the Dusty Attic leaves in the top left corner.

Materials Used from Meg’s Garden
Ode to Summer’s Day
Buds of May P6335
A Summer’s Dance P6337
A Summer’s Day P6333
Flower – mead Meadows
Lace L2920
Leaves da810
Green Toile  P6295

Other Items Used
Mini alphabet letters
Green Alphabet stickers
Green rhinestones

Well I hope you like these projects and thanks for stopping by!

Friday, March 15, 2013

Graphic 45 Design Team 2013 Audition

So graphic 45 is having their 2013 Design Team call so I've decided to through my hat into the ring. I figure you don't know unless you try right and I so love Graphic 45's products! I seriously don't think Graphic 45 could come up with anything bad. Anyway these are the projects I'm entering in for consideration as a Design Team member. This tissue box I made using Graphic 45's "Songbird" collection.
 I love this "A Ladies Diary" collection, don't you? I knew it would be perfect for this photo of my friend and her Mom and older sister.
Some more Graphic 45 yummyness with the "Ye Olde Curiosity Shoppe" papers mixed with some Bo Bunny papers.
 This is a photo of my Mum when she was 15 yrs old in 1936 in Bedale, England.
I love this layout of my grandson, I think he looks so serious and mature!
This layout I did for the Ultimate Design Challenge over at Swirlydoos, it helped me move on to the next level (week 4) in the challenge.
This layout is of my daughter, her friend is becoming a budding photographer so she always gets my daughter to model for her so she can add the photos to her portfolio.
This is a photo of my Dad, my daughter and my granddaughter taken a couple of years before my Dad passed away.
This was one of my Meg's Garden DT project.
My Tim Holtz configurations box.
Thanks for having a peek at my projects and I'm keeping my fingers crossed that I make the top thirty!


Swirlydoos March Card Challenge

So this month for the Swirlydoos Card Challenge we have six teams! I am the first one for team 6 so I got to come up with the card that the others in our team will lift. So here are the twists for this months challenge:
#1. Create a, Peek -a - BOO/ Slide Out, element on your card.
#2. Use some sort of frame. (handcut - diecut - crafter's clay - resin - stamped)
#3. Everyone loved Miranda's Metal foil tape tutorial for the UDC, so I thought it would be nice to use that technique.

So amazingly enough I managed to get all three of the twists into my card!
 So I have a pull out tag that you can see at the top that you can write a little note on or add a photo, my butterfly is made with the foil tape and I used one of Pink Paislee's frames which I died with teal chalk ink.I liked doing all these twists so much I decided to do them for my son's birthday card!
So if you lift up on the tab on the Happy Birthday (which of course is made with foil tape) there is another message saying "Make today awesomely fabulous!", which would be my Peek-a-Boo element and my frame is another one of Pink Paislee's frames which I used some "Vintage Photo" distress ink on and laid it over my clock, which just happened to be almost the same time as my son was born! So tomorrow is the reveal date for week 2 so I can't wait to see what everyone comes up with. Pop on over to Swirlydoos and check out the "Challenge" forum. TFL!

Saturday, March 9, 2013

My Journal

I decided to finally try Drew's journal that I showed you a picture of last weekend. I didn't have the actual Prima Journal that Drew used but I decided that was okay because I wasn't sure how it would turn out and didn't want to mess up the journal so I picked this book up at the Dollar store. It had hard cardboard covers on the front and back but I decided to add a thicker piece of white mulberry paper that I had as it had so much texture to it. It also just has regular lined paper inside as I want this to be more of a journal to write in rather than an art journal.

I painted the mulberry  paper with gesso first. After that was dry I painted a thick coat of mod podge on the paper so I could use it as the glue base for most of my products I wanted to lay down. I laid down different pieces of lace on the cover, a piece down the left side of the journal and pieces along the bottom. I also used some  embroidery thread laid down in different areas and a piece of burlap on the top right side. I then painted another layer of mod podge over everything and allowed that to dry.

Once that was all dry I used three different glimmer mists on my journal Tattered Angels "Lily Pad" and "Tuscan Sun" and the other one is a small one ounce bottle of glimmer spray called Ditto that I picked up for a $1 at Michaels, it's a really pretty blue shade. I wish I'd picked up a whole bunch of them now, lol. 

When this was dry I laid down my Prima window frame and flowers, layering them slightly over each other running down the middle from the top left to the bottom right. I also added my chipboard letters to the cover.  When this was dry I then panted it with another layer of gesso over everything. After that was all dry I sprayed my glimmer mists again over everything. When that was all dry I dry brushed some white and black acrylic paint over different areas just to help show off the different textures. I just kept doing this layering of paint and glimmer mists until I got the look I wanted. Here are a couple of close ups.

Well I think it turned out not to bad for a first attempt. I'm really liking this working with different mediums so I'm going to have to stock up on some more of these goodies. Thanks for looking and have a great weekend!
 

Saturday, March 2, 2013

Live with Prima Winner!

Don't you hate it when you go to bed so tired but you can't fall asleep! I went to bed like 4  hours ago and I tossed & turned until I finally thought forget I'll just get up. Anyway I was so busy last night posting my layouts I totally forgot to tell you I was a winner on "Live with Prima" on Thursday night! I'll be stalking the mailman till my prize arrives, lol.

Drew was doing the broadcast on Thursday night and he was doing this awesome altered journal...
 Is this just not the coolest journal cover? I saw this a month or so ago on the internet and I printed it out cause I wanted to try doing one. I was so excited when I found out he was doing the class on Thursday. If you want to check it out you can go to Prima's Ustream channel here: Prima. You really should check out the video. Well I'm off to bed again to see if I can get to sleep this time, lol.

Friday, March 1, 2013

March already!

Okay I can not totally believe that it is March 1st already! So all three of the layouts below were made using the "Belle Chanson" Swirlydoos kit. Isn't is amazing at how versatile these kits are? Three layouts and they are all totally different but they are made using the same kit. I still have tons of goodies left from the kit to make more layouts or cards. The Swirlydoos Kits really are worth the money that you spend on them. Okay so that you can see what I mean, here are the three layouts......
This one above is a photo of my Mum when she was 15 yrs old taken in May of 1936. 

This next layout is a photo of my Dad, my daughter (his granddaughter) and my granddaughter (my sons daughter and my Dad's great granddaughter). My Dad passed away two years later, but he did get to meet his great-grandson one month before he passed away.
So this last layout, done using the same Swirlydoos kit, with a couple of items from my stash, and I think, it made a great masculine page. This is my son and his son and my nephew and his son. I really do hate to realize my son and nephew have little ones of their own - I'm sure I'm still only 29 yrs old! LOL, okay you can stop laughing now! So here's the last one I did...

 Isn't it amazing how all three of these layouts came from the same kit? Anyway I'd love to hear your comments on it! TFL and have a great weekend!
 

Wednesday, February 27, 2013

Ultimate Design Challenge Winner

So the winner of Swirlydoos Ultimate Design Challenge was announced yesterday and the grand prize winner is Kathi Simmons - Congratulations Kathi!! Kathi's win was well deserved, her projects were all fabulous! You should pop on over to the Swirlydoos gallery and check out all of the beautiful entries!

So I decided I should dig into my Swirlydoos kit "Belle Chanson" and do a few layouts and tags. Last night I made another tag using the kit, I just love the teal color on some of the papers and Krissy very nicely added a teal chalk ink with the kit - I'm loving coloring my chipboard with it, lol. I just wanted to do another simple inspirational quote tag so off I went digging through my quotes that I have saved on my computer. Once I found the one I wanted I got to work on my tag.

I took a couple of pages out of an old romance type paperback novel and just tore them into different sized pieces. I took some Mod Podge and painted a layer over my tag. I then just laid the pieces down in no particular fashion. I didn't worry if I went over the edges of the tag as I would trim it all up after it was dry. I then painted over the tag with the Mod Podge again to seal it all. Once the tag was all dry I trimmed it all then used some vintage photo distress ink and inked all around the inner edge of the tag and then used the teal chalk ink & went around just the edge of the tag. I also used the teal ink on my script stamp and stamp down the left side of my tag.

I had some left over burlap in my stash so I took that piece and glued it onto my tag and then took a bit of gesso and painted a few spots of it onto my burlap in different areas. I then inked up my Tim Holtz flourish with the teal ink. While I was waiting for that to dry I made a couple teal flowers that I added a bit of glossy accents to and then dipped into some diamond dust to give them all that sparkle! I also stamped my teal ink onto my non-stick craft mat, added some water to it and then took a piece of my cream seam binding and soaked up all that luscious color and scrunched it up and left it to dry to tie onto my tag when I was finished. 

Once everything was dry I was able to glue the pieces onto my tag along with a little string bow I made. I then printed out my saying and cut it out and glued that onto the tag and tied my ribbon on and voila I was done! I hope you like it! TFL!
   

Tuesday, February 19, 2013

Second Try!

Okay so I did another tag using Lynn Forsythe's video and I actually remembered to do all of the steps this time, lol. Some times I really have to shake my head at myself! Oh well, I'm entertaining if nothing else, lol. Okay enough about my feeble brain, I really just wanted to pop in and post the new tag, so here it is.
 I don't know but I think I like both of them, this one just has the few added extras. Well thanks for stopping by and having a peek!

Sunday, February 17, 2013

Good Evening all!

Since I didn't get to go on in Round 5 of the Ultimate Design Challenge at Swirlydoos I've had a little bit of time to catch up on things. I have been wanting to try Lynn Forsythe's "Farewell Technique" tag that she did a video on, which you can find HERE. So sad that Lynn has left the Swirlydoos Design Team to move on to other things, but I will be stalking her blog! So here is my version of Lynn's tag...
 So I was all pleased with myself for just zipping along on this and getting it done so quickly, when I suddenly realized I had forgotten a few steps. I had totally forgot to cover the tag with torn book pages and also forgot the lace and twine bow underneath the large flower. You'd think by now I would learn to watch the video again before I try someone else's technique - duh, blonde moment! I still like the way the tag turned out but I am in the process right now in doing another one and making sure I do all the steps this time, lol. The small rosebuds I made myself and I cut the leaf flourish on my Cricut machine. You can check out my "Rosebud" tutorial HERE. Anywhoo...thanks for stopping by and having a peek! 

Friday, February 15, 2013

Swirlydoos Round Robin Card Challenge

So unfortunately I didn't  make it into week 5 of the Ultimate Design Challenge over at Swirlydoos but I sure had fun with the first four challenges, it really pushed me out of my comfort zone. Thanks for a fun time Krissy!

So it was my week for team 4 of the February 2013 card challenge. We got three twists for this challenge and had to do at least one of them. Here's the information for the challenge
Twist 1 You had to use at least one of the three colors - white, blue and brown and you could not use any other colors on the card except for maybe green from leafs of your flowers.
Twist 2 You had to use either glitter, bling or pearls on the card.
Twist 3 You couldn't make a square card.

I checked out Patty's (who's card I was following)  card  and got started. So there I was whipping along with my card and thinking how quick I was when suddenly I'm like "Oh S__t", I hadn't used any of the colors we were suppose to use. Oh well, that card just became my dh's Valentine card, lol. So off to my paper stash to collect the paper colors I needed and I think I got all of the twists, on this card. There is glitter on the card and also blue rhinestones for bling, I used the white, blue & brown colors and the card is more of an oval shape. So here's my card!
I also wanted to show you Patty's card that I had to follow!
 
 So thanks for stopping by and I love hearing your comments. Have a great weekend!

Thursday, February 7, 2013

Swirlydoos Ultimate Design Challenge Week 4

So excited that I made it to week 4 in the Ultimate Design Challenge at Swirlydoos. So this week the challenge is using mixed media on a canvas. I did my first one but I was not really happy with it so I redid it (thank God for Dollar store canvases, lol). So this is what I came up with.

 So first is used three glimmer mists in blue, pink and green. When they were almost dry I used my Prima Peacock feather mask and molding paste on it. I didn't realize this before but when you add molding paste to a damp canvas it will suck up the color from below, which made the colors on the feather look very cool. Then I added some glass bead gel to three corners of the canvas and let that all dry. While these were all drying I took some cheesecloth and sprayed it with the same glimmer mists and set that off to the side to dry. 


 So while that was drying I cut out some angel wings on my Cricut machine out of some Tim Holta grunge board and then embossed them. I painted them with white acrylic paint and when that was dry I used Inka Gold Steel Blue and Green-Yellow and just rubbed that over with my finger and then dry brushed some blue Gelato's over the wings. The embossing and painting doesn't show up that well in the photo but it looks good IRL. When that was all dry I glued them and a gold heart (from a pair of earrings which I got from the dollar store) to the top left corner.

Now that the canvas was all dry I took some Glossy Accents and painted that on the area I wanted to put the cheesecloth on and then laid that down to dry. I then printed out my saying on the computer and cut it out and laid it down over the cheesecloth once it was all dried. I took just a bit of gesso on my finer and kind of rubbed it over the glass beads in the corners and then dry brushed that with some blue Gelato's.  I think I covered all of the steps here, lol. 

So I thought I'd show you my first canvas I did which I decided to use for a photo of my daughter when she was 16 mo old. I didn't use enough molding paste for my peacock feather and i used gesso to stick my cheesecloth down with and I also didn't pre-spray my cheesecloth so it didn't pick up enough of the glimmer mist when I sprayed it on. I think my second try looked a lot better, lol. So here it is....
I'd love to hear your comments on them. I'm keeping my fingers crossed that I make it to week 5 but I'm not real confident as the others are all so talented. I'm pretty happy that I made it this far but I sure would like to win that prize! TFL! 

Sunday, February 3, 2013

Finnabair Style...

I'm sure everyone knows who Anna Dabrowska/Finnibair is and her style of scrapping. I love her work but my style of scrapping isn't anything close to what she does but I thought I would give it a try. So here's my masterpiece, lol.
I bought the canvas from the Dollar store - I love that place, you can buy something and if what your doing with it doesn't really work out, well you haven't lost a great deal of money! So to start I decided to use my brick mask on the canvas. Instead of using gesso or molding paste I decided I'd use some Liquitex glass beads. If I'd been really smart I should have read the label first to see that it dried transparent, not the beads but the paste. So to fix that I just took some gesso and a paint brush and painted over the beaded bricks. Once that was all dried I sprayed everything with glimmer mist in "Sunflower", "Tuscan Sun", and "Lily Pad". After a few layers of that I decided to try spraying some "Juniper" glimmer mist - bad idea, it was to dark for what I wanted. The canvas looks a lot brighter IRL than what it looks like here but it would have been much better if I had left off the "Juniper" mist.

While all that was drying I dug into all of my scrapping stash and pulled out all sorts of bits and bobs I could use on this canvas. I also remembered I h ad some metal Prima flowers which would be perfect to use on this canvas. I even used the metal tabs off of the pop cans and pulled out some old jeans I have in my sewing room for doing repairs with a cut the zipper pulls off of all of them. I decided to use this B&W photo of  my daughter that her friend took (I'm sure everyone must be getting sick of seeing these photos by now but I love them, lol) and basically figured out where I would place it and then moved it off the canvas and started laying all the goodies down. I sprayed more glimmer  mist over everything and once it was all dried I glued my photo down. I liked it but still felt it needed something else - like maybe  more bits & bobs. I decided to show it to all of my Swirly sisters at "Swirlydoos" to see what they thought. Well they all agreed that they liked it but yes it needed more "stuff" laid down, overlapping the photo and on top of other pieces. So below is what the canvas looked like before I added more goodies. I think you'll probably agree that the top one looks much better. Some of the girls also suggested maybe putting some gesso over some of the goodies so they would pick up more of the glimmer mist and I think I'll try that out next time. It was a lot of fun to play with something so outside of my comfort zone. I'd love to hear your comments - TFL!


Friday, February 1, 2013

Ultimate Design Challenge Week 3 - Metal Foil Tape

So I made it through to week 3 in the Ultimate Design Challenge over at Swirlydoos. This weeks challenge was from Design Team member Miranda Edney to use Foil tape. This stuff is amazing to work with and just looks so cool, like real metal or you can use inks on it, just so many ideas. You can find Miranda's tutorial on how to use this tape here: Foil Tape Tutorial You really do need to stop by the Swirlydoos forum to see everyone's projects, they will take your breath away!

After playing around with the tape a bit I decided to make a picture frame to go with a photo I have of my dh on his Harley to give to him as a Valentines/Anniversary gift. I wanted to use chipboard letters for the title on the frame but when I tried it the foil tape I had was a thin gauge so it tended to tear when trying to push the tape down on the letters. So instead I used alphabet stickers which gave the same effect just not so deep. I used a crisscross embossing folder on the tape on the botto0m right and top left of the frame. Then I took 4 small metal gears that I had and put two on each side and covered them with the foil and used my stylus around the gears. Beside the crisscross metal pattern on the top of the frame I laid down some mesh ribbon (like you would use for making Christmas wreaths) and laid the tape down over that and used my bone folder and ran it back and forth across it to pick up the mesh pattern. I used a spider web embossing folder for the top left corner of the frame. For the other areas I just used my stylus to make the different patterns. After the frame was all done with the foil tape I covered it with black paint (as shown  in Miranda's tutorial) and wiped it off so that the black paint was left in the cracks and crevices of the tape. I really like how it turned up ad once I got the photo in it I think it looked even better. (As she pats herself on the back, lol) I really hope that my dh likes it as much as I do. I hope you stop by Swirlydoos and check out the challenge! TFL  

Thursday, January 31, 2013

Guest Design Spot at OUAS

So for February 2013 all of the Meg's Garden design team are guest designing at Once Upon a Sketch. Here is all the information for this months sketch:

The month of February is the month we celebrate St Valentine's Day here in Australia and in many parts of the world. Love takes on many forms..relationship love, parental love etc etc. So let's think about what the above quote can mean and how you can interpret it on a layout. You are free to scrap about any kind of love you wish however you like based on the following sketch. 

Ideas for journalling: love for your partner, family , parents ,siblings , children, work, students, craft, music, extra curricular activities. Whatever it is that you connect LOVE with. 


Your layout must incorporate this theme and the sketch below. 

Please make sure that we see some sort of journalling on your layouts and please tell us where your journalling is . You are allowed to journal in any language but please tell us where on your page we will find your journalling. Remember journalling has to be a bit more than a title, or a generic comment. Hidden journalling is perfectly fine.
Nadia always has such beautiful sketches. I used the beautiful "French Bird Cage" paper for this layout, I thought it would be perfect for this photo of my daughter. I also used one of the pretty White Gardenias from Meg's Garden in between two of my handmade flowers. I really like the way the layout turned out.
 

Saturday, January 26, 2013

DT layout for Meg's Garden


I love these beautiful papers from Meg’s Garden and thought they would be perfect for this photo of my daughter. I distressed all papers with my distress tool. For my paper layers under the photo I used a piece of “French Bouquet” paper approximately 7¼” x 3½” and glued the white lace down the right side of the paper. The next 4” x 2” piece of paper was cut from the 4” bottom strip of the “Ma Fleur Rose” paper using the scroll frame piece which I glued down about an inch down from the top of the other piece. I cut the perfume label from the “French Bouquet” paper and glued that down as shown. I then laid my photo down over top of these layers.

I took one of the white gardenias and used my purple ink to color it and glued it down and used two of the green leaves to slip under either side of the flower as shown and then glued down the lilac and lavender flowers and the small pink rose buds on either side of the large flower. I tore in on one side of the background paper and used a small piece of mauve cardstock behind the torn area and glued down a small purple rosebud as shown by the tear. I then laid the pink crystal and pearl flourish on the left side of the layout. I printed out two butterflies and used glossy accents on both of them for some strength & shine and glued them down as shown. I then cut out my title with my Cricut machine and laid that down. Here's a closeup of the flowers.

Materials Used from Meg’s Garden

Paper – P6251 Blue Paradise
             P6296 Ma Fleur Rose
              3400 A French Bouquet
Lace     - L2920 White Lace
Flowers- gar wh White Gardenias
-          Lilac & Lavender Paper Roses
da810 Green Leaves
 
Don't forget to stop by Meg's Garden and checkout the beautiful new papers by Denise Ann, "Ode to a Summers Day" ! The Design Team will be showcasingthis collection over the next few months. Thanks for stopping by and having a look!

Thursday, January 24, 2013

Ultimate Design Challenge Week 2

Okay so I didn't get an email from Swirlydoos to say I was eliminated in round 1 so I got to enter the Week 2 challenge.

If you were eliminated in round 1, you would have received an email early this morning. If you did not enter round one you have been eliminated. If you entered round one and did not receive an email early this morning then you are IN IT TO WIN IT! GOOD LUCK!

Your SECOND challenge is issued by Swirlydoos Designer Rachel Moses and the challenge is:
"To create a scrapbook page or card using the PAPER LAYERING techniques shown in Rae's video  below"

Here, Rae shows us an example of a layout she completed using multiple paper layers and distressing techniques. You may follow along and create something along these lines, or feel free use your own creative license to show us what amazing paper layering concepts you have hiding within your self!
http://youtu.be/3qxlo9szY0s
So below is my layout for week 2. I think I have about 10 layers here (unless you count the photos, then it's 12). These are photos of my grandchildren one taken  in 2006 and the other taken this past November. I'm feeling really old all of a sudden, lol. I used the papers from the Swirlydoos "Belle Chanson" kit. I love the teal color in this kit. Krissy just coordinates these kits so well! 

I  just realized after I had finished my layout that I had given it the same title as I had on the layout I did of my son (their Dad) and his cousin. Oh well, that's okay, lol.