

Wednesday, March 14, 2012
Day Three At Websters Shipping Party!
Tuesday, March 13, 2012
Websters is having a party!!

Sunday, March 11, 2012
My Shabby/Chic Funky side...
Well I think that's what you would call it, lol. My daughter's friend, who is becoming a photographer, keeps getting my daughter to do photo shoots with her to add to her portfolio. My daughter always gets all done up for these shoots and I absolutely love the photo's her friend takes. Make's me think my daughter has lost her calling and should become a model, lol. As soon as I saw these two photos I just knew I had to scrap them and immediately knew the kind of layout I wanted to do and these new papers from Bo Bunny's "Weekend Market" collection, Graphic45's "Olde Curiosity Shoppe" and TPC Studio's "Memory Lane" were a perfect choice! I love it when I can find papers from different manufacturers and they work so well together.
I did quite a bit of distressing and inking on the "Moments in Time" piece of paper. I used Tim Holtz Distress ink in four different colors - tumbled glass, peeled paint, bundled sage and brushed corduroy all over different areas of the paper. On the Graphic45 paper I cut out the corner that had the clocks, shelving and old fashioned boot and peacock feather on it. I did some fussy cutting around the boot, feathers and flourishes on the right side of this piece. You can't really see it that well in the photo, since I added one of the real peacock feathers that I bought on eBay to the layout, but when you look at it in person you can. I also added these pretty Prima roses and flourish bling to the bottom right corner.
On the bottom left I took one of the latches from the Tim Holtz grunge board I had and painted it with some Crackle Paint in vintage photo and attached it with some little metal brads. I used a Tim Holtz's ornate plate and printed the word "Beauty" off on my computer on some cardstock which I used some distress vintage photo ink on the edges of it before adding it to the plate. I also had this pretty white vintage look lace that I used some vintage photo distress ink on and put that behind the photo and that just seemed to finish the layout perfectly. So here's the finished layout, I hope you like it as much as I do - and please leave a comment and let me know.
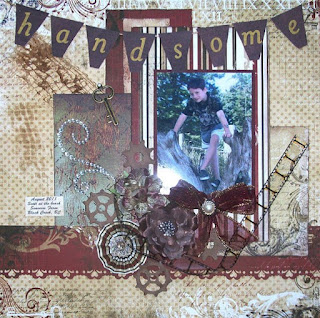
 On this next layout I used the Bo Bunny and Graphic45 papers again. I didn't really do any distressing on these papers but I did do a little bit of fussy cutting on the Graphic45 piece of the lady with the key on her back just around the bottom corner of her skirt. I also cut out the "Olde Curiosity Shoppe" sign from the paper to put on the bottom of the layout and popped it up with some foam squares. The old key and key lock I had in my stash. I took one of the flourishes from Tim Holtz grunge board and painted it with "Picket Fence" crackle paint and then used a bit of vintage photo distress ink around the edges of the flourish.
In my stash I have some of the plain flowers in different sizes that you can apply your own color to and I took one of the large ones to color. I took some vintage photo distress ink to color it with and once it dried I folded it in half and used a small glue dot to hold together. I then painted it with a thin coat of some "Diamond" stickles using a small paint brush to give it a bit of sparkle. I layered this underneath the other Prima flowers that I had on the corner of the photo. The saying "A Natural Flair" I cut out of the Graphic45 paper and popped it up with foam squares. The two cards with the old fashion dressed women were in my stash and I believe they are from one of the old Graphic45's papers. If anyone knows for sure please leave me a message in the comments section. I had this little strip of gold trim in my stash and it really wasn't big enough for using on any of my other layouts but it just happened to be a perfect size to put down the side of the paper with the woman on it. See, I knew there was a reason for not throwing it out, lol. I added one of Prima's pretty butterflies to the layout and that just seemed to finish it off perfectly. So here's the finished layout, please let me know what you think by leaving a comment.

Thanks for stopping by and I hope you have a great week!
I did quite a bit of distressing and inking on the "Moments in Time" piece of paper. I used Tim Holtz Distress ink in four different colors - tumbled glass, peeled paint, bundled sage and brushed corduroy all over different areas of the paper. On the Graphic45 paper I cut out the corner that had the clocks, shelving and old fashioned boot and peacock feather on it. I did some fussy cutting around the boot, feathers and flourishes on the right side of this piece. You can't really see it that well in the photo, since I added one of the real peacock feathers that I bought on eBay to the layout, but when you look at it in person you can. I also added these pretty Prima roses and flourish bling to the bottom right corner.
On the bottom left I took one of the latches from the Tim Holtz grunge board I had and painted it with some Crackle Paint in vintage photo and attached it with some little metal brads. I used a Tim Holtz's ornate plate and printed the word "Beauty" off on my computer on some cardstock which I used some distress vintage photo ink on the edges of it before adding it to the plate. I also had this pretty white vintage look lace that I used some vintage photo distress ink on and put that behind the photo and that just seemed to finish the layout perfectly. So here's the finished layout, I hope you like it as much as I do - and please leave a comment and let me know.

In my stash I have some of the plain flowers in different sizes that you can apply your own color to and I took one of the large ones to color. I took some vintage photo distress ink to color it with and once it dried I folded it in half and used a small glue dot to hold together. I then painted it with a thin coat of some "Diamond" stickles using a small paint brush to give it a bit of sparkle. I layered this underneath the other Prima flowers that I had on the corner of the photo. The saying "A Natural Flair" I cut out of the Graphic45 paper and popped it up with foam squares. The two cards with the old fashion dressed women were in my stash and I believe they are from one of the old Graphic45's papers. If anyone knows for sure please leave me a message in the comments section. I had this little strip of gold trim in my stash and it really wasn't big enough for using on any of my other layouts but it just happened to be a perfect size to put down the side of the paper with the woman on it. See, I knew there was a reason for not throwing it out, lol. I added one of Prima's pretty butterflies to the layout and that just seemed to finish it off perfectly. So here's the finished layout, please let me know what you think by leaving a comment.

Thanks for stopping by and I hope you have a great week!
Saturday, March 10, 2012
Time to Spring Forward!
Well the weather outside isn't very spring like today - crazy winds and rain again. But never the less we have to remember when we go to bed tonight to change the clocks ahead by 1 hour. It sucks that you lose an hours sleep but it's good because it will stay light longer - Yeah! I love when Spring and Summer comes and you get to be outside longer enjoying the sun shine. I'm one of those people that when it's dark I figure I should be in bed sleeping, lol. All I can say is "SPRING - Bring it on!!"
Well as my sister said "It was only a matter of time" until it happened. What you say? Time to do a layout on one of my daily routines. My daily trip to Starbucks to get my "Frapachino" fix - not one of the coffee flavored ones (yuck - I hate coffee) just the chocolate cream based ones. I won't even tell you how much chocolate is in it - but lets just say if I stopped going to Starbucks everyday for one of these I could probably lose about 10 lbs, lol.
I decided to do this layout with some of the papers I had in my stash from the Scrap Cake, their Spring Awakening" collection. I did a bit of fussy cutting of the flowers from one of the papers and popped them up with foam. Then I took one of the blue papers and did some punching on that one to frame my delicious drink (I know I'm sad, lol), and just a strip of the stripped type of paper from the collection behind that and notched it out at either end.. After looking at the paper for a bit I decided to cut out some squares from a couple of the other papers and place them down the side of the page to make kind of a diamond row in the plaid - I think it looked kind of cute and I added some little pink satin roses on the blue squares. I added some Prima flowers and some other little satin roses to one of the fussy cut flowers, added a bow of light mint green organza ribbon. I added one of the coffee sleeves to the layout. I've had these little tiny blue flowers in my stash like forever and I thought they would be perfect to just kind of dot them around the layout and it just gave the layout that little something extra. So here it is....the "Great Frapachino" layout!

I'm thinking I can hear my daughter now saying "Mum, you need to get a life!" - hey when you get to my age it's the little things that make me happy, lol. I still have a couple of other layouts to post but I think I'll do that later or probably more like tomorrow. So have a great evening all and TFL!
Friday, March 9, 2012
Happy Friday Everyone!
Well it seems I have quite a few layouts that I've done but haven't posted yet. I really don't know where the days go to - it seems like one minute it's Monday and all of a sudden it's Friday again. This never happened when I was working outside the home, it seemed like forever before the weekend would come, lol.
We finally got some snow here last week. I was so happy because I've been dieing to use these Bo Bunny "Snowfall" papers again. We only got about 5 or 6 cms but it was such wet snow it just made all the tree branches hang down from all the weight of it. In this layout below you can see how the poor branches on my laurel hedge are almost touching the ground. Normally I can't see any of my neighbors homes because our hedge is so high, but not that day. These pics are looking out to our side yard and backyard. These Bo Bunny papers are just so pretty you really don't have to do a lot to dress them up. On this one I took a duplicate piece of the "Words"paper and cut out the "Snowfall" word from it and popped that up with foam on the other piece. Then I cut a circle out of the "Wintertime" paper and laid that down and before taping it down I took a couple of narrow strips from some of the other papers from this line and punched one side with my snowflake punch and also a couple of strips from Little Yellow Bicycle's "Snowy Window" paper and did the same thing and layered them off one side and the top of the circle. I also used the LYB blue paper to mat my photo's. I cut out a couple of snow flakes with my Cricut machine and popped them up on the page with foam dots, added a few small Prima flowers and some glittery foam snowflakes I had in my stash and that was it - not a whole lot of things but you really don't have to with these papers and they still come out so pretty! So here's the finished product. Remember you can click on the pic to see a larger version of the layout and then just hit your back button to return to this page.
 My son was up at Whistler Mountain (where they had the 2010 Olympics) a couple of weekends ago with his girlfriend to go snowmobiling. So of course I had to snag this photo of him so I could do another layout with the Bo Bunny paper, lol. This is my scrap lift of Angelica's (Swirlydoos) "Mystical Winter" layout.I had to improvise here and there as Angelic was using the kit from Swirlydoos and I was just using goodies from my own stash as I haven't started buying the Swirlydoos kits yet but I don't think it turned out to bad. I did a lot of layering and distressing of the papers and a view little "peek a boo" spots where I put some punched paper popping out underneath the rolled edges of the brown background sheet. I think Angelica's layout was awesome and I really enjoyed lifting her layout here. Here's my finiahed piece.

Well I think I'll post the other layouts that I have done tomorrow - don't want to go overboard and bore you to death here, lol. Remember I love to hear your comments! Have a great evening all!
We finally got some snow here last week. I was so happy because I've been dieing to use these Bo Bunny "Snowfall" papers again. We only got about 5 or 6 cms but it was such wet snow it just made all the tree branches hang down from all the weight of it. In this layout below you can see how the poor branches on my laurel hedge are almost touching the ground. Normally I can't see any of my neighbors homes because our hedge is so high, but not that day. These pics are looking out to our side yard and backyard. These Bo Bunny papers are just so pretty you really don't have to do a lot to dress them up. On this one I took a duplicate piece of the "Words"paper and cut out the "Snowfall" word from it and popped that up with foam on the other piece. Then I cut a circle out of the "Wintertime" paper and laid that down and before taping it down I took a couple of narrow strips from some of the other papers from this line and punched one side with my snowflake punch and also a couple of strips from Little Yellow Bicycle's "Snowy Window" paper and did the same thing and layered them off one side and the top of the circle. I also used the LYB blue paper to mat my photo's. I cut out a couple of snow flakes with my Cricut machine and popped them up on the page with foam dots, added a few small Prima flowers and some glittery foam snowflakes I had in my stash and that was it - not a whole lot of things but you really don't have to with these papers and they still come out so pretty! So here's the finished product. Remember you can click on the pic to see a larger version of the layout and then just hit your back button to return to this page.


Well I think I'll post the other layouts that I have done tomorrow - don't want to go overboard and bore you to death here, lol. Remember I love to hear your comments! Have a great evening all!
Update on Ribbom Carousel prize
So I'm on Facebook yesterday just reading through all the posts of friends and I come across Canadian Scrapboooker's post and they were announcing the winners for the contest that I posted about the other day. So there I am reading and lo and behold there's my name! To say I was surprised was an understatement - I mean I never win anything and this was my second time of winning something in less than week. I didn't win the top prize of this ribbon rack but I did receive a years free subscription to Canadian Scrapbooker - which is awesome! So thank you Canadian Scrapbooker mag!
Last week I joined UStream video so I could watch the Prima show every Thursday and join in on the chat as the demonstration was going on. Apparently at the end of each show/class they give away a prize (no idea what the prize is) and guess what...I was the name chosen! So that was my first win and the free subscription was my second. So you know how they always say things happen in three's? I figured I should go buy a lottery ticket, so that's just what I did. ;-) Well when I was at the grocery store this morning I figured I'd check my ticket for the 649 lotto draw last night. Okay all of a sudden I hear the music from the machine that comes on when there's a winning ticket - so I won...a big $10, lol. I should have specified to the Loto God's that I wanted to win the big one - oh well at least I won something and I still have another ticket for tomorrow's Loto Max which I believe is up to $40 Million.
Well I best get off to bed now, I just had to share the news. I've got some new layouts that I did to post ere so I'll try and get that done tomorrow. Thanks for stopping by!
Wednesday, February 29, 2012
Big Giveaway at Canadian Scrapbooker & Ribbon Carousel!!

Okay you have to stop by Canadian Scrapbooker's blog here: CS Blog and Ribbon Carousel's blog here: RC Blog for two chances to win this awesome prize pictured at the top - imagine having this awesome carousel to hold all your ribbons in your own scrappy place! I know I would and I've entered so pop on over and do the same thing - you can't win unless you try! HAVE A GREAT DAY!!
Wednesday, February 22, 2012
Cute & Vintage Photos
Don't you just love looking at photos of babies and young kids. My friends cute little niece is just so photogenic (unlike me, lol) and she had taken this cute photo of Lucy and I just had to scrap it for her scrapbook. Little ones expressions are just so adorable and this one is definitely adorable! I think these papers from My Minds Eye "Follow Your Heart" collection just went perfect with this photo. The yellow in the papers seemed to draw out the yellow in her shirt perfectly. I did a bit of punching with a heart punch on some of the paper and layered and distressed it. On the top part with the tear I used a small white doily which I added some "Broken China" Distress ink to behind the tear and then placed a pretty yellow distressed Prima rose to it. The other flowers are all Prima ones except for the teal one with the light blue center, I made this using the water distressed technique and added the little tiny Prima blue rosebud to the center. I cut out a couple of kites to match the kites in the paper and popped them up with foam. On one of them I used some rub on's to show Lucy's age at the time when the photo was taken. After placing and before gluing everything down I felt the layout still needed something. So after playing with it a bit I printed out a smaller B&W version of the photo and framed it with some green glittered chipboard that I had, and a little bit of bling and that seemed to just finish the layout off perfectly.

I love old vintage/heritage photos and like to collect some of the freebie ones I have found on the internet. Still trying to keep to my plan of using up papers from my stash I thought these three pretty vintage ones I had would go perfectly with these papers I had leftover from my Nov 2010 LE kit from "My Creative Scrapbook". The idea I had in mind for this layout, I thought, would go great with the February Sketch challenge at My Creative Sketches. I'd really love to win the sketch challenge as the prize for this month is a nice bunch of Prima goodies - now who wouldn't want to win Prima goodness, lol! I didn't stray to far off of the sketch and I had done a bunch of fussy cutting of some flowers from one of the papers from this kit so they worked out perfectly for me to use on this layout. I used this big yellow Prima Flower for the bottom right corner and some Prima bling across the center of my ribbon and I cut the title out with my Cricut machine. I was quite pleased at how it all turned out when I was finished. So here is my finished project. Thanks for stopping by and having a peek!


I love old vintage/heritage photos and like to collect some of the freebie ones I have found on the internet. Still trying to keep to my plan of using up papers from my stash I thought these three pretty vintage ones I had would go perfectly with these papers I had leftover from my Nov 2010 LE kit from "My Creative Scrapbook". The idea I had in mind for this layout, I thought, would go great with the February Sketch challenge at My Creative Sketches. I'd really love to win the sketch challenge as the prize for this month is a nice bunch of Prima goodies - now who wouldn't want to win Prima goodness, lol! I didn't stray to far off of the sketch and I had done a bunch of fussy cutting of some flowers from one of the papers from this kit so they worked out perfectly for me to use on this layout. I used this big yellow Prima Flower for the bottom right corner and some Prima bling across the center of my ribbon and I cut the title out with my Cricut machine. I was quite pleased at how it all turned out when I was finished. So here is my finished project. Thanks for stopping by and having a peek!

Tuesday, February 21, 2012
Graphic 45 Design Team 2012 Audition
Well they say you'll never know unless you try, so.....as you can read from the title of this post, I'm trying out for the 2012 Design Team for Graphic 45. The following are some of my projects that I have created that, I hope, will show the type of layouts I am able to create.


Thanks for stopping by and I hope you'll keep your fingers crossed for me! :-)
Tuesday, February 14, 2012
Happy Valentines Day!
Well I hope everyone is enjoying their day today! I just thought I'd pop in between the goings on today to post a new layout I did of this funny photo of my daughter that her friend took while they were shopping last week. As soon as I saw it I new had to post it. Usually when I'm doing layouts it sometimes takes me a little bit to come up with just the right title for it, not this time though, it came to me right away - "Incognito"! All of the papers and goodies are still from my June 2011 LE Kit from My Creative Scrapbook - and I can't believe I still have lots more of this kit to use up still! I did a little bit of fussy cutting of the small green flowers and the strip down the left side of the layout and some distressing on the layers. I think it came together quite well (she says after patting her own back, lol). Thanks for stopping by and have a great Valentines evening!

Saturday, February 11, 2012
Yeah, the weekend is here!
Well I don't know where my heads been at. I thought I was more or less up to date on posting some of my layouts but I guess not since I have four of them to post today, lol I guess I was to busy checking out everyone else's work on their blogs and doing blog hops, I forgot all about mine.
When I was down visiting my friend in Portland her sister asked me if I could do a scrapbook for her on little Lucy (her granddaughter in my earlier 2 layouts). I got a few photos of her to start with so these following two layouts are for this scrapbook.


Finally at the end of January we got a snowfall of sorts (all of about 3 inches) so I could finally use some more of my Bo Bunny Snowfall collection. I am totally in love with these papers, they are just so yummy!! Luckily I took a photo of the snow through the sliding glass door in my scrap room out to the sundeck while it was snowing as it started rainy later in the evening and washed it all away. That's the kind of snowfall I like, lol. I made the flowers myself out of the same papers and cut the title on my Cricut machine.

This last layout I did last night for a challenge over at My Creative Scrapbook. We had to scrap a photo of ourselves and incorporate 3 hearts and 2 handmade flowers into the layout. I really had to dig through my photo's to find one of me that looked somewhat decent. I hate my picture being taken because they all look so terrible. I figured I good use that fact in my layout to use one of the hearts I had to have in the layout. I cut the title and sub title out on my Cricut after taking it into the Cricut Design Studio to weld the letters together. The pink flowers I made using hydrangea petals that I had and misting them with water and twisting the petals, let them dry and then layered three together. The teal ones I made using an SVG file I made so I could cut it on my Cricut along with the swirly thingy around the photo. I used my June 2011 LE Kit from My Creative Scrapbook. This kit contained papers and embellishments from the Crate Paper "Portrait Collection" which worked out perfectly for this layout. I still of tons of stuff left in this kit to make more layouts - Pam really packs these kits full of so many goodies! Anyway here's the layout, I hope you like it and thanks for stopping by!

Monday, February 6, 2012
Happy Monday!!
I know, you're all saying "Since when are Mondays happy?" - lol. Well today has been absolutely gorgeous here in Campbell River, Beautiful blue skies, not a cloud insight - I even managed to get a head start on all of my spring cleaning by taking all my blinds down in the kitchen and taking them outside to wash and hanging up to dry and then all hung back up - I'm feeling pretty good about that. I just love it when I can get back outside when the weather gets nicer like this - bring on Spring I say!
Another great thing about today is I found out that Websters is doing another give away on their blog. This time they are giving away the whole "Everyday Poetry" collection, including paper, flowers trim, bling and embellishments! Now wouldn't that be a great collection to win? All you have to do is pop over to Websters blog and leave a comment about this new collection. Here is a link to their blog: Websters Blog Below is a picture of the collection, you can click on the picture to see a larger view of the kit. Have a great week everyone!

Another great thing about today is I found out that Websters is doing another give away on their blog. This time they are giving away the whole "Everyday Poetry" collection, including paper, flowers trim, bling and embellishments! Now wouldn't that be a great collection to win? All you have to do is pop over to Websters blog and leave a comment about this new collection. Here is a link to their blog: Websters Blog Below is a picture of the collection, you can click on the picture to see a larger view of the kit. Have a great week everyone!

Sunday, January 29, 2012
Lazy Sunday
Well it's one of those drizzly, cloudy days that you really don't even want to get out of bed for, lol. My MS has really been acting up this past week and the fatigue is quite bad.I didn't even get out of bed yesterday until about 10 am and then I had to go lay down at noon and fell asleep for a good 2 hours. By the time a did a few things and got dinner made and eaten I was back in bed at 7:30pm last night and didn't get up this morning until 9am. Now it's only about 2:15 pm and I could really head back to bed - I hate it when this fatigue takes over and it usually means that something bigger is going to happen with the MS. I've already been having stupid vertigo if I move to fast and really don't need anything else happening. Oh well, can't do much about it I guess. :-(
I did manage to get another layout done of my friends cute little great niece that I took when I was down in Portland visiting this past November. She is just such a cutie I couldn't resist doing another layout of her. She was just so cute playing in this upside down wicker table and some plastic containers - who needs fancy toys when you have all that, lol! I used some of my left overs from the March 2011 LE Kit from My Creative Scrapbook featuring Websters "Spring Market" collection. I did some layering and distressing and took a duplicate piece of the paper and did some fussy cutting of the signs etc in the bottom left corner and of the vellum in the top right corner. The banner I made using some of the cross grain ribbon from the kit and the Websters Storyteller Alpha stickers - these alpha stickers are great, they come in so many colors and fonts that you can use them with any layouts your doing! The little bouquet of flowers and the fabric pink and white one are from Prima and were included in this kit. I hope you like the layout and thanks for stopping by!

I did manage to get another layout done of my friends cute little great niece that I took when I was down in Portland visiting this past November. She is just such a cutie I couldn't resist doing another layout of her. She was just so cute playing in this upside down wicker table and some plastic containers - who needs fancy toys when you have all that, lol! I used some of my left overs from the March 2011 LE Kit from My Creative Scrapbook featuring Websters "Spring Market" collection. I did some layering and distressing and took a duplicate piece of the paper and did some fussy cutting of the signs etc in the bottom left corner and of the vellum in the top right corner. The banner I made using some of the cross grain ribbon from the kit and the Websters Storyteller Alpha stickers - these alpha stickers are great, they come in so many colors and fonts that you can use them with any layouts your doing! The little bouquet of flowers and the fabric pink and white one are from Prima and were included in this kit. I hope you like the layout and thanks for stopping by!

Thursday, January 26, 2012
Websters New Paper Pads
Have you been over to Websters blog and seen their new "Paper Pads"? PETITE PAPER PADS are back in all of their new lines! That's right, they've got the same gorgeous designs you see in 12x12 form all sized down to 6x6... The 6x6 papers give you a great assortment so you get more than one collection per pad. Take a look at this one, SUNDAY PICNIC and EVERYDAY POETRY:

And the other one has three lines in it, GAME ON, PALM BEACH and IN LOVE:


And the other one has three lines in it, GAME ON, PALM BEACH and IN LOVE:

Gorgeous, right?
But that's not all. Because these scaled down versions of their papers are so popular, they've decided to create a brand new product this year, PERFECT MOTIFS.

This 18 page paperpad is LOADED with motifs from ALL FIVE COLLECTIONS! a NEW Product from Websters. If you'd like to read more about it you can check out the Websters Pages blog today! Websters Blog. I don't know about all of you but I'm thinking I need to win the lottery so I can buy all of the awesome new paper lines the manufacturer's are releasing for CHA! Thanks for stopping by and have a great day!
Wednesday, January 25, 2012
Trying to use my stash...
I'm trying really hard not to buy any new papers until I use up more of my stash. I figure if I want to buy some of the new lines that are coming out at CHA next month I better get rid of some of the stuff I have already - you know how us scrappers love to hoard papers, lol. So far I'm not doing to badly at using stuff up. Pam at My Creative Scrapbooks just packs her kits with so many goodies you can get so many layouts done with each kit and still have leftovers, which, if your joining a kit club is a good thing to know!
This first one I've done her is a photo of a friend of mine and myself that was taken at another friend's place on New Years Eve. She is such a great person and we always laugh when we get together, one of our things we always tell our other friends is that "For a couple of old broads, we don't look to bad!", lol. These papers are from the January 2011 LE Kit from My Creative Scrapbook. When I pulled out my piece of green background paper that I wanted to use for this layout I realized that my paper was short about and inch and a half so I thought I was pretty sneaky and got three other sheets of left over paper from the kit and punched them and laid them down on top of each other at the top of the layout to cover up the shortage - sometimes my brain actually works, lol. I did some fussy cutting of the flowers from one of the other sheets of paper from the kit for the bottom two corners and popped them up with foam. Included in this kit was this great package from Pink Paislee called "Artisan Elements" - they look like white chipboard but they have more of a plastic/rubber type feel to them and you can distress them, mist them, paint them and pretty much anything else you'd like to do with them. There are four corner pieces and then about 8 other circle shapes going from large to small - they are very cool looking. I decided I just want to leave mine white and I use that one to frame my photo. I did a bit of layering with the other papers from the kit and then used these pretty brown and red Prima flowers. Remember if you click on the photo you can see a larger view of the photo.
 This next layout I've used a photo of myself and My friend's cute little great niece, Lucy, that I finally got to meet when I was down visiting in Portland. She was so cute when she was leaving to go home she was waving to us and saying "Bye Gramma's". I think because her real Gramma (my friends sister) and my friend and I are all blonde she figures anyone older with blonde hair is a Gramma, so funny. I used the Feb 2011 LE kit for this layout - I've still got some left over even after doing this one, lol. I just love this collection "Once Upon a Springtime" from Graphic45! I just love all the cute little fairies in this collection so I did a lot of fussy cutting of the fairies from the paper plus the flowers. I did some layering and distressing and added Prima flowers that came in the kit as well as some I had in my stash. The white flowers I made but for the centers I used some tiny Prima rose buds that I had in my stash. I also added a little bit of white picket fencing that I had in my stash. It really took me about two days of playing around with this layout before I was finally happy enough with it to start gluing and taping things down. So here is how it turned out, hope you like it and remember I love to hear your comments! TFL!

This first one I've done her is a photo of a friend of mine and myself that was taken at another friend's place on New Years Eve. She is such a great person and we always laugh when we get together, one of our things we always tell our other friends is that "For a couple of old broads, we don't look to bad!", lol. These papers are from the January 2011 LE Kit from My Creative Scrapbook. When I pulled out my piece of green background paper that I wanted to use for this layout I realized that my paper was short about and inch and a half so I thought I was pretty sneaky and got three other sheets of left over paper from the kit and punched them and laid them down on top of each other at the top of the layout to cover up the shortage - sometimes my brain actually works, lol. I did some fussy cutting of the flowers from one of the other sheets of paper from the kit for the bottom two corners and popped them up with foam. Included in this kit was this great package from Pink Paislee called "Artisan Elements" - they look like white chipboard but they have more of a plastic/rubber type feel to them and you can distress them, mist them, paint them and pretty much anything else you'd like to do with them. There are four corner pieces and then about 8 other circle shapes going from large to small - they are very cool looking. I decided I just want to leave mine white and I use that one to frame my photo. I did a bit of layering with the other papers from the kit and then used these pretty brown and red Prima flowers. Remember if you click on the photo you can see a larger view of the photo.


Sunday, January 22, 2012
Pion Design's Giveaway!

Fridday, Jan 21st was Pion Designs 1 year blog anniversary and they would like to celebrate with some wonderful blog candy! Here is what you need to do to have the chance to win the entire collection of From My Heart ll and From My Heart ll 6×6 is…
•become a subscriber to there blog (under “Follow Us” in the sidebar)
•write about their blog candy on your blog with their logo and link back to Pion Design
•last but not least, write a comment to on their blog post and tell them your favorite collection from Pion Design.
The winner will be announced 14th of February, on Valentines Day.
Good luck!
Saturday, January 21, 2012
On a roll!
I was in a bit of a scrapbooking slump for a few days. I kept looking at the photos I wanted to scrap and it seemed nothing was coming to me in the way of layouts. Finally after going to my LSS and finding these pretty Bo Bunny Christmas papers my brain actually got back into the swing of things, lol. This first layout I used the Bo Bunny Christmas papers mixed with some things I had left over from the Dec 2010 LE kit from My Creative Scrapbook. We have been having a yearly Christmas Eve gathering at our friends place since our kids were all babies. The kids are now 19 - 22 years of age but everyone still gets together even though some of us have moved and have other things going on. So it was great to be able to get together with everyone when I was down for Christmas - even some of the kids still come as they say they look forward to it every year.

This next layout I used a mix of different Websters winter papers. I did a lot of layering, distressing and popping things up with foam dots on this one, I was quite pleased at how it turned out. This is my daughter's silly dog looking up at the mantel because he wanted some more doggie treats out of his stocking, lol.
 On this next layout I used vellum and papers from Websters "Wonderfall" collection. They really went perfect with the photo since I was down visiting my girlfriend in Portland for Thanksgiving this past November. I did some fussy cutting and popping things up with foam dots on this layout. I made the white flowers with the peach centers myself, not that you can really tell very well in this photo the the centers are peach colored. My girlfriend and I have been friends since we were in grade three. I had started out putting the number 40 on this page until my ex-husband reminded me that it's been 50 years - how the heck I got so old I don't know, lol.

This next layout of my grandson and the one after were done following the January sketch over at My Creative Scrapbook Sketch Blog. I made the organza flower myself, it doesn't look perfect but I figured it wasn't to bad for my first attempt at one, lol. My grandson got Nerf dart gun for Christmas so of course the first thing he did was stick the darts all over his face, lol - he does love to make people laugh!

This next layout is of a photo of my girlfriend and I and her sisters going out to celebrate my birthday and one of her sisters birthdays while I was down visiting. I used some papers and goodies I had left over from my April 2010 LE Kit from My Creative Scrapbook. This just goes to show you how many layouts you can get done with these awesome kits that Pam puts together! I used some Rangers Ink, Stream, to dye the paper doily and since I had all this ink still on my non-stick craft mat I decided to dye some plain card stock with it to cut out my title with my Cricut. I made the pink flowers with the brown centers myself.

Well thanks so much for stopping by and I would love to hear your comments on my layouts. Have a great weekend!

This next layout I used a mix of different Websters winter papers. I did a lot of layering, distressing and popping things up with foam dots on this one, I was quite pleased at how it turned out. This is my daughter's silly dog looking up at the mantel because he wanted some more doggie treats out of his stocking, lol.


This next layout of my grandson and the one after were done following the January sketch over at My Creative Scrapbook Sketch Blog. I made the organza flower myself, it doesn't look perfect but I figured it wasn't to bad for my first attempt at one, lol. My grandson got Nerf dart gun for Christmas so of course the first thing he did was stick the darts all over his face, lol - he does love to make people laugh!

This next layout is of a photo of my girlfriend and I and her sisters going out to celebrate my birthday and one of her sisters birthdays while I was down visiting. I used some papers and goodies I had left over from my April 2010 LE Kit from My Creative Scrapbook. This just goes to show you how many layouts you can get done with these awesome kits that Pam puts together! I used some Rangers Ink, Stream, to dye the paper doily and since I had all this ink still on my non-stick craft mat I decided to dye some plain card stock with it to cut out my title with my Cricut. I made the pink flowers with the brown centers myself.

Well thanks so much for stopping by and I would love to hear your comments on my layouts. Have a great weekend!
Monday, January 16, 2012
Big Sketch Contest
My Creative Scrapbook hosted a 3 month long sketch contest at their sketch blog (you can find it here: My Creative Sketches) in which they supplied a sketch and everyone was to create a layout based on that sketch.The contest was October through December...and as usual Pam has given away the most awesome prizes! The sketches and the layouts I did based on these sketches are below.
Sketch #3:

My layout:

Sketch #2:

For my layout I turned the sketch on it's side:

Sketch #1:

My layout for this sketch is being published in "Scrapbook News and Review's" January issue so I am unable to show it here until Feb 15th, so I will post it then but I needed to get these all up
on my blog here so I could enter the final phase of this big sketch contest.

Thanks for stopping by and please leave a comment, I love to read them all - good or bad!
Saturday, January 7, 2012
I've fallen in Love!
No, not with another man - one is enough, lol. It's Bo Bunny's beautiful "Snowfall" collection....I love, love, love this line - even more than last years "Snowy Serenade" line. With all it's pretty glitter and snowflakes and shades of blues and browns, it's just so yummy! And of course I'm dying to get some pretty snowfall photos to scrap with it, but so far we haven't had any snow yet this winter - what the heck is that!? I know we don't get as much snow here on the West Coast of Canada as they do back east but we usually get at least one or two days by now. Even in Alberta they are having unusually warmer weather than normal. The good thing about Bo Bunny papers, I find, is that you can pretty much use any of their lines for any type of photo. So I sat looking at a photo of my daughter and I taken in front of her Christmas tree and the photo just didn't go with the usual red & green colors of Christmas paper. Then I noticed the blue walls behind the tree and it hit me - I can use this beautiful Bo Bunny Snowfall papers! Yay!
Since there were browns in the photo I wanted to make sure I used the papers with browns in them also. I wanted to use, for the main background paper, the "Snowfall-Chill" paper but I decided to cut the sides of the paper that surrounded the pretty glitter framed section and then use the "Wintertime" piece behind the cut out "Chill" paper. Now sometimes it takes me awhile to catch on to things but I finally decided that I should do what other scrappers do and cut out the center of the "Wintertime" paper that would not be seen behind the "Chill" piece. What a great idea, why waste all this pretty paper that isn't going to be seen by anyone! I was then able to use the blue & white side of this cut out piece as one of my layers behind the photo.
So I used a piece of the Wintertime cut out and a piece of the "Snowdrift-Stripe" paper to layer behind the photo. I distressed the edges using my distress tool and then inked the edges with some blue ink that I had. I had a really pretty piece of blue with white polka dot ribbon that my granddaughter had given me for Christmas, so I took that and folded it and gave it a tail at either end and placed the edge of it just under the stripped paper. I then used this very pretty white sheer flower from Prima along with the pretty blue handmade flowers I made using my friend Paulien Van Den Bosch's tutorial to put in the left hand corner of the photo. I added a couple of white satin leaves and white satin rosebuds to the cluster. Added a blue glitter snowflake to the layout and added my title and there it was - my first layout with this beautiful paper line and no snow in the photo at all!

I decided I would scrap another Christmas photo with this same pretty Bo Bunny paper using this cute photo of my granddaughter with her new hat on that she had got for Christmas. Looking at the photo I thought she looked like she was all ready to hit the ski slopes - hence my title "Snow Ready". For this layout I took a piece of the brown "Cabin" paper which had this really pretty blue glitter snowflake in one corner and I cut around the snowflake and then cut the snowflake in half. I used that piece along with the two sides of the "Wintertime" paper and the "stripe" paper to layer under the photo and I matted the photo with a piece of the blue side of the "Drift" paper.
I decided I would make some water distressed flowers to embellish my layout using my friend Gabi's tutorial that you can find here: Water Distress Tutorial These flowers are so simple to make and really look awesome when they are finished. I wanted to use both blue and brown for the flowers but I wanted each flower to have the two colors in it. So I made some blue ones with brown centers and brown ones with blue centers. After the flowers were dry I took some glossy accents and with a small paint brush just randomly wiped some of the glossy accents on the petals and then dipped the roses in some "Diamond Dust". I was quite pleased at how they turned out. I've added a closeup of the flowers so you can see them a bit better. I added a bit of white picket fence to the layout, a small piece of Queen & Company's felt fusion, a small white 3D butterfly and a blue glitter snowflake that I had in my stash. The title I cut out with my Cricut and overlapped them a bit to fit into the glitter frame on the paper. You'll have to bare with the photo on the layout, my flash seems to make the photo look all grainy. Thanks for stopping by and I'd love to hear any comments you have on my layouts!


Wednesday, January 4, 2012
Happy New Year Everyone!
I hope everyone had a safe and happy New Year. We went to a couple of house parties and even managed to make it past midnight, lol. It's always great to ring in the New Year with good friends!
So I even managed to get one of the Christmas photo's scrapped today. This is s photo of my grandchildren looking very serious for some reason. lol. I used a mix of Bo Bunny's "A gift of love" papers and Websters papers on this layout. I finally got smart after listening to other scrappers on how they save some of their papers when layering and only cut the holly paper so it fit around the paper in front instead of having all this wasted paper behind the other paper. It takes me awhile but eventually I catch on, lol.
For my poinsettia I took some of my white flowers and dyed them with some Rangers ink, in cranberry, and them layered them, used a white brad for the center and outlined the petals with stickles glitter. I also used some red stickles for the holly on the right corner of the photo. I cut out the Santa in the air balloon from the Websters papers and then popped it up with foam for the 3D look. I think it turned out not to badly, I just wish the photo was a bit better quality. Well thanks for stopping by and I hope everyone is enjoying the first few days of 2012!

Subscribe to:
Posts (Atom)


