Thursday, October 18, 2012
Beautiful Dreamer.....
That's the title for my newest layout of another one of my daughters photo's that her friend (the budding photographer) took - I so love these photos! The background paper and the striped paper are FabScraps "Victoria's Fantasy" paper line and the other papers are from my stash. I distressed all of my layers, but this time I only used my distress tool, I did not use my ink as I usually do on my distressed edges. I took a duplicate piece of the background paper and fussy cut the unicorn, the diamonds on the playing card, the face and the clown down the right side of the paper and then popped them up with foam on the background paper. I matted the photo but before sticking it onto the layout I took some tulle and gathered it up on one side and then stuck it down on the back of the matting in the top left corner, to mimic the tulle that my daughter is holding in the photo. The butterfly is from Prima as are the mauve flowers with the feathers and the mauve roses. I handmade the small purple rosebuds and the large purple flowers with puffy paint. The pink flourishes that I had in my stash are from Recollections.
 If you click on the photo you can see a larger version of the photo. I hope everyone is having a great week. TFL

Monday, October 15, 2012
More Good News!
I have some great news to share today. I have been chosen as one of the Design Team members for "Megs Garden". If you've seen Meg's gorgeous papers you can understand how excited I am to be able to work with these papers! To celebrate the new Design Team members Meg is have a give away on her blog, so pop on over and check it out here: Megs Garden Blog
I've been busy making out some more layouts for the DT position at Heartfelt Creations. They sent me some of their papers and stamps and coordinating dies and we had to do two more layouts with their products and mail them in to their office. We won't know anything until October 31st when they make their announcement but I am keeping my fingers crossed. Of course I can't post the photos of these layouts until after they make the announcement but I loved working with these products!
I do have a couple of other projects I did that I will be posting here today. This first one is a quick card I made using some of the Websters "Hollywood Vogue" collection. The flourish is one I had in my stash and the flower is from Prima.
 This next layout "You Make Me Smile" is a photo of my daughter when she and her cousin went to London and Europe this past summer, they were in one of the stores trying on hats. This was made using the "Mon Doux" kit from Swirlydoos. I did a lot of distressing of the layers here and on the background paper I added some bits of lace to peek out from some of the distressing. I made the bigger peach colored flower as well as the tiny peach and blue rose buds. The pretty flourish is from Zva Creative. The pretty butterflies are graphics from Lisa over at Swirlydoos, thank you Lisa! I printed and cut them out and added glossy accents to them. I was quite pleased at how the whole layout turned out. I liked the background paper I used for this layout as on the bottom right side of the paper there was a faint colored "Eiffel Tower" and Paris is one of the stops on my daughters trip so it seemed perfect! Anyway I hope you like it and don't forget I love to hear all of your comments. Have a great week everyone!

I've been busy making out some more layouts for the DT position at Heartfelt Creations. They sent me some of their papers and stamps and coordinating dies and we had to do two more layouts with their products and mail them in to their office. We won't know anything until October 31st when they make their announcement but I am keeping my fingers crossed. Of course I can't post the photos of these layouts until after they make the announcement but I loved working with these products!
I do have a couple of other projects I did that I will be posting here today. This first one is a quick card I made using some of the Websters "Hollywood Vogue" collection. The flourish is one I had in my stash and the flower is from Prima.


Wednesday, September 26, 2012
Still excited...
So after getting the email from Heartfelt Creations last night about making the semifinalist list for their design team I was so excited I couldn't sleep. So what does a scrapper do when she can't sleep? Scrap of course!
I scrapped these two photos of my grand kids that I took when we were at the beach one day when they were visiting. I used Websters "Yacht Club" collection for this layout. I think I pretty much used every paper from this collection on this layout. I did a lot of fussy cutting - I just can't resist fussy cutting when it comes to Websters papers, they're all so gorgeous! I was quite pleased at how it turned out. I guess my scrapbooking mojo likes the late nights, lol. Anyway here's the finished product.
 So I hope everyone has gone by Heartfelt Creations blog and placed your votes for your favorite semifinalist for the new design team - you have until October 17th to place your votes! Here's the link to their blog: Heartfelt Creations I'm still keeping everything I can cross, crossed - my poor eyes are getting really sore, lol!
I scrapped these two photos of my grand kids that I took when we were at the beach one day when they were visiting. I used Websters "Yacht Club" collection for this layout. I think I pretty much used every paper from this collection on this layout. I did a lot of fussy cutting - I just can't resist fussy cutting when it comes to Websters papers, they're all so gorgeous! I was quite pleased at how it turned out. I guess my scrapbooking mojo likes the late nights, lol. Anyway here's the finished product.

Heartfelt Creations DT call
I'm very excited to tell you that I have been chosen as one of the semifinalists for "Heartfelt Creations" design team call and I'd like to share the three projects that I sent in with my application to Heartfelt Creations. The design team process is a little different....the semi-finalists have been chosen, but they are counting on people to vote for the finalists.
You must choose at least 5 of your favorites, and when you do, you are
entered to win a $50 Heartfelt Creations Gift Certificate!
This first layout is a few photos I took of my grandchildren while we were camping with our friends. Mikayla and Scott were watching our friends playing Mexican golf and I happened to glance over at them and they were standing there and Mikayla had her arms wrapped around Scott and he was holding onto her arms - they just looked so cute. Of course the minute they realized I was taking their picture they started acting all goofy, but that was okay I managed to get this one shot of them anyway, lol. So I hope that when they are young adults they'll be happy that I did get this photo of them. I used the Swirlydoos "Mon Doux" scrap kit for this layout. I did some distressing on the different papers and some fussy cutting of some of the papers, I was quite happy with the way it turned out.
 This next layout is of my granddaughter taken in the late spring this year. She just started high school this September so this photo means a lot to me as she's just become a teenager but she is still my sweet little grand baby - I can hear her now groaning "Oh Gramma, I'm not a baby anymore!". I used the Websters "Hollywood Vogue" collection for this layout. I did some fussy cutting of some of the papers for this layout - I just love doing fussy cutting with Websters papers, they are all so pretty! I also did some handmade embellishments and flowers for the layout - I used a scallop punch in different sizes to put one of the ladies head silhouette's on which I used in the top right corner and made the two flowers which I used a bit of puffy paint on them. So here is how my layout turned out!
 The last thing I wanted to share with you is an altered tissue box I did using Graphic 45's new "Song Bird" collection. I picked up this plain wooden tissue box at one of our local Dollar stores for $2.00 - don't you just love dollar store bargains? I love these papers - if I could I'd wall paper my bedroom with this paper, lol. I made all my own flowers for this project - I added stickles to some of the tiny rose buds and then puffy paint to some of the larger ones. I just think that the puffy paint adds a little something to the flowers. I also made the little fan that I have on the side with the flourish. I painted the flourish with some Tim Holtz distress crackle paint "Picket Fence". The two corner resin pieces are from Recollections and the pearl flourishes are actually one from Prima that I cut into two pieces, and the pearls all around the box are from a string of pearls I had in my stash. The pink butterfly is courtesy of Lisa at Swirlydoos, thanks Lisa! I added some glossy accents to it after cutting it out on the cardstock I printed it on to give it some depth.
I hope you all like these projects and maybe give me a vote over at Heartfelts blog here: Heartfelt Creations" I will be keeping all my fingers and toes crossed that I get chosen as one of the new design team members - have a great week!


This first layout is a few photos I took of my grandchildren while we were camping with our friends. Mikayla and Scott were watching our friends playing Mexican golf and I happened to glance over at them and they were standing there and Mikayla had her arms wrapped around Scott and he was holding onto her arms - they just looked so cute. Of course the minute they realized I was taking their picture they started acting all goofy, but that was okay I managed to get this one shot of them anyway, lol. So I hope that when they are young adults they'll be happy that I did get this photo of them. I used the Swirlydoos "Mon Doux" scrap kit for this layout. I did some distressing on the different papers and some fussy cutting of some of the papers, I was quite happy with the way it turned out.


I hope you all like these projects and maybe give me a vote over at Heartfelts blog here: Heartfelt Creations" I will be keeping all my fingers and toes crossed that I get chosen as one of the new design team members - have a great week!


Monday, September 17, 2012
Indian Summer
Well the weather is certainly making up for the crappy June we had here in BC. It's been gorgeous and sunny here (except for one kind of cloudy day, but still warm) with the temperatures up between 22 - 27 nearly everyday. So of course with the good sunny weather it means getting out in the yard and start to clean things up for the fall so I haven't got a whole lot of scrappy time in since the grand kids left.
I finally got started on a layout yesterday which I'm still playing around with - seems my mojo has gone off on vacation or something, lol. Oh well I'll just keep plugging away at it and hopefully I can finish it off today so I can actually post something new on my blog.
Oh one thing I did want to mention is that over on the "Swirlydoos Forum" my friend, Paulien van den Bosch, is going to be having Round Robin going on only for cards instead of layouts. It sounds like it's going to be lots of fun, you don't have to be buying the Swirlydoos kits to join in on this RR so pop on over and check it out here: "Cards, cards, cards" All of the members at Swirlydoos are so talented, I have learned so much from all of them since joining the group and we always love new members! Well I'm off to try and get my layout finished, I hope everyone has a good day!
I finally got started on a layout yesterday which I'm still playing around with - seems my mojo has gone off on vacation or something, lol. Oh well I'll just keep plugging away at it and hopefully I can finish it off today so I can actually post something new on my blog.
Oh one thing I did want to mention is that over on the "Swirlydoos Forum" my friend, Paulien van den Bosch, is going to be having Round Robin going on only for cards instead of layouts. It sounds like it's going to be lots of fun, you don't have to be buying the Swirlydoos kits to join in on this RR so pop on over and check it out here: "Cards, cards, cards" All of the members at Swirlydoos are so talented, I have learned so much from all of them since joining the group and we always love new members! Well I'm off to try and get my layout finished, I hope everyone has a good day!
Saturday, September 1, 2012
A busy August...
I just realized it's been quite some time since I updated my blog. I had my grandchildren visiting for the month of August so I didn't get a lot of scrappy time in. I did get to work on a project for a Curio Cabinet using a pattern that I had purchased from Laura Denison at "Follow the Paper Trail". I don't know if you've ever been to her website but if you haven't you have to stop by and check out all of her great patterns she has for sale - she is a very talented lady! You can find her site here: Follow the Paper Trail You can either make this just as a trinket box with the drawer or you can make the drawer a mini album when you open it up. I chose to just have mine as a drawer. Remember you can click on the picture for a larger view, so here's my finished project...
 I used a few Prima flowers on this project but most of them are ones that I made myself - the ones with the puffy paint on them. The butterflies I've used are from Lisa (starsailer) over at Swirlydoos, after I cut them out I covered them with glossy accents, I just love doing that with these butterflies, it just seems to give you a little more depth to your projects. I used Graphic 45's "A Ladies Diary" papers for this cabinet - I absolutely love this collection of papers!
Here is a closeup of the cabinet with the front doors open. On the shelf I have a little shell that my granddaughter painted for me. I also took a small metal frame that I had in my stash and painted it with Picket fence crackle paint and cut out one of the ladies heads from the paper for the picture in the frame. There is also a tiny glass bottle with beads. The bottom part has a couple more flowers, a little bird and a small brass telephone I picked up at a second hand store. Hanging off the left side of the cabinet you can see one of Tim Holtz swivel clasps and chain holding a small heart and key I had in my stash. I've also added a couple of Lisa's butterflies that I've painted with glossy accents. On the shelf I have a little shell that my granddaughter painted for me. I also took a small metal frame that I had in my stash and painted it with Picket fence crackle paint and cut out one of the ladies heads from the paper for the picture in the frame. There is also a tiny glass bottle with beads. The bottom part has a couple more flowers, a little bird and a small brass telephone I picked up at a second hand store. Hanging off the left side of the cabinet you can see one of Tim Holtz swivel clasps and chain holding a small heart and key I had in my stash.
 This is the left side pf the trinket box. I cut out a dress form with my Cricut and then took some pink netting and gathered it for the waistline with some pink ribbon, there is also a small bottle with diamond dust in it. You can't see it very well but I used another one of Lisa's butterflies which I also covered in glossy accents.

 Well I hope you liked this project and I hope you stop by Laura's website, I'm sure you'll find something you like. Have a great long weekend all and watch out for all the kids on the road on Tuesday as they head back to school!

Here is a closeup of the cabinet with the front doors open. On the shelf I have a little shell that my granddaughter painted for me. I also took a small metal frame that I had in my stash and painted it with Picket fence crackle paint and cut out one of the ladies heads from the paper for the picture in the frame. There is also a tiny glass bottle with beads. The bottom part has a couple more flowers, a little bird and a small brass telephone I picked up at a second hand store. Hanging off the left side of the cabinet you can see one of Tim Holtz swivel clasps and chain holding a small heart and key I had in my stash. I've also added a couple of Lisa's butterflies that I've painted with glossy accents. On the shelf I have a little shell that my granddaughter painted for me. I also took a small metal frame that I had in my stash and painted it with Picket fence crackle paint and cut out one of the ladies heads from the paper for the picture in the frame. There is also a tiny glass bottle with beads. The bottom part has a couple more flowers, a little bird and a small brass telephone I picked up at a second hand store. Hanging off the left side of the cabinet you can see one of Tim Holtz swivel clasps and chain holding a small heart and key I had in my stash.


This is the right side of the cabinet.The little wooden case with the wine bottles I picked up at one of our Dollar stores, tucked in behind that is a rose from my stash and beside the wine cabinet is an old clip on beaded earring from my stash.

Monday, July 23, 2012
Happy Monday All!
Well I haven't been posting a lot of layouts these past few weeks but I have been working on some that I will be posting later in August and I'll also have a bit of news to share. Today though I am posting a layout that I did of my granddaughters grade 7 graduation. I can't believe she'll be in High School in September - where did all those years go to!

Satin Ribbon Flower Tutorial

This tutorial has
been inspired by some of the many other flower tutorials that I have seen on
the internet, this one is just my way of doing this flower.
Supplies needed:
Glue
Needle & thread
Scissors
Self adhesive flat
back pearls
7” of 1 inch wide
satin ribbon
7” of ½ inch wide
satin ribbon

Take your 1” wide
ribbon and fold it in half and stitch the ends together. I know some people
like to stitch the ends together after each flower layer is gathered and tied
but I find it easier to do it at the beginning. Also some satin ribbons have
one side that is quite smooth and shiny and the other is more of a
flat/non-shiny finish (as mine is here). If that is the case fold the ribbon in
half with the shiny sides together.

Now take your thread
and knot one end of it and do a slip stitch all the way around one edge, being
careful to leave a couples of inches of thread hanging from where you started
your stitching.

Once this is done you
can then take the two threads from either end and pull together to gather the
ribbon and tie the threads together. I like to tie/knot the two threads 3 times
just to make sure it won’t come apart. Now you can just sort of play with the
ribbon to get the gathers the way you like it.

Repeat this same
stitching process to the ½” wide ribbon, pull to gather and tie the tie ends as
done previously. You’ll notice that the thinner ribbon is a lot more gathered
than the 1” ribbon. If you would like more gathers in the 1” ribbon you can add
and extra inch or two in length to the 1” ribbon. The wider the ribbon the more
length you will need if you like lots of gathers. I just happen to like mine to
be less gathered on the bottom. Remember it’s your flower so you can do which
ever way you like!

Now you can glue the
two layers together and add your pearl center and viola – you have a simple and
pretty flower to add to your layouts or cards! You can also use a brad or
whatever type of bling you’d like for your center.
I hope you'll give this tutorial a try. If you have any comments I'd love to hear them and if you have any question you can email me at sdinnell@scrappers-heaven.com. TFL!
Tuesday, July 17, 2012
Back home....finally!
Well I've actually been back for two weeks but I just finally managed to get in some free time to update my blog. Babysitting all of my daughters pets while she was away went pretty good. At least I managed to get in some exercise since I had to walk the dogs every day, lol. Now that I'm home I figured I'd start doing my beach walks again, since I had got use to walking everyday with the dogs, This way I can start losing some of this weight I'd put on since I quit smoking at the end of January. So far I've managed to lose 7 of the 13 lbs I've put on - Yeah!
This past Saturday we had a big BBQ for my dh's birthday which was on Sunday. It was a great time as we cooked a big huge Bison roast. I'd never had Bison before and boy was it yummy! One of our friends is the chef at our local pub around the corner from us and he made up his own yummy marinade for the Bison and then he also brought over this super delicious Brandy Peppercorn sauce to have with it - did I say this was yummy? Very yummy! I thought I'd share a picture I took of the BBQ with you just below. Thanks for stopping by and I hope you all have a great weekend!

This past Saturday we had a big BBQ for my dh's birthday which was on Sunday. It was a great time as we cooked a big huge Bison roast. I'd never had Bison before and boy was it yummy! One of our friends is the chef at our local pub around the corner from us and he made up his own yummy marinade for the Bison and then he also brought over this super delicious Brandy Peppercorn sauce to have with it - did I say this was yummy? Very yummy! I thought I'd share a picture I took of the BBQ with you just below. Thanks for stopping by and I hope you all have a great weekend!

Wednesday, June 6, 2012
National Scrapbooking Day/Month
So May is National Scrapbooking Month and there was a ton of fun things happening in the scrappy world. Lots of blog hops, challenges, scrap fests, and cool prizes to be won! I did as many blog hops as I could (boy there are some talented scrappers out there!) and tried out some of the challenges. The layout below was for one of these challenges. Over at Swirlydoos we had a challenge to take the Swirlydoos logo with us on one of our typical days and take photos of it to scrap. So my photos start out at my first stop of the day at the post office, next stop was Walmart (that's the Walmart greeter holding the logo). Then I did my daily stop at Starbucks for my frap and then finished off at the beach walk by the "50th Parallel" sign. I asked some poor German tourist if he could take my photo holding the logo by the sign. He looked at me kind of weird but he still took the photo. I can just imagine the conversation he has when he gets home to Germany and is telling his friends and family about this weird Canadian woman he met, lol!
I used some of Prima's pretty "Sun Kissed" papers for this layout and the yellow checked paper is from Websters "Western Romance" collection. The bigger flowers I made following Gabrielle Pollacco's "Paper Flower" tutorial that you can find here: "Paper Flowers" The leaf vine I cut on my cricut machine after taking the leaf graphic (courtesy of Lisa G at Swirlydoos) and making it into an SVG file to use in the "Make the Cut" program, The orange satin flowers I had in my stash. the yellow butterflies are also courtesy of Lisa G (aka starsailor) at Swirlydoos. I cut them out and added glossy accents to them, I love how the glossy accents makes things look! The butterflies pearl path I made using some pearl drop paint I found in the fabric painting section at Michaels. Super good deal, I got four different colors for $8.99 and the tubes are quite a good size and the end result looks great! So here is my finished layout....

Thanks for stopping by and I hope you have a great day!
I used some of Prima's pretty "Sun Kissed" papers for this layout and the yellow checked paper is from Websters "Western Romance" collection. The bigger flowers I made following Gabrielle Pollacco's "Paper Flower" tutorial that you can find here: "Paper Flowers" The leaf vine I cut on my cricut machine after taking the leaf graphic (courtesy of Lisa G at Swirlydoos) and making it into an SVG file to use in the "Make the Cut" program, The orange satin flowers I had in my stash. the yellow butterflies are also courtesy of Lisa G (aka starsailor) at Swirlydoos. I cut them out and added glossy accents to them, I love how the glossy accents makes things look! The butterflies pearl path I made using some pearl drop paint I found in the fabric painting section at Michaels. Super good deal, I got four different colors for $8.99 and the tubes are quite a good size and the end result looks great! So here is my finished layout....

Thanks for stopping by and I hope you have a great day!
Tuesday, June 5, 2012
June already?
Wow, it really has been awhile since my last post! We finally got some good weather so I've been out in the yard doing all of my gardening that is normally done in March but our spring weather has been terrible. Now I'm back down on the mainland taking care of my daughters dogs for her while she and a cousin go off to Europe for three weeks.
Anyhoo I have done a couple of layouts and a canvas during all of this time away from my blog. This canvas was done using my friend Paulien Van Den Bosch's tutorial over at Swirlydoos here: Beach Card This tutorial is for making a card using some sticky back canvas but I didn't have any of that but I did have a couple of cheap canvas frames from the dollar store so I decided to use that instead and make it a wall hanging. I was really quite pleased with how it came how so I gave it to my MIL for Mother's Day.
 Paulien always comes up with such cool ideas for her cards and layouts. Like on this one where the material around the edge of this is just cotton bandage material and the white netting is the kind of netting they use to put over a bandage to keep it in place. Who would ever think to use something like that and that it would look so good? Since this canvas was a lot larger than a card I decided to make a title for it to add to all the blank space in the middle. I also added some seagulls that I cut out with my cricut machine and popped up with foam pop dots and some fencing that I had in my stash.
This next layout is photos of my granddaughter - I can't believe she's 13 already! Seems like just yesterday that she was born. I have been wanting to do a layout on my granddaughter for a while as I have all of these letters and drawings etc that she as done for me and I wanted her to know how much I loved these things and have a special spot (behind the photos) that I could slide all of these keepsakes into so I wouldn't lose them. As soon as I saw these photos of her I knew they would be perfect for this layout. I used the Websters "Western Romance" papers "Love Notes" that went perfect with this whole layout. The papers even matched my granddaughters shirt she is wearing perfectly! I did some fussy cutting from some of the papers of the cowboy hat and letters and the corner piece that says "Love Letters" and popped them up with foam pop dots. The butterflies are courtesy of Lisa at Swirlydoos. I cut them out and added some glossy accents to them.

I have another layout to post but I will do that this afternoon. Thanks for stopping by, have a great day!
Anyhoo I have done a couple of layouts and a canvas during all of this time away from my blog. This canvas was done using my friend Paulien Van Den Bosch's tutorial over at Swirlydoos here: Beach Card This tutorial is for making a card using some sticky back canvas but I didn't have any of that but I did have a couple of cheap canvas frames from the dollar store so I decided to use that instead and make it a wall hanging. I was really quite pleased with how it came how so I gave it to my MIL for Mother's Day.

This next layout is photos of my granddaughter - I can't believe she's 13 already! Seems like just yesterday that she was born. I have been wanting to do a layout on my granddaughter for a while as I have all of these letters and drawings etc that she as done for me and I wanted her to know how much I loved these things and have a special spot (behind the photos) that I could slide all of these keepsakes into so I wouldn't lose them. As soon as I saw these photos of her I knew they would be perfect for this layout. I used the Websters "Western Romance" papers "Love Notes" that went perfect with this whole layout. The papers even matched my granddaughters shirt she is wearing perfectly! I did some fussy cutting from some of the papers of the cowboy hat and letters and the corner piece that says "Love Letters" and popped them up with foam pop dots. The butterflies are courtesy of Lisa at Swirlydoos. I cut them out and added some glossy accents to them.

I have another layout to post but I will do that this afternoon. Thanks for stopping by, have a great day!
Thursday, April 19, 2012
M.I.A.
Okay so I kind of disappeared for a number of days. I went down last week to the mainland to help my daughter out after some surgery she had done. It's so hard to watch your kids, no matter what age, when they are in pain. But she seems to be doing good now, so I came home this morning. I love seeing the kids but I'm happy to be sleeping in my own bed tonight.
I had another layout completed but didn't get it posted before I left. This is another photo of my daughter that her friend took. You are all going to be bored at me scrapping all these photos...what can I say, I just love the photos, lol! I used some more of Websters Hollywood Vogue collection for this layout, the papers are perfect for these photos! I used the die cut from this collection for my background paper. I did some fussy cutting from some of the other papers in this line which I popped up with foam dots. The flowers, of course, are from Prima - don't you just love the tiny rosebuds? The leaves are from Lisa at Swirlydoos which I made into an SVG file so I could cut it with my cricut machine using the "Make The Cut" program. The butterflies are also from Lisa which I printed and cut out and then added some glossy accents to, to give them a nice glossy sheen. I also used one of Prima's clear stamps to stamp on the right side of the photo. On the left side I've added some Tim Holtz negative film tape. I really like the way it turned out. Well I hope everyone has a great weekend and thanks for stopping by!

I had another layout completed but didn't get it posted before I left. This is another photo of my daughter that her friend took. You are all going to be bored at me scrapping all these photos...what can I say, I just love the photos, lol! I used some more of Websters Hollywood Vogue collection for this layout, the papers are perfect for these photos! I used the die cut from this collection for my background paper. I did some fussy cutting from some of the other papers in this line which I popped up with foam dots. The flowers, of course, are from Prima - don't you just love the tiny rosebuds? The leaves are from Lisa at Swirlydoos which I made into an SVG file so I could cut it with my cricut machine using the "Make The Cut" program. The butterflies are also from Lisa which I printed and cut out and then added some glossy accents to, to give them a nice glossy sheen. I also used one of Prima's clear stamps to stamp on the right side of the photo. On the left side I've added some Tim Holtz negative film tape. I really like the way it turned out. Well I hope everyone has a great weekend and thanks for stopping by!

Wednesday, April 4, 2012
Birthday cards
Well today is my granddaughters 13th birthday - Wow I can't believe I have a granddaughter that age, man I'm getting old. I have to keep reminding myself that my son and daughter are 11 years difference in age so since my son's 32 of course I can be a Gramma to a 13 year old, lol. It's also my daughters 21st birthday on April 8th so these are both important birthdays for the girls. My granddaughter is now officially a teenager and my daughter is now a legal adult world wide. Our drinking age in Canada is 19 years old, so she's been legal here for a few years but now she can do that anywhere. It might be kind of fun for her and I to go to Las Vegas now that she can legally gamble there, lol.
Anyways I've been busy making birthday cards for them both and I was quite happy that I had my Websters new papers to do this with. My first card was my take on my friend Paulien Van Denbosch's tutorial from the Feb 14th sketch at Swirlydoos. I'm really quite pleased at how it turned out. I didn't have a flourish to use so I made my own using some purple stickles that I had. So here's how it turned out.

The one that I made for my daughter is using the same Websters Hollywood Vogue collection and is my own design. I took some of my ink and inked up one of my white doilies with it to match up. The butterfly is one that Lisa at Swirlydoos had given to us which I took into my PSP program and colorized it from the blue that it was to a nice shade of mauve to match up with the papers also. After it dried from the inking I covered it with a thick coat of glossy accents to give it a nice shiny glass look to it and used a pearl strand that I had to use as my butterflies flight path. I did a little bit of fussy cutting of the roses on the negative strip of paper and then added a cream and mauve flower that I made using some Prima hydrangea petal that I had sprayed and twisted and let dry and put them together and of course two pretty tiny Prima mauve roses were added with that flower. Here's how this one turned out.

Thanks so much for stopping by and I hope everyone's week is going great!
Anyways I've been busy making birthday cards for them both and I was quite happy that I had my Websters new papers to do this with. My first card was my take on my friend Paulien Van Denbosch's tutorial from the Feb 14th sketch at Swirlydoos. I'm really quite pleased at how it turned out. I didn't have a flourish to use so I made my own using some purple stickles that I had. So here's how it turned out.

The one that I made for my daughter is using the same Websters Hollywood Vogue collection and is my own design. I took some of my ink and inked up one of my white doilies with it to match up. The butterfly is one that Lisa at Swirlydoos had given to us which I took into my PSP program and colorized it from the blue that it was to a nice shade of mauve to match up with the papers also. After it dried from the inking I covered it with a thick coat of glossy accents to give it a nice shiny glass look to it and used a pearl strand that I had to use as my butterflies flight path. I did a little bit of fussy cutting of the roses on the negative strip of paper and then added a cream and mauve flower that I made using some Prima hydrangea petal that I had sprayed and twisted and let dry and put them together and of course two pretty tiny Prima mauve roses were added with that flower. Here's how this one turned out.

Thanks so much for stopping by and I hope everyone's week is going great!
Thursday, March 22, 2012
March sketch contest at My Creative Scrapbook

I had some mauve hydrangea petals in my stash so I went about spraying them with water and then twisting the petals and let them dry. Once they were dry I layered the different size petals together to make my flowers. I love this look, I think it looks so much prettier than just plain old petals laying flat. The cream hydrangea petals I had in my stash also and the edges of them had a mauve color to them so I did the same thing with a couple of those. I also had the little teal rose buds in my stash and the other couple of teal ones which added a nice touch to my flower cluster. Of course I couldn't resist adding one of my peacock feathers to the layout and of course a pretty Prima flourish. I cut one of the little pearl butterflies from the flourish and added it up by the left top corner of the photo. Well actually I did that to two of the butterflies from the flourish but I had already taken the photo of the layout and was to lazy to take another one - I know bad girl, lol. I also had the pretty purple glitter letters in my stash so I used them for my title. I dyed my two white paper doilies with some teal ink that I had which I think looked good against the darker teal paper that I layered them on. I was quite happy at how it turned out. So here's the finished layout, hope you like it! TFL

Wednesday, March 14, 2012
Websters Shipping Party Continues!!

So have you been over to Websters this week to partake in all of the fun? If you haven't you still have another chance today.Today you can enter to win Journaling Cards, Fabric Tickets, Alphas and Fabric Ribbon in the new collection of your choice! How's that for awesome!? So get Facebooking, Blogging, and Tweeting - it could be yours! Here's the link: Websters Pages
Have a great day all!
Day Three At Websters Shipping Party!

Tuesday, March 13, 2012
Websters is having a party!!

Sunday, March 11, 2012
My Shabby/Chic Funky side...
Well I think that's what you would call it, lol. My daughter's friend, who is becoming a photographer, keeps getting my daughter to do photo shoots with her to add to her portfolio. My daughter always gets all done up for these shoots and I absolutely love the photo's her friend takes. Make's me think my daughter has lost her calling and should become a model, lol. As soon as I saw these two photos I just knew I had to scrap them and immediately knew the kind of layout I wanted to do and these new papers from Bo Bunny's "Weekend Market" collection, Graphic45's "Olde Curiosity Shoppe" and TPC Studio's "Memory Lane" were a perfect choice! I love it when I can find papers from different manufacturers and they work so well together.
I did quite a bit of distressing and inking on the "Moments in Time" piece of paper. I used Tim Holtz Distress ink in four different colors - tumbled glass, peeled paint, bundled sage and brushed corduroy all over different areas of the paper. On the Graphic45 paper I cut out the corner that had the clocks, shelving and old fashioned boot and peacock feather on it. I did some fussy cutting around the boot, feathers and flourishes on the right side of this piece. You can't really see it that well in the photo, since I added one of the real peacock feathers that I bought on eBay to the layout, but when you look at it in person you can. I also added these pretty Prima roses and flourish bling to the bottom right corner.
On the bottom left I took one of the latches from the Tim Holtz grunge board I had and painted it with some Crackle Paint in vintage photo and attached it with some little metal brads. I used a Tim Holtz's ornate plate and printed the word "Beauty" off on my computer on some cardstock which I used some distress vintage photo ink on the edges of it before adding it to the plate. I also had this pretty white vintage look lace that I used some vintage photo distress ink on and put that behind the photo and that just seemed to finish the layout perfectly. So here's the finished layout, I hope you like it as much as I do - and please leave a comment and let me know.
 On this next layout I used the Bo Bunny and Graphic45 papers again. I didn't really do any distressing on these papers but I did do a little bit of fussy cutting on the Graphic45 piece of the lady with the key on her back just around the bottom corner of her skirt. I also cut out the "Olde Curiosity Shoppe" sign from the paper to put on the bottom of the layout and popped it up with some foam squares. The old key and key lock I had in my stash. I took one of the flourishes from Tim Holtz grunge board and painted it with "Picket Fence" crackle paint and then used a bit of vintage photo distress ink around the edges of the flourish.
In my stash I have some of the plain flowers in different sizes that you can apply your own color to and I took one of the large ones to color. I took some vintage photo distress ink to color it with and once it dried I folded it in half and used a small glue dot to hold together. I then painted it with a thin coat of some "Diamond" stickles using a small paint brush to give it a bit of sparkle. I layered this underneath the other Prima flowers that I had on the corner of the photo. The saying "A Natural Flair" I cut out of the Graphic45 paper and popped it up with foam squares. The two cards with the old fashion dressed women were in my stash and I believe they are from one of the old Graphic45's papers. If anyone knows for sure please leave me a message in the comments section. I had this little strip of gold trim in my stash and it really wasn't big enough for using on any of my other layouts but it just happened to be a perfect size to put down the side of the paper with the woman on it. See, I knew there was a reason for not throwing it out, lol. I added one of Prima's pretty butterflies to the layout and that just seemed to finish it off perfectly. So here's the finished layout, please let me know what you think by leaving a comment.

Thanks for stopping by and I hope you have a great week!
I did quite a bit of distressing and inking on the "Moments in Time" piece of paper. I used Tim Holtz Distress ink in four different colors - tumbled glass, peeled paint, bundled sage and brushed corduroy all over different areas of the paper. On the Graphic45 paper I cut out the corner that had the clocks, shelving and old fashioned boot and peacock feather on it. I did some fussy cutting around the boot, feathers and flourishes on the right side of this piece. You can't really see it that well in the photo, since I added one of the real peacock feathers that I bought on eBay to the layout, but when you look at it in person you can. I also added these pretty Prima roses and flourish bling to the bottom right corner.
On the bottom left I took one of the latches from the Tim Holtz grunge board I had and painted it with some Crackle Paint in vintage photo and attached it with some little metal brads. I used a Tim Holtz's ornate plate and printed the word "Beauty" off on my computer on some cardstock which I used some distress vintage photo ink on the edges of it before adding it to the plate. I also had this pretty white vintage look lace that I used some vintage photo distress ink on and put that behind the photo and that just seemed to finish the layout perfectly. So here's the finished layout, I hope you like it as much as I do - and please leave a comment and let me know.

In my stash I have some of the plain flowers in different sizes that you can apply your own color to and I took one of the large ones to color. I took some vintage photo distress ink to color it with and once it dried I folded it in half and used a small glue dot to hold together. I then painted it with a thin coat of some "Diamond" stickles using a small paint brush to give it a bit of sparkle. I layered this underneath the other Prima flowers that I had on the corner of the photo. The saying "A Natural Flair" I cut out of the Graphic45 paper and popped it up with foam squares. The two cards with the old fashion dressed women were in my stash and I believe they are from one of the old Graphic45's papers. If anyone knows for sure please leave me a message in the comments section. I had this little strip of gold trim in my stash and it really wasn't big enough for using on any of my other layouts but it just happened to be a perfect size to put down the side of the paper with the woman on it. See, I knew there was a reason for not throwing it out, lol. I added one of Prima's pretty butterflies to the layout and that just seemed to finish it off perfectly. So here's the finished layout, please let me know what you think by leaving a comment.

Thanks for stopping by and I hope you have a great week!
Saturday, March 10, 2012
Time to Spring Forward!
Well the weather outside isn't very spring like today - crazy winds and rain again. But never the less we have to remember when we go to bed tonight to change the clocks ahead by 1 hour. It sucks that you lose an hours sleep but it's good because it will stay light longer - Yeah! I love when Spring and Summer comes and you get to be outside longer enjoying the sun shine. I'm one of those people that when it's dark I figure I should be in bed sleeping, lol. All I can say is "SPRING - Bring it on!!"
Well as my sister said "It was only a matter of time" until it happened. What you say? Time to do a layout on one of my daily routines. My daily trip to Starbucks to get my "Frapachino" fix - not one of the coffee flavored ones (yuck - I hate coffee) just the chocolate cream based ones. I won't even tell you how much chocolate is in it - but lets just say if I stopped going to Starbucks everyday for one of these I could probably lose about 10 lbs, lol.
I decided to do this layout with some of the papers I had in my stash from the Scrap Cake, their Spring Awakening" collection. I did a bit of fussy cutting of the flowers from one of the papers and popped them up with foam. Then I took one of the blue papers and did some punching on that one to frame my delicious drink (I know I'm sad, lol), and just a strip of the stripped type of paper from the collection behind that and notched it out at either end.. After looking at the paper for a bit I decided to cut out some squares from a couple of the other papers and place them down the side of the page to make kind of a diamond row in the plaid - I think it looked kind of cute and I added some little pink satin roses on the blue squares. I added some Prima flowers and some other little satin roses to one of the fussy cut flowers, added a bow of light mint green organza ribbon. I added one of the coffee sleeves to the layout. I've had these little tiny blue flowers in my stash like forever and I thought they would be perfect to just kind of dot them around the layout and it just gave the layout that little something extra. So here it is....the "Great Frapachino" layout!

I'm thinking I can hear my daughter now saying "Mum, you need to get a life!" - hey when you get to my age it's the little things that make me happy, lol. I still have a couple of other layouts to post but I think I'll do that later or probably more like tomorrow. So have a great evening all and TFL!
Well as my sister said "It was only a matter of time" until it happened. What you say? Time to do a layout on one of my daily routines. My daily trip to Starbucks to get my "Frapachino" fix - not one of the coffee flavored ones (yuck - I hate coffee) just the chocolate cream based ones. I won't even tell you how much chocolate is in it - but lets just say if I stopped going to Starbucks everyday for one of these I could probably lose about 10 lbs, lol.
I decided to do this layout with some of the papers I had in my stash from the Scrap Cake, their Spring Awakening" collection. I did a bit of fussy cutting of the flowers from one of the papers and popped them up with foam. Then I took one of the blue papers and did some punching on that one to frame my delicious drink (I know I'm sad, lol), and just a strip of the stripped type of paper from the collection behind that and notched it out at either end.. After looking at the paper for a bit I decided to cut out some squares from a couple of the other papers and place them down the side of the page to make kind of a diamond row in the plaid - I think it looked kind of cute and I added some little pink satin roses on the blue squares. I added some Prima flowers and some other little satin roses to one of the fussy cut flowers, added a bow of light mint green organza ribbon. I added one of the coffee sleeves to the layout. I've had these little tiny blue flowers in my stash like forever and I thought they would be perfect to just kind of dot them around the layout and it just gave the layout that little something extra. So here it is....the "Great Frapachino" layout!

I'm thinking I can hear my daughter now saying "Mum, you need to get a life!" - hey when you get to my age it's the little things that make me happy, lol. I still have a couple of other layouts to post but I think I'll do that later or probably more like tomorrow. So have a great evening all and TFL!
Friday, March 9, 2012
Happy Friday Everyone!
Well it seems I have quite a few layouts that I've done but haven't posted yet. I really don't know where the days go to - it seems like one minute it's Monday and all of a sudden it's Friday again. This never happened when I was working outside the home, it seemed like forever before the weekend would come, lol.
We finally got some snow here last week. I was so happy because I've been dieing to use these Bo Bunny "Snowfall" papers again. We only got about 5 or 6 cms but it was such wet snow it just made all the tree branches hang down from all the weight of it. In this layout below you can see how the poor branches on my laurel hedge are almost touching the ground. Normally I can't see any of my neighbors homes because our hedge is so high, but not that day. These pics are looking out to our side yard and backyard. These Bo Bunny papers are just so pretty you really don't have to do a lot to dress them up. On this one I took a duplicate piece of the "Words"paper and cut out the "Snowfall" word from it and popped that up with foam on the other piece. Then I cut a circle out of the "Wintertime" paper and laid that down and before taping it down I took a couple of narrow strips from some of the other papers from this line and punched one side with my snowflake punch and also a couple of strips from Little Yellow Bicycle's "Snowy Window" paper and did the same thing and layered them off one side and the top of the circle. I also used the LYB blue paper to mat my photo's. I cut out a couple of snow flakes with my Cricut machine and popped them up on the page with foam dots, added a few small Prima flowers and some glittery foam snowflakes I had in my stash and that was it - not a whole lot of things but you really don't have to with these papers and they still come out so pretty! So here's the finished product. Remember you can click on the pic to see a larger version of the layout and then just hit your back button to return to this page.
 My son was up at Whistler Mountain (where they had the 2010 Olympics) a couple of weekends ago with his girlfriend to go snowmobiling. So of course I had to snag this photo of him so I could do another layout with the Bo Bunny paper, lol. This is my scrap lift of Angelica's (Swirlydoos) "Mystical Winter" layout.I had to improvise here and there as Angelic was using the kit from Swirlydoos and I was just using goodies from my own stash as I haven't started buying the Swirlydoos kits yet but I don't think it turned out to bad. I did a lot of layering and distressing of the papers and a view little "peek a boo" spots where I put some punched paper popping out underneath the rolled edges of the brown background sheet. I think Angelica's layout was awesome and I really enjoyed lifting her layout here. Here's my finiahed piece.

Well I think I'll post the other layouts that I have done tomorrow - don't want to go overboard and bore you to death here, lol. Remember I love to hear your comments! Have a great evening all!
We finally got some snow here last week. I was so happy because I've been dieing to use these Bo Bunny "Snowfall" papers again. We only got about 5 or 6 cms but it was such wet snow it just made all the tree branches hang down from all the weight of it. In this layout below you can see how the poor branches on my laurel hedge are almost touching the ground. Normally I can't see any of my neighbors homes because our hedge is so high, but not that day. These pics are looking out to our side yard and backyard. These Bo Bunny papers are just so pretty you really don't have to do a lot to dress them up. On this one I took a duplicate piece of the "Words"paper and cut out the "Snowfall" word from it and popped that up with foam on the other piece. Then I cut a circle out of the "Wintertime" paper and laid that down and before taping it down I took a couple of narrow strips from some of the other papers from this line and punched one side with my snowflake punch and also a couple of strips from Little Yellow Bicycle's "Snowy Window" paper and did the same thing and layered them off one side and the top of the circle. I also used the LYB blue paper to mat my photo's. I cut out a couple of snow flakes with my Cricut machine and popped them up on the page with foam dots, added a few small Prima flowers and some glittery foam snowflakes I had in my stash and that was it - not a whole lot of things but you really don't have to with these papers and they still come out so pretty! So here's the finished product. Remember you can click on the pic to see a larger version of the layout and then just hit your back button to return to this page.


Well I think I'll post the other layouts that I have done tomorrow - don't want to go overboard and bore you to death here, lol. Remember I love to hear your comments! Have a great evening all!
Update on Ribbom Carousel prize
So I'm on Facebook yesterday just reading through all the posts of friends and I come across Canadian Scrapboooker's post and they were announcing the winners for the contest that I posted about the other day. So there I am reading and lo and behold there's my name! To say I was surprised was an understatement - I mean I never win anything and this was my second time of winning something in less than week. I didn't win the top prize of this ribbon rack but I did receive a years free subscription to Canadian Scrapbooker - which is awesome! So thank you Canadian Scrapbooker mag!
Last week I joined UStream video so I could watch the Prima show every Thursday and join in on the chat as the demonstration was going on. Apparently at the end of each show/class they give away a prize (no idea what the prize is) and guess what...I was the name chosen! So that was my first win and the free subscription was my second. So you know how they always say things happen in three's? I figured I should go buy a lottery ticket, so that's just what I did. ;-) Well when I was at the grocery store this morning I figured I'd check my ticket for the 649 lotto draw last night. Okay all of a sudden I hear the music from the machine that comes on when there's a winning ticket - so I won...a big $10, lol. I should have specified to the Loto God's that I wanted to win the big one - oh well at least I won something and I still have another ticket for tomorrow's Loto Max which I believe is up to $40 Million.
Well I best get off to bed now, I just had to share the news. I've got some new layouts that I did to post ere so I'll try and get that done tomorrow. Thanks for stopping by!
Last week I joined UStream video so I could watch the Prima show every Thursday and join in on the chat as the demonstration was going on. Apparently at the end of each show/class they give away a prize (no idea what the prize is) and guess what...I was the name chosen! So that was my first win and the free subscription was my second. So you know how they always say things happen in three's? I figured I should go buy a lottery ticket, so that's just what I did. ;-) Well when I was at the grocery store this morning I figured I'd check my ticket for the 649 lotto draw last night. Okay all of a sudden I hear the music from the machine that comes on when there's a winning ticket - so I won...a big $10, lol. I should have specified to the Loto God's that I wanted to win the big one - oh well at least I won something and I still have another ticket for tomorrow's Loto Max which I believe is up to $40 Million.
Well I best get off to bed now, I just had to share the news. I've got some new layouts that I did to post ere so I'll try and get that done tomorrow. Thanks for stopping by!
Wednesday, February 29, 2012
Big Giveaway at Canadian Scrapbooker & Ribbon Carousel!!

Okay you have to stop by Canadian Scrapbooker's blog here: CS Blog and Ribbon Carousel's blog here: RC Blog for two chances to win this awesome prize pictured at the top - imagine having this awesome carousel to hold all your ribbons in your own scrappy place! I know I would and I've entered so pop on over and do the same thing - you can't win unless you try! HAVE A GREAT DAY!!
Wednesday, February 22, 2012
Cute & Vintage Photos
Don't you just love looking at photos of babies and young kids. My friends cute little niece is just so photogenic (unlike me, lol) and she had taken this cute photo of Lucy and I just had to scrap it for her scrapbook. Little ones expressions are just so adorable and this one is definitely adorable! I think these papers from My Minds Eye "Follow Your Heart" collection just went perfect with this photo. The yellow in the papers seemed to draw out the yellow in her shirt perfectly. I did a bit of punching with a heart punch on some of the paper and layered and distressed it. On the top part with the tear I used a small white doily which I added some "Broken China" Distress ink to behind the tear and then placed a pretty yellow distressed Prima rose to it. The other flowers are all Prima ones except for the teal one with the light blue center, I made this using the water distressed technique and added the little tiny Prima blue rosebud to the center. I cut out a couple of kites to match the kites in the paper and popped them up with foam. On one of them I used some rub on's to show Lucy's age at the time when the photo was taken. After placing and before gluing everything down I felt the layout still needed something. So after playing with it a bit I printed out a smaller B&W version of the photo and framed it with some green glittered chipboard that I had, and a little bit of bling and that seemed to just finish the layout off perfectly.

I love old vintage/heritage photos and like to collect some of the freebie ones I have found on the internet. Still trying to keep to my plan of using up papers from my stash I thought these three pretty vintage ones I had would go perfectly with these papers I had leftover from my Nov 2010 LE kit from "My Creative Scrapbook". The idea I had in mind for this layout, I thought, would go great with the February Sketch challenge at My Creative Sketches. I'd really love to win the sketch challenge as the prize for this month is a nice bunch of Prima goodies - now who wouldn't want to win Prima goodness, lol! I didn't stray to far off of the sketch and I had done a bunch of fussy cutting of some flowers from one of the papers from this kit so they worked out perfectly for me to use on this layout. I used this big yellow Prima Flower for the bottom right corner and some Prima bling across the center of my ribbon and I cut the title out with my Cricut machine. I was quite pleased at how it all turned out when I was finished. So here is my finished project. Thanks for stopping by and having a peek!


I love old vintage/heritage photos and like to collect some of the freebie ones I have found on the internet. Still trying to keep to my plan of using up papers from my stash I thought these three pretty vintage ones I had would go perfectly with these papers I had leftover from my Nov 2010 LE kit from "My Creative Scrapbook". The idea I had in mind for this layout, I thought, would go great with the February Sketch challenge at My Creative Sketches. I'd really love to win the sketch challenge as the prize for this month is a nice bunch of Prima goodies - now who wouldn't want to win Prima goodness, lol! I didn't stray to far off of the sketch and I had done a bunch of fussy cutting of some flowers from one of the papers from this kit so they worked out perfectly for me to use on this layout. I used this big yellow Prima Flower for the bottom right corner and some Prima bling across the center of my ribbon and I cut the title out with my Cricut machine. I was quite pleased at how it all turned out when I was finished. So here is my finished project. Thanks for stopping by and having a peek!

Tuesday, February 21, 2012
Graphic 45 Design Team 2012 Audition
Well they say you'll never know unless you try, so.....as you can read from the title of this post, I'm trying out for the 2012 Design Team for Graphic 45. The following are some of my projects that I have created that, I hope, will show the type of layouts I am able to create.


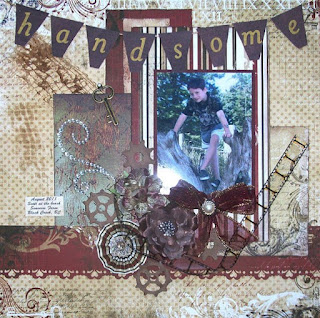


Thanks for stopping by and I hope you'll keep your fingers crossed for me! :-)
Tuesday, February 14, 2012
Happy Valentines Day!
Well I hope everyone is enjoying their day today! I just thought I'd pop in between the goings on today to post a new layout I did of this funny photo of my daughter that her friend took while they were shopping last week. As soon as I saw it I new had to post it. Usually when I'm doing layouts it sometimes takes me a little bit to come up with just the right title for it, not this time though, it came to me right away - "Incognito"! All of the papers and goodies are still from my June 2011 LE Kit from My Creative Scrapbook - and I can't believe I still have lots more of this kit to use up still! I did a little bit of fussy cutting of the small green flowers and the strip down the left side of the layout and some distressing on the layers. I think it came together quite well (she says after patting her own back, lol). Thanks for stopping by and have a great Valentines evening!

Subscribe to:
Posts (Atom)