Thursday, May 28, 2015

Cheque Book

So finally I'm getting around to posting something for May. We were away for a week May 9th on a vacation in Las Vegas so I've been trying to do catch up on everything around home. Apparently I don't have any little fairies taking care of my home for me while I'm away, lol.

I haven't really had any scrapbook mojo happening with me lately, I think my mojo is still in Las Vegas hanging around the pool, lol. Anyway every time I'm paying bills I keep thinking I need to get a new cheque (or "check" for all the Americans) book cover as mine was just falling apart so I thought I should just make my own but of course using paper/card stock would be just to flimsy. Then I had a "TA-DA" moment and remembered I had some resit canvas from Prima that was in the Swirlydoos "Treasured Yesterdays" kit, which would be perfect to use! So I decided to take some pics of the process and do a little tutorial in case anyone else wanted to do this for themselves. So here is the finished project which is of course folded in half with my cheque's and cheque register inside.
So to start out I cut one piece of the resist canvas size 6 3/8" x 6 5/8" and then two pieces size 6 3/8" x 2 3/4".
Next I picked out a couple of colors that I wanted to spray the canvas with, I used Lindy's Stamp gang sprays "Cotton Candy Pink" and "Baby Blue Eyes Aqua". You can use whatever colors you like and spray it as much as you want.
Next take one of the smaller pieces and cut a slit in it at approximately 3½" horizontally centered, approximately 1¼" from the top and 1½" from the bottom. This is where I keep my debit slips until I get  my bank statement and check them all off in my cheque register. I've put a pen through the slit in the picture below just so you could see what I meant.
On the other small piece cut a 5¼" x 2" three sided round cornered rectangle, approximately ½" from the top and ¼" from the bottom as shown below. I've just slipped in a ruler so you could see what I mean't, this would be the area where you would keep your cheques.
Next you would take the two smaller pieces and stitch them to the front piece as shown.
In this next photo I've shown how I've slipped in my cheque register and debit receipt.
The next photo is showing how I've placed the cheque's into the book.
For the front of my cheque book I was going to get all fancy with embellishments then I decided that was probably not a good idea as all the embellishments would get damaged or knocked off from being taken in and out of my purse. So I had this very pretty rose graphic I found on the internet, I'm sorry I can't remember where but if someone knows please let me know so I can give credit to that person. I fussy cut the rose out and used that for the front of my cheque book. I first covered the whole front and back of the cheque book with clear mod podge. Before that was dried I placed my rose graphic where I wanted it and used the mod podge as glue to stick it to the front. I then covered the rose graphic with the clear mod podge. The mod podge acts as a sealant so I can wipe it off if it got dirt or whatever on it. I was quite happy the way it turned out. I hope that this tutorial will help you to realize there are other uses for the resist canvas than just for scrapbooking. Thanks for stopping by and if you have any comments I'd love to hear them. Here's the finished  project again.


Wednesday, April 29, 2015

Just Because

Just wanted to share a card that I made for a friend to give his wife. He was quite adamant that he hadn't done anything, just wanted to give her a card so she knew how much she meant to him. You gotta love men, lol. Anyways I thought that Graphic 45's "Secret Garden" collection would be perfect for this, especially since I had the 8x8 paper pack. My basic card size was 4½ x 6¼.

For my first layer I used the blue side of the Posy Patch paper which I distressed with both my distress tool and Vintage Photo distress ink, all papers used on this card were distressed in the same way. The next layer I used the back side of the Leafy Tree Tops paper and then the next layer was the main side of the Posy Patch paper. I then cut out one of the tags from the Springtime paper and popped it up on the card with foam pop dots. I used one of the tags from the Meadow Lark papers for the sentiment. I used my Paint Shop Pro program and laid and typed out the sentiment on plain paper and then laid the tag over the printed paper and ran it through my printer again to get the sentiment on to the tag. This tag was also popped up with foam pop dots. I took my 1" punch and punched out one of the Seed Fairy stamps and added it to a bottle cap and added that to the card. I also took a couple of Hydrangea petals which I spritzed with water and twisted the petals slightly and let them dry and then glued together to make the large flower on the card and added two small mauve rose buds that I made to the card. I'd love to hear your comments on my card, thanks for stopping by.
 

Wednesday, April 15, 2015

Vintage Photo

I always remember this photo of my Mum's older sister Lillian, when my sister and I would go over to out Mum & Dad's on the weekend we would drag out this big old cookie tin that my Mum & Dad kept all their photos in. I just thought photo was so cool that it was slightly colored and since they didn't have colored photos back in 1945 my Mum told us that this was hand painted. My Aunt  was a little bit better off than the rest of my Mums family so I imagine that she could actually afford to have this done to her photos.I used the "Treasured Yesterdays" kit from Swirlydoos Kit club for this layout, this kit was just perfect for doing vintage layouts. Here's the finished project.
 

Wednesday, April 8, 2015

Sympathy card

I haven't made a sympathy card before but I had a friend ask me to make one for her. The Blue Fern Studios "Sanctuary" papers from Swirlydoos January 2015 "Bejeweled" kit were perfect for this card. This was also a lift of a couple of cards made by a few of the girls from Swirlydoos for a card round robin. I hope you like it, TFL!
 

Thursday, April 2, 2015

Birthday Tag

So my family has a few birthdays this month, the first being my granddaughter who will be 16 on Saturday. I can't believe she's 16, where did all the years go? I couldn't believe my son (her Dad) turned 35 last month...hmmmm, I guess I'm getting old, lol. So I have had some of the Julie Nutting doll stamps for quite awhile but haven't had a chance to really play with them, so I decided to do a tag/birthday card for my granddaughter with one of the stamps. I used one of the tags from the Julie Nutting Tag Pad "Aquarelle" for this tag. The doll stamp I used is "Olive", for some reason she just made me think of my granddaughter. I used Graphic 45's "Secret Garden" paper collection for this tag and I used a small doily. It's a pretty simple tag but I was pleased at how it turned out, here's a photo of the tag. I printed out the sentiment on my computer and used a brad to attach it to the card.
 Well I hope to hear what you think of my tag. Have a great Easter weekend everyone!

Wednesday, April 1, 2015

Spring Round Robin

So we just wrapped up the March Round Robin over at Swirlydoos this past Monday. To celebrate Spring our rules for this RR were:
1. We had to use a photo with flowers in it
2. We had to have a least one handmade flower on your layout
So this is my entry for Team 1, week 4
I used the Webster's "Western Romance" paper collection for my layout. The photo is of some flowers my husband gave me for our anniversary/Valentines. The handmade flower is the yellow one between the two blue Prima flowers. After I made the flower I brushed some glossy accents all over it and then dipped it in some diamond dust. Here's a bit of a close up of the flower.
It looks so much prettier in real life. Thanks for stopping by, have a great evening! 

April already!

I can't believe another month has flown by, were so busy here this past month, going away a few weekends and trying to fit other things into the daily schedule. So I have a few things to share with you.

This is a photo of my Mum taken when she was about 20 yrs old (1941). It's a lift of one of Gabrielle Pollacco's layouts called "Love & Laughter". I used the October "Treasured Yesterdays" kit from Swirlydoos for this layout. This kit is absolutely perfect for vintage photos!

I made the brown card for my son's birthday at the beginning of March. It was a very simple card as I was trying to use up some left over papers from other projects, which is why I made the other card, left over papers and then put it into my stash of cards.

Photo of my Dad on his brothers motorcycle, or as my Dad called it "Lance's Steed". This was taken approximately 1940.With three little girls the closest my Dad got to having a son was me. I was such a tomboy, I'd go fishing with my Dad while my two older sisters were like "Eewwee" My Dad was always my hero, as far as I was concerned my Dad could do anything! This is my take on the "Treasured Yesterdays" sketch from Swirlydoos! Here's the sketch:

On this layout above I used the "Treasured Yesterdays" October kit from Swirlydoos again. The photo is of my Mum & Dad and sisters and I, I'm the baby of the family. I cut quite a few long banner strips for this layout, for some reason I'm really into using strips like this on  my layouts right now. It helps to use up a lot of your smaller pieces of papers that you have.  The bottle cap dangle I made myself, I hope to make some more of these to sell in my Etsy shop when I get some time.

This layout has photos of my Dad when he joined the Canadian Air Force in 1940 when he was 18. I did lots of layering and distressing to the papers. I also used one of my stencils and molding paste and a small music note stamp here and there on the layout. I added som Tim Holtz photo strip to this, along with some Prima flowers and wooden clocks. I also added a bit of cheese cloth under the photos and other goodies. I was very excited to find out that this layout of mine was chosen for "Layout of the Week" for March 22nd over at Swirlydoos!

Well I'm so happy you stopped by and I'd love to hear any of your comments on my projects. Have a great week!
 

Friday, February 27, 2015

Three to Share

I really am poking along with my blog posts, I didn't realize I hadn't posted anything at all in January. Must have been to much going on in December that I just needed to relax in January. This first layout I'm going to share with you was done using the January "Bejeweled" scrap kit from Swirlydoos and as usual Krissy has put together a fabulous kit using the Blue Fern Studio's "Sanctuary" collection! This is my take of January's sketch and here's the sketch:
The photo I've used for this layout is of my daughter and I, when she was 12, and we took a short cruise from Vancouver, BC to San Francisco and then we stayed in San Francisco for a week. We had such a fun time! We were all dressed up for the formal night on the ship, I love this photo of the two of us! I didn't do a lot of layering as this paper was so pretty I didn't want to cover it all up and I'm pleased at how it turned out. You can click on the photo to see a larger size.
 My next layout I did was using a photo of my son taken this past summer in Steveston, BC. For this layout I used the Oct 2014 "Treasured Yesterday's" scrap kit from Swirlydoos. The papers in this kit are from Prima's "Epiphany" collection, I'm so glad I ordered the paper add-on kit because these are so yummy! I did some mixed media work on the background paper using one of my stencils and some of my Lindey's Stamp Gang sprays. I then did a lot of tearing of strips of paper and layering them. I also did a bit of fussy cutting of one of the designs on the papers. For my bigger paper layers I used some papers from my stash. I popped my photo up with some cardboard so I could tuck some flowers and embellishments under the edges of the photo.Added a Prima wooden clock and key to the page and also some chicken wire chipboard from Dusty Attic. I printed out the same photo smaller and in B&W to use in the bottom right corner and added a resin frame from my stash and a few of the Prima flowers from the kit. I also used some light bulbs from Prima, one says Love and the other You and I called it done. Here's the finished project
There was a question on the Swirlydoos forum this week "Do you think the clean and simple layouts is making a comeback?" which was funny as I'd had this next photo of my son when he was 3½ (I can't believe my baby boy is going to be 35 in March) with his first fish he ever caught printed out forever but didn't really have the right papers for the layout. Since I've got into layouts using a shabby/chic distressed look most of my papers are geared for that type of layout. I had to dig way back into my stash to find some papers and I came across these ones from Scenic Route's Metropolis Idea Kit. I decided to do a more Clean & Simple type layout for this photo and I was really pleased at how it turned out. I use to always scrap my photo's using the C&S style mostly because I thought that was the way it should be done. Then I went on the internet searching scrapbooking and came across all of these shabby/chic, grunged and distressed layouts. I was just in awe of these crafter's work and that was it I was hooked! But there are certain photos that really do need to be scrapped in the C&S style so that's how this one was done. So here's my attempt to get back to that style:
 Well I hope you all enjoyed looking at my layouts and I'd love to hear your comments. Have a great weekend everyone!

Tuesday, December 30, 2014

Very Happy!

Wow, Christmas has come and gone for another year! I hope everyone enjoyed the holidays. I was very happy last week to find out that the layout I did of my Mum ( in the post from Dec 20th below) won "Layout of the Week" for Dec 21st over at Swirlydoos. So tonight I go onto the Swirlydoos Forum and find out that my layout was chosen for "Layout of the Month"! To say I was excited was beyond words! There are so many talented ladies at Swirlydoos and they have taught me so much about scrapping and I owe them, and many others in the online scrapbook world, for helping me express myself through scrapping! Thank you all!

Saturday, December 20, 2014

Vintage Layout

I love this old photo of my Mum from July 1936 when she was 15. I knew that the "Treasured Yesterdays" kit from Swirlydoo's would be perfect to scrap it with. I'm trying to use more different mediums like Sprays and molding paste etc. So this is one of my attempts at doing this using some molding paste and one of my stencils and then a couple of different Tattered  Angels sprays, Tuscan Sun and Lily Pad. I did a lot of distressing on the papers and using bits and pieces of paper torn in to strips. I'm really pleased at how the whole layout turned out.
Well I'm off to the airport shortly to catch a plane to have Christmas with my son and grandchildren. I hope that everyone has a happy & safe Christmas!
 

Wednesday, December 17, 2014

A Quick Post

I just wanted to post a photo of an altered picture frame I made for my girlfriend for Christmas. Her youngest daughter had her first child this past October and this photo that was taken of my friend with the baby I thought was so nice and I knew immediately that I wanted to do this as a Christmas present for her. I'd love to hear what you all think.
 

A Busy Month

Well I'm sure like everyone else we are all busy this month trying to get ready for the holidays. I've been busy working on our daughters wedding album as I wanted to get it finished so I could give it to her as a combined Birthday (her birthday was Dec 10th) Christmas present. Noelle and her new husband came up for a visit this past weekend, a surprise for her Dad which went perfectly! I was so happy to watch them going through the album and seeing the smiles on their faces. I thought I would share the rest of the scrap layouts here.

So our daughter & son-in-law and all of their friends are addicted to these silly cat hats so nothing would do, they brought all of the hats and had all their friends and themselves have pictures taken with them on. 
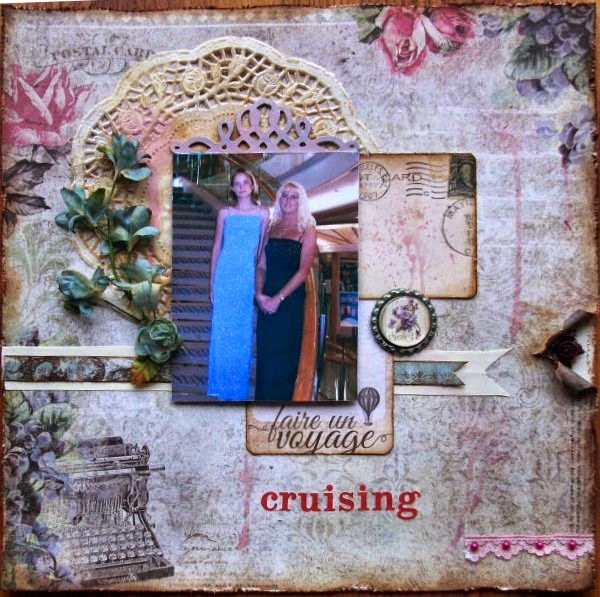
Our daughter and her Mom getting ready on the "big day"
This was the setting at the beach they got  married at at sunset, so pretty!
 This one taken just shortly after the ceremony.
 My In-laws with the bride and groom. Noelle is their only grandchild so they were pretty happy.
 I've had this sunflower paper in my stash forever (I believe it's from Prima) and since our daughters flowers for the wedding was sunflowers it was perfect for this page of the bride & groom and the Maid of Honor and Best man!
 This one of my DH and I with the bride and groom.
These photos were just taken through out the evening and I thought the November sketch from Swirlydoo's was perfect for these photos.
 This  next layout is for a photo of the bride and groom cutting the cake. Since most of the photos I've used for the album were ones that I had taken I didn't really have a good picture of the cake cutting so I left it so the kids could put a photo in once they got the good photos from the photographer. The next one is also left for the kids to add what ever photo they wanted from the photographers photos.
Thanks for stopping by and I'd love to hear your comments!

Monday, December 8, 2014

Christmas Cards

Well I'm quite amazed that I actually managed to get my Christmas cards done and mailed out before the middle of December for a change. Got them done and mailed out last week - yay me! So I thought I would post a few of them here. This first card below was inspired by one I found on Pinterest, which I thought I had pinned to one of my boards but apparently not so I'm unable to post the link here. 


My card below was done for the November card round robin at Swirlydoos Kit Club for team 2, week 3. You can see the other cards for this round robin here: Swirlydoos Card RR


Thanks so much for stopping by and I'd love to hear your comments on my cards!

Thursday, November 20, 2014

Cricut Mats...for all us "thrifty" people!


Don't you hate it when your Cricut & Silhouette mats loose their stickiness. I know I do and at $10 or $11 a mat it can tend to get expensive after awhile. I was surfing through Pinterest last night and came across all these great tips for renewing the mats. Here are the easy steps:

1. Take your mat and with warm water and any mild dish soap (I used Palmolive) and one of those plastic/rubber scrubbers and scrub the mat well to take off all the lint and paper bits that end up on them through all the use. You can also use one of those Mr Clean Magic erasers rather than the dish soap & scrubber to take off all the lint.

2. Let your mat air dry, this is important as you don't want to dry with towels or paper towels as you'll just put lint right back onto it. Once it's all dry you can feel it with your hand to see if it's sticky enough for you. Both of my mats were quite sticky after it air dried so I didn't do the next steps.

3. If you want your mat stickier take some masking tape or painter's tape and tape off the edges of the mat. This is done so you don't get the sticky glue on those edges where the rollers of the machine will run over it and start getting them sticky, which would not be a good thing for the machine.


 4. Once you have the edges taped off you can use some "Krylon Easy-Tack" or "Quilt Basting Spray" and spray the mat with it and then let air dry. You can also use "Zig 2 Way Glue" wide tip and just run down the mat from top to bottom with the the glue and let it air dry. Once the mat has air dried if you think the mat is too sticky you can condition it by place your hands on and off the whole mat.

**Disclaimer: Using the above methods to recondition your mats may void the warranty.

I hope you'll try this out and that it works as well for you as it did for me, I love anything that will save me money! Have a great day!

Monday, October 20, 2014

Swirlydoos October Card Challenge

So I entered the Swirlydoos Card Challenge for October 2014. Here are the twists for this month.
:
#1: Basic colors of your card have to be white/off white/cream/beige/light brown/light blue. You can use them all or just 1, it is up to you. You can use 1 different color, for example, the flowers. (you may use different shades of this color for your flowers) Of course it is okay to use black or dark brown for your sentiments.

#2: Stenciling/ or stamping

#3: Use some sisal/ unraffled twine/ thin thread, as long as it adds texture!


I'm on Team 2, week 2, following Linda Pekrul's card from week 1, here's her pretty card:
I basically stayed true to Linda's card. I used some blue and brown/creme winter papers from my stash. I used some blue ribbon instead of twine and a snowflake instead of a flower. I used my "Noel" stamp for my sentiment and used a few blue gems dotted around the card along with some lace. Here is  my lift of Linda's card: 
 

Tuesday, October 14, 2014

Another wedding layout

I decided since I was doing layouts for our daughters wedding album for her I should do a page with one of the invitations I did for them. The layout is based on a sketch I found on Pinterest but now  I can't remember who's sketch it was, if anyone knows let me know so I can give credit where credit is due. So here's the result, hope you like it!

Friday, October 10, 2014

Father of the Bride

Another page for the wedding album. I just love both of these photos of my husband and his/our daughter. I love how happy our daughter looks in these photos and how happy my husband is, he is so happy that Noelle has found such a wonderful husband and he knows he doesn't have to worry about her anymore...even though he'll still worry, you know how men can be about their daughters, lol. The papers I've used for this layout is a wedding kit that I bought at Walmart. The paper is not really a heavy type of card stock but it's still good for these wedding layouts. The black flowers I've used were in my stash but I believe they are from Petaloo and the white flower is from Manorhouse. The die cut white branch & leaves are from Die-namite's dies. I'm quite pleased at how it turned out. TFL!

Saturday, October 4, 2014

The Ring

Well I seem to be on a roll, I've actually managed to do another layout for our daughters Wedding album. This one is a photo of her engagement ring. It was so cute, she was saying how sparkly it was when she sent this photo to me. A few minutes later she text me a 10 second video of her hand moving so I could see how it sparkled, lol. For this layout I used Websters "Hollywood Vogue" collection that I had in my stash. Once I started laying things down it came together quite quickly...I think my mojo finally decided to come home from vacation. Anyway here's the finished project, TFL!
 

Friday, October 3, 2014

The Engagement

Well I've been in a real scrapping funk these days, my mojo went on vacation and forgot to take me, lol. I promised our daughter that I would do a scrapbook of her wedding for her. Yesterday I got my butt in gear and did the first layout for the album. I started with a photo that the kids got taken on the night they got engaged. I was texting back and forth with Noelle about getting engaged and she filled me in on exactly how Frank proposed to her. I took her words from that text and used it for the journalling on the layout. I thought that it would be cool for their future kids to read this and see how it all happened and how happy their Mom was by reading her own words. So here is the layout, I hope you like it! TFL